Sunday, March 24, 2013

Back to Earth and Back in Time


Getting the Drop on Some Germans...

Some of the stuff in the box.
Well, we’ve been in fantasy land and a galaxy far, far away... maybe it’s time for a return to Earth!

Now, if you know wargames, well, there are wargames and there are wargames. Some players are fond of extremely complex historical simulations, with lots of specific unit counters and intense rules and sub-rules and sub-sub-rules. While there’s a lot of fun in that, personally I favor a more relaxed type of game— not the least reason being that less-complicated games, as a rule, tend to play a bit quicker. That works out well with my limited gaming schedule, and also means I’m more likely to entice my teenage son into spending an hour or so facing the old man across a table. (If you’ve got a teenager, you know that’s quite a feat to pull off— especially if food isn’t involved.)

A New Classic: Memoir '44

One of the games that will draw my son in is Memoir ’44 by Days of Wonder. Created by Richard Borg, this recreation of World War II battlefield warfare is both pleasingly simple, yet surprisingly effective at capturing the feel of the era— and it’s challenging and fun to play.

If you’ve ever played Borg’s Battle Cry (Wizards of the Coast/Hasbro), BattleLore (Fantasy Flight Games), or Command & Colors (GMT), you’re already familiar with the basic concepts of the game: Two armies face each other across a large hex map, with terrain features represented by hex tiles (allowing for multiple scenarios to be easily created with the same features). The battlefield is divided into three equal sections by dashed red lines: Left Flank, Right Flank, and Center (always relative to the player’s view; one player’s “left” is the other’s “right”).
Control of the forces is determined by a hand of cards, drawn by both players from the same deck. Each card designates one or more sections in which a player may issue orders to his troops, as well as the number of those troops which may move and fight in that section. So, for example, a card may state that the player can move and fight with two units on the Right Flank. If played, the player may only move and shoot with two units, and those units must be in the rightmost section of the battlefield (relative to the player’s view). If the player doesn’t have any units in that section, the card is useless. If he has only one, he can move it but the extra unit move is ignored. If he has three or more units in the Right Flank, he can choose which two move and fight, but the rest do nothing. There are also cards with special effects, like restoring lost forces, or calling in artillery barrages and “air strikes” (basically, attacks against any enemy unit, regardless of location), and more.
Terrain affects movement, offers protection from attacks and/or limits the ability to attack, and blocks line of sight. Terrain includes hills, forests, waterways, towns, hedgerows, etc., as well as special features like bridges, fords, bunkers and so on.
Units typically consist of two, three or four figures, depending on whether the unit is “artillery,” “armor,” or “infantry,” respectively. The figures represent the “hit points” of a unit— one hit removes one figure, which is an easy and effective tracking system. Otherwise a unit’s strength remains the same regardless of how many hits it takes. If a unit typically rolls three combat dice, it rolls three dice whether it has four figures or one remaining. Otherwise the number of dice can be modified by range or terrain effects (usually a penalty), or boosted by special cards.
The dice are unique, displaying images representing infantry (2 sides), armor (tanks), a grenade, a flag and a star. If you roll the symbol of the unit being attacked, each symbol equals one hit on that unit (the “tank” symbol represents hits against both armor and artillery). The grenade is a “wild” hit that applies to any unit, the flag forces a unit to retreat a hex (1 hex per flag rolled), and the star is usually a miss (certain cards can change this). Note that while infantry units take more hits, they are more likely to be hit than others (50% chance vs. 33% chance).

The game is played in scenarios based on actual WW2 battles, sometimes with special scenario rules based on the history of the event. Victory is gained by eliminating complete enemy units— one “Victory Medal” for each unit, regardless of type— or by achieving battlefield objectives (usually taking and holding a specific town, hill, bridge or other terrain feature). Typically a side must amass four to six Victory Medals to win, as set by the scenario. The first force to achieve the required total wins the battle.

And that’s pretty much it— simple, but quite versatile in play, and very challenging as you struggle to plan how to use your cards most effectively... especially as each player is limited to a hand of six or fewer cards, depending on the skill of the historical commanders for each side. Since you don’t know what new card you will draw at the end of your turn, you can’t be certain that your strategy will work as planned. If you’re not careful, you might even wind up with your forces essentially stuck in one section of the battlefield, unable to take action because you don’t have a card for that section in your hand!
My son and I have played the game several times, but as we’d not touched it in a while, I opted for a simpler scenario to get started— but it’s no less an important battle for that!

The D-Hour of D-Day

The scenario selected was in fact the first battle of D-Day. In the early darkness of June 6, 1944, gliders filled with British commandos flew behind German lines into Occupied France. Their objective: seize two key bridges across the Caen Canal and the Orne River, and hold them for the Allied advance later that day (assuming, of course, the Allies were successful in defeating the German defenses at Normandy). In history, the gliders landed with pin-point accuracy, giving the commandos complete surprise on the German defenders, and both bridges were swiftly secured. Although two separate bridges across separate waterways were involved, the battle has always been named after the bridge over the canal and the famous “flying horse” badges of the men who captured it— the Battle of Pegasus Bridge.

The Battle of Pegasus Bridge

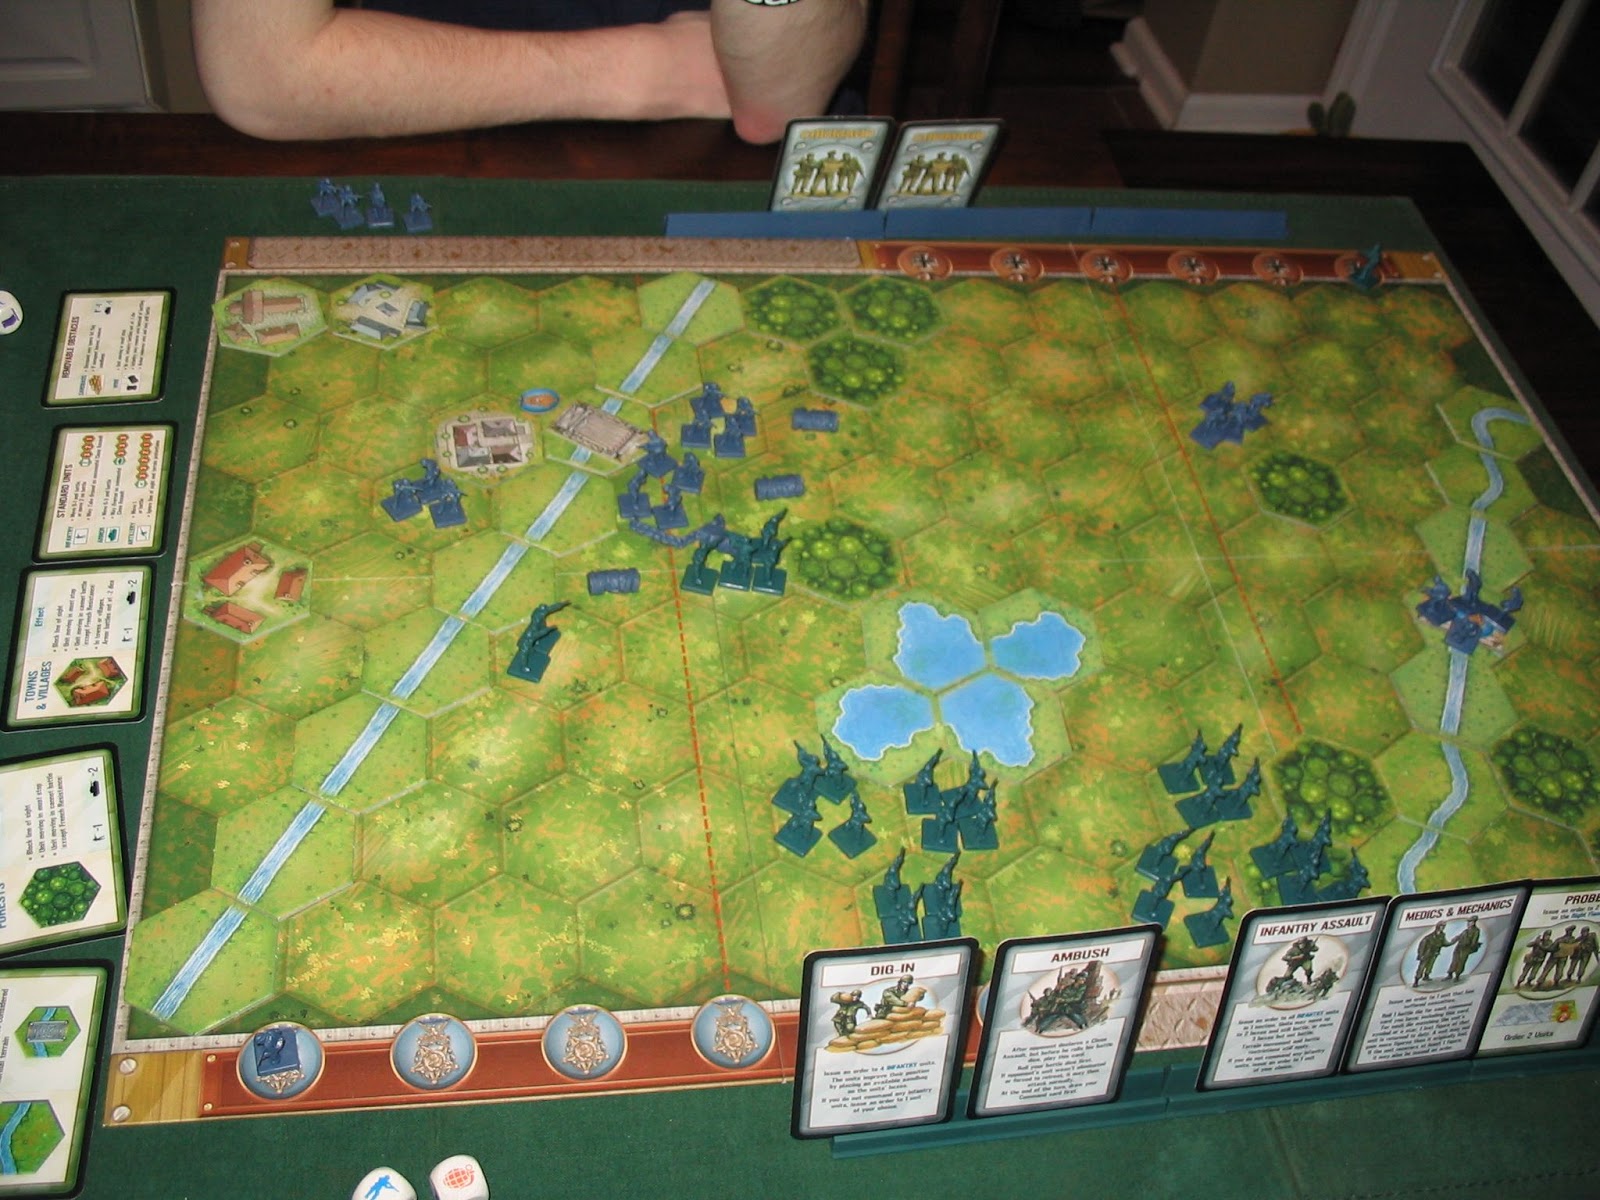
The Beginning of the Battle: The gliders have landed.
The scenario begins with the gliders already “landed” and the troops deployed. The view is from the Allied Commander’s “side,” so I will refer to the battlefield sections accordingly. In the Left Flank are the Pegasus Bridge and canal (no units may cross the canal except at the bridge; however, they may freely shoot at enemies across the canal). In the Center is an impassable pond and a few woods (the latter block line of sight, stop a unit’s movement when entered, and provide a -1 attack dice protection for a unit inside a wood). To the Right Flank are the Orne River and bridge. Grey units are German infantry, Green units are British infantry (green figures are interchangeable among the Allies, depending on scenario, so some visual discrepancies from the actual troops present should be forgiven).

To reflect that the Germans were caught unprepared, the German Commander begins the battle with only two command cards versus the Allied Commander’s six. However, the German commander adds an additional card each turn (as he “comes to grip” with the situation), though his maximum hand size is four cards. That might seem unfair, but watch as the fight progresses and you’ll see that even an undersized hand can be very, very good.

In this scenario (and in history) the British commandos have the first move. Alas, I didn’t have particularly great command cards, but I could at least advance a few forces here and there. I opted to start off with an attack on the forces guarding the canal bridge, in hopes of driving them back and gaining some early Victory Medals (note that in this scenario, the two bridges each represent a Victory Objective for the British side— one Victory Medal each towards the required goal of four).
Early A.M., June 6, 1944: The commandos advance...
My initial charge clearly caught the Germans half asleep. Despite being hampered by barbed wire (the grey “jelly rolls” on the board), which penalize attacks by one die for any infantry shooting from the barbed hex, I managed to wipe out one entire infantry unit— one Victory Medal gained in the very first move!
The German Commander responded with an echoing move, bringing up his forces on my Left Flank to protect the bridge. He also succeeded in reducing my leading unit by half. No commander likes to see that!
The Brits face stiff resistance!

Turn 2 saw the Germans far more ready for battle, issuing orders to units on both the Right and Left Flanks! (A “Pincer Move” card— wish I’d had it.) On the Right, he occupied the Orne Bridge, preventing an easy grab by me, while on the Left, he took out my weakened unit and set up a fire team across the canal to harass my supporting troops! 1 Victory Medal for him— (Lucky kid. Grumble.)
(You can see in the photo that I had limited card choices. Two were for my Right, where I had zero forces, and I had drawn no moves for the Left, where the action was the hottest!)
Bringing in the reserves— one hopes not too early.
I decided to use an “Infantry Assault” card, which allows all the infantry in any one section to move (and move an extra hex, too). Although I had wanted to use it when I could actually turn the move into a broader firefight, I decided I had to bring in my back reserves to shore up my badly mauled Left. I also moved units into the Right flank to menace the Orne Bridge. On both sides I managed to weaken his forces, but gained no VMs.

Still, I thought things were looking up... but the German Commander had other tricks up his short sleeves.

What Happened?!?

The Jerries fight back! I say, that smarts.
Look at that photo. Just look at it. WHAM. I lost another whole unit on the Left, underwent a general retreat there, and saw my Right almost shattered by two guys running off a bridge! Another one of those dang Pincer Moves— what, do they print them in Berlin? Now the kid had two VMs to my one! Blimey!
Oh yeah? Well... take that!
Fine. I had forces on the right now, so I could use that blasted Probe card I’d had since turn one, and attacked with two units. RAT-A-TAT-TAT! Those two Jerries should’ve stayed on the bridge. That gained me a second VM, too, and allowed my attacking unit to immediately gain a free advance into the space vacated by the enemy— one step away from claiming the Orne bridge!

But Fritz wasn’t done yet— he responded in the same area, and took out a three-man unit! (Lousy dice— bet they were made in Berlin, too.) Now he had three VMs— just one away from victory.
That could not be allowed to happen! History was at stake! Plus, he’d lord it over me for the rest of the night!
A battle in the balance...
Time to pull out the secret weapon. MUAH-HA-HA... wait, that’s probably not right for this genre.
Uh... “For King and...”
No, these chaps probably just yelled, “At ‘em, lads!”
I played the “Behind Enemy Lines” card, which allowed me to advance one unit three hexes (normal max is two), fight, and advance three more hexes. Roaring out of the woods, a fresh unit of commandos poured down on the German left, avenging the lost British comrades and then racing to claim the undefended "Horsa" Bridge.
HISTORY IS SAVED!
It was a timely play, as that move netted me two VMs and the game. 
Victory for the Brits! Huzzah! Huzzah! Huzzah!

T’was yours truly who claimed the laurels for the evening— though, very nobly, I did not lord it over my son, but offered him a gentleman’s handshake. That’s sweet victory enough for the old man.

After Action Debriefing

My son put up a good fight, and the game was in the balance down to the last (one mark of just how good a game Memoir ’44 is). If I hadn’t drawn the Behind Enemy Lines card, I’d have been facing real trouble. (I will note that I had the Ambush card, and completely failed to use it an opportune moment— not an unusual drawback for a card you play out of turn. One has to remember one has it when the other guy makes his move. Instead, I was too busy reacting to the danger to recall I had a handy solution. "Typical officer," my men probably muttered.)

In any case, even this basic scenario (which features only infantry) is a solid challenge and a lot of fun. If you have the game, I hope I’ve whetted your appetite to pull it out again. If not, I encourage you to find a copy!

--- Howard Shirley

P.S. Oddly enough, my version of the game— which I picked up used— did not have enough components to actually lay out the Pegasus Bridge terrain as pictured in the book— there simply aren’t enough canals (straight waterways). I think, however, that's probably true of the standard boxed game, too, as the component count is right for my set. So in setting this up, you have to use the curvy river pieces instead. The game effects aren’t any different, but I find the straight components fit actual overhead pictures of the canal and river at the time:
The "Pegasus" Bridge and Caen Canal (upper left)
and "Horsa" Bridge and Orne River (middle left)
Horsa gliders (for which the Orne Bridge was renamed) can be seen in the photo as well (click to enlarge).

Fortunately, I also have the Terrain Pack expansion set, and between the two I could approximate a somewhat “historical” look.

Tuesday, March 19, 2013

First Flight: The Millennium Falcon


PROLOGUE

Pilot’s mess, Imperial Death Star

HOWLGUNNER (angry): “Backstabber!

BACKSTABBER: “That’s my call sign. Don’t wear it out.”

HG: “It was you, wasn’t it! You blabbed to the Colonel!”

BS: “Can’t hang it on me. You’re the one had the fling with the Rebbie chick on Coruscant.”

HG: “I didn’t know she was a Reb!”

BS: “Ain’t my problem you didn’t check your six.”

HG: “I’m grounded ‘cause of you!”

BS: “Because of you, sir.

HG: “Sir?!?  They gave Black Squadron to you?!?

BS: “What can I say. Opportunity just falls into my lap.”

HG: “Oh yeah. ‘Cause you’re a no-good lousy backstabber.”

BS: “Like I said, don’t wear out my call sign, Reb-lover.”

HG (lunging for BS): “Why you!!!”

[KLAXON SOUNDS]

ANNCR: “Black Squadron. Black Squadron. Report to Hangar 12. Report to Hangar 12.

BS: “Duty calls, Reb-lover. Your time to consider your sins, my time to outshine the stars.”

Exit BACKSTABBER.

HG: “Oh, I hope you do, pal. I hope you do.”

END SCENE

Elsewhere, Outside the Death Star...

It’s the final moments in the desperate rescue of Princess Leia from the clutches of Darth Vader. The tractor beam is shut down, and everyone but the now vanished Obi-wan are aboard the Millennium Falcon, racing to escape from the Death Star, carrying the princess to safety and the stolen Death Star plans to the Rebel Alliance. But there’s one last obstacle in the way— four of them, in fact: the TIE fighters of Black Squadron. Little does either side realize that’s all one big set up...

Star Wars X-Wing’s Millennium Falcon


Well, there’s your intro for this week’s blog. You know the scene, with the turret guns of the Millennium Falcon blasting up TIEs in a race for freedom. What could be a better test for the new Star Wars X-Wing Miniatures Game Millennium Falcon Expansion Pack— which plopped out of hyperspace and onto my doorstep on Saturday!
Naturally I had to open it and give it a proper first flight. :-)

“You came in that thing? You’re braver than I thought.”

Straight from the shipyards!
I must say, the ship is a beauty. First of all, it’s huge— I’ve never had a miniature quite as large as this. But the scale is visually spot on for the game. I don’t know if it’s exact or not, but it looks good with the TIEs (as you’ll see in the battle report photos). So kudos to Fantasy Flight Games for getting that right. The details are also well done, and I’m very impressed by the paint job— it’s far beyond my skills, and certainly superior to what you typically expect from pre-paints (and waaaay better than die-cast toys). The only lackluster portion is the exhaust strip, which is just a pale blue-grey. On the other hand, it shouldn’t be too hard to juice it a bit— just paint a bright blue around the edges and white down the middle and voila— engine flair! (I suspect that FFG might have left the area so simple to allow the painter-minded to give it a go.)

The other components are the large base, the assorted punch-out components for use in the game (including markers and bases for different configurations of the “YT-1300 Light Freighter”), pilot cards, upgrade cards, and a rule-book addendum with extra stuff for this vessel and a special smuggler scenario. All very impressive, and well worth the $29.99 retail price.

The rule changes are minimal and specific to the ship, as well as some new types of upgrade cards: Crew, Modifications, and Titles.
Crew cards allow you to add support personnel to your ship, rather like the Astromech upgrade for fighters. Support personnel can improve your ship’s capabilities. Some are generic, like the “Weapons Engineer,” meaning multiple ships could have one. Others are specific individuals, and thus unique (like pilots). In a few cases, certain main characters like Chewbacca and Luke Skywalker can be added to your crew— but that means that their pilot cards can’t be used by someone else in the same battle. (The Force is strong, but not *that* strong.)
Modifications are upgrades to a ship’s systems, such as engines or shields. Note that the Modification symbol (a pair of crossed tools) doesn’t appear on the upgrade bar of any ship. I gather, therefore, that any ship can be modified. However, only one Modification card can be used per ship; so you can’t boost both engines and shields.
Lastly are the “Title” cards. These indicate that the vessel is a very specific vessel, rather than just a plain-vanilla stock freighter (for example). The Millennium Falcon has special abilities that any other YT-1300 won’t have. Just as with named crew cards, only one version of a “titled” vessel is allowed per battle— you can have as many YT-1300s as your points will allow, but only one can be the Millennium Falcon.

But how does she fly?


“I’ve made some special modifications myself.”

The Millennium Falcon: Maxed out.
I decided to test the ship out as the full-bore Millennium Falcon from the original Star Wars film. For that, I took the “Han Solo” pilot card, the Millennium Falcon “title” card, the “Engine Boost” modification card, the “Elusiveness” upgrade card (which gives the ship the Evade action, fitting for Han’s ship), the Chewbacca crew card (which can block a hit) and the Luke Skywalker card (which can re-roll a whiffed attack). No, there’s not a Princess Leia card, but in the battle scene in the film, she really didn’t add anything anyway, aside from the occasional “look out!” I’m certain at some point one of Chewie’s growls translated as “backseat pilot.” Princess Leia: great in a blaster fight or when soothing potentially hostile teddy bears— not so much use in a space battle.

(Note: Yes, in the film sequence Chewie flies the ship and Han & Luke man the guns. While the set includes Chewie as a pilot, it doesn’t include Han as gunner crew. So I went with Han as the pilot and Chewie as crew to create a full complement.)

“This had better work.”

The Sacrificial Lambs... uh, the Black Squadron.
Of course, the above configuration practically maxes out the vessel at 64 whopping points, which meant my Imperial opponents couldn’t just be four random Academy noobs, as would make sense for intended blaster fodder. But simple math meant I could go with four TIEs at 16 points each, give or take. Three Black Squadron Pilot card fit the bill well, with one upgrade card each, but I still needed to round out the 64 points with someone a little more costly. As in the film the squadron were intended to be unwitting sacrificial lambs, I chose “Backstabber.” I figured the call sign implied more than just skill at fighting, but a nasty, self-serving personality that the Flight Officer might not be all that reluctant to write a letter home about. (Heck, it’s the Empire. They probably don’t even bother with a telegram.) Hence my little imagined scene at the start of the blog.

Actually, Backstabber turned out to be a bit of a wasted point choice— his ability is to gain an attack die when outside his target’s fire arc. But the YT-1300 has a 360° turret arc for it’s primary weapon; it’s impossible to be outside the Millennium Falcon’s firing arc. (Yeah, Backstabber was definitely hung out to dry by the FO on this assignment.)


“C’mon, buddy. We’re not outta this yet.”

The battle begins. Four against one— not fair. For the four, that is.
And so the fight began.

With a pilot rating of 9, Han Solo had a distinct advantage— he would always move last and shoot first (well, of course, on the latter). And with his ship’s “Boost Action” capability, this meant he could potentially set up shots at preferred ranges, once he had seen the TIEs' maneuvers!

Now, I played this as a solo game, which meant I strived to make the best maneuvering choices for both sides, based on what each might guess was likely to happen. But at least the Boost ability made it possible for me to reasonably “outguess” myself, as I could avoid planning that element until after one side was done moving.

On to the first move.


The Boost, in action.
The TIEs made a general advance, assuming (as I would have) that the Falcon would fly towards them as well. But I felt the Millennium Falcon player would expect the advance and try a little fancy flying, making use of the Boost ability to try to flank the TIE line, or at least be out of range of part of the swarm. You can see how the Boost Action works in the photo; it can produce very radical moves, not unlike the Barrel Roll ability of the TIEs. (On a side note, I started my TIE formation at “barrel roll spacing”— meaning a TIE could safely barrel roll towards his wingman without colliding.)
Han Shoots First!
Thanks to the Boost, that put all but one TIE in firing range. Han shot first, trying for Backstabber, but didn’t achieve anything, and... uh... well, I forgot to have the TIEs shoot back. (One of the hazards of solo gaming is forgetting that you have *two* sets of everything to do in a “turn.”) Oops.


Watch my six. I've got a turret, baby!
The TIEs converged on the Falcon for the next turn, but Han expected this (no, really, it makes sense) and pushed through the formation to wind up behind the TIE line. At this point the advantage of the turret’s arc really shows, as despite racing away from the TIEs, the Falcon can still shoot— and quite well. Han placed a target lock on Backstabber, but hit him twice without needing it. (I think I goofed somewhere, as in the photo I can see a Focus marker on the MF. The marker shouldn’t be there, since Han used the Target Lock as his action. Didn’t matter, as I didn’t modify the dice in this turn.)
The Falcon takes some hits. "Angle the deflector, Chewie!"
Backstabber replied with some equally effective shooting, knocking out two of the Falcons shield tokens— but the ship had three left (and 8 hull points), so Han shrugged it off (good thing, as one hit would have been a crit). The other TIEs had been caught out of position by Han’s fancy flying, so that ended the exchange of fire.

In Turn 3 the Empire managed to pull some tight turns and barrel rolls to line up shots on the MF... before Han moved.


Howlgunner gets his wish, and Backstabber gets it.

The TIEs close in...

Pulling away, Han blasts the closest TIE— which happened to be Backstabber. The initial roll was actually a miss, as Backstabber rolled two evades to Han’s two hits, but Han used the Target Lock to take a chance on re-rolling one die... and got a hit! Scratch one TIE— and the flight leader, no less!
But Han pulls away... and gets a kill!

Han Gets Cornered...

Caught in a tight spot...
Turn 4, however, sees Han flying into a tight space. (Do they have table edges in space? Let’s just say it represent’s the Death Star’s firing range.) Realizing this means an Immelman “flip” is imminent, the Empire sees the opportunity to press the attack. All three TIEs wind up with the Falcon dead in their sights. Han, however, thinks he can push the envelope, and opts to continue forward, planning to flip on his next turn. This keeps the range a tad longer, which benefits the Falcon, which has better guns but poor evasion skills (one die!). Han decides to aid the latter by using his Elusiveness upgrade to place an Evade marker.

The shooting is furious from all sides. The Falcon puts two hits on one of the TIEs, but the Emperor’s lackeys manage to burn off all of the Falcon’s remaining shields! She can start taking crits, which is the last thing Han wants for his baby.

Flip the Ship

Turn the ship, turn the tables.
At the last second, Han flips the Falcon, aiming straight for his pursuers. (One corner of the base was barely off the table edge— I ruled it inconsequential. The point is to keep playing, not grant a win to either side by default.) One of the TIEs is too far out of range to shoot, and everyone else is at extreme range, leaving nothing happening but a pretty light show for Turn 5.


“Well, it worked in the Death Star hallway scene... Charge!”

Out of position— and the hunted becomes the hunter!
Forced to turn back themselves to avoid the table’s edge, the TIEs suddenly found themselves being pursued— a classic Solo move. One TIE opted to press the attack, but found himself dodging the oncoming Falcon, much to his surprise. That left every fighter unable to shoot at all, while Han could freely open fire. Shifting targets off the wounded TIE, Han puts two hits on another opponent. The lambs are beginning to sense the sacrifice coming.

Comin’ Through!

Zap. Zap.
Boom.
One TIE barely made his Immelman to stay in the battlespace, while the others opted for tight maneuvering to try and get the elusive freighter back in their sights. Han swings through the formation, leaving the flipping fighter out of range, and only one TIE able to sight in on the Falcon. But before he can, Luke sights in on him— BOOM— Scratch another TIE.

Fancy Flyin’

Oh, look! Another target...
...Another kill!
Han cuts back across the TIE formation, coming behind the lead TIE (who expected a different position, obviously). Already wounded, the TIE is no match for a range 1 roll of 4 dice from the Falcon, which adds his atoms to the cloud of particles created by his buddies.
Lucky shot!
Chewie! Fix that!
Feeling lonesome and desperate, the final TIE opens up, and manages one hull hit on the Falcon... “Chewie!” yells Han, and his able first mate leaps to damage control— and even brings a level one shield! (The “Chewbacca” crew card cancels one hit and restores a shield, but only once per battle. I opted to save it until the hull was exposed in  case I needed to void a crit.)


Final Dance

Grab your partner! (Point blank... and we both miss?)

More ineffectual shooting.

It was down to a duel. The next move found both ships at point blank range... and both managed to evade the shots! Han swept the Falcon around, using a Boost to make almost a full half circle, leaving the TIE out of position— but again he evaded the Falcon’s guns.
The last TIE fighter.
The TIE tried to come in around to catch the Falcon’s flank, but another Boost move left him with no shot, and another point blank opportunity for Han and Luke— and they made the most of it— three hits in one shot, and the TIE (who had barrel rolled) couldn’t roll any evades. BOOM— the last obstacle to escape was gone!
Victory!

“You call that easy?” or, the Follow Up and Review


I have to say, I love the Millennium Falcon in game. This is the second time I’ve seen her in action, but the first time to “pilot” her myself. The Boost upgrade is an incredible advantage, especially when the pilot has a high ranking as Han Solo does. As you could see, I used it several times to alter the shooting positions after movement, denying shots to the TIEs while lining up shots for the Falcon. Also, despite the Falcon having a top speed of 4, the combination of the Boost upgrade and the YT-1300’s longer base make it a very fast ship indeed— even an unmodified TY-1300 is almost as fast as a TIE, and effectively faster than an X-wing!

The 360° turret also adds to the YT-1300’s advantage, as it needn’t worry as much about setting up a shot— it always has one, if the target is in range.

I was a little disappointed that the Falcon could only shoot at one target with the primary weapon— after all, in the films we see that she clearly has two independent turrets, as well as other weaponry (though the latter appears to be anti-personnel, not anti-ship). Though if you gave the Falcon two shots, you’d have to up her point cost considerably.

As it is, the Falcon with a full complement of upgrades seems to be more than a match for an equal point base of TIEs. Granted, I missed the first firing opportunity for the Empire side, and it’s possible that against an opponent other than myself, I might have gained some of the maneuvering advantages I ended up with— it’s hard to maintain a “fair” solo game. But even so, the TIEs only managed to burn off shields, and with no shields themselves were at higher risk of crits. The fact that they could be caught out of position to shoot, but the Falcon never could, also clearly made a difference.

The only way to know for sure is to bring some buddies over and see what they can do with (or to) Han’s little beauty. And when they do, you can be certain I’ll tell you all about it.

May the Force be with you!

--- Howard Shirley

Monday, March 11, 2013

Shakedown Cruise...


... Star Wars Style

Breaking out the new ships... and some old ones. Yes, the table is green.

I popped into my Friendly Local Game Store, Wargames, LLC., both to see what was happening and to pick up at least one of the new Wave 2 expansion sets for the Star Wars X-Wing Miniatures Game (the same game I blogged about here). I purchased a lovely little A-Wing, and as luck would have it, the store owner (the indomitable Baxter), decided to crack open the fantastic new Millennium Falcon miniature for the game, others gather to admire, and the next thing you know we wound up having an impromptu battle there in the shop. And here’s how the day went down, in the event I like to call The Battle of the Rocky Nebula (‘cause it was a big green battlefield with rocks on it).

The Battle of the Rocky Nebula


Entering the Mutara Nebula... wait, wrong movie.

We limited each player to 30 points, which left Baxter piloting a basic YT-1300 (the class name for the freighter, for those not versed in Star Wars nomenclature). An awesome ship, but it doesn’t have Han Solo’s “special modifications,” and doesn’t include Han Solo as its pilot (which became evident later). Still, with 5 shields and 6 hull points, it’s a lot of ship to bring down.

To back him up, the other player and I took on an A-wing apiece, choosing veteran pilots— mine with skill level 6 and the ability to actually shoot while “colliding” with another ship (which vessels normally cannot do in the game). I also added homing missiles, which prevent targets from evading an attack (nasty)!

Rookie pilot (upper right):
"Wait, I don't have any shields?"
Heh, heh, heh...
Facing us we had a fresh-from-the-Imperial-dockyards TIE Interceptor, an Advanced TIE (but not Darth Vader), and a newbie with two standard TIE fighters (quoth he, “Great. I’m going to get blown up— twice.” Wise for his years, that one).


The Probability of Successfully Navigating an Asteroid Field


Hey, freighter! Watch where you're flying!
Oh, and that's my little ship in the foreground, avoiding rocks.


As you can see, the opening stages consisted of everyone pouring it on, directly into the asteroid field— rather fitting for the ship of Han Solo. As there was no chance of shooting yet, all of us being out of range, I opted to use the Boost Action capabilities of the A-Wing. This is a nifty bonus move that allows you to tack an additional 1-length maneuver onto your movement— you can even make your “boost” a shallow turn. Clearly the A-Wing is intended to be the fastest and possibly most maneuverable fighter in the game (a far cry from my earlier plugging around in a Y-Wing). Unfortunately, due to my starting position, I was forced to avoid a couple of asteroids, which wound up keeping my A-wing out of the fight for most of the action— because of course, everybody on the opposing team decided to aim for the biggest target!


A target rich environment— especially if you only have One Big Target.
Oh, and that's my little ship on the far right, avoiding rocks.


Shooting a Flying Side of a Barn at Close Range


The YT-1300 is no slouch as a ship— Baxter even put it through a dime-squashing “Korioan Maneuver” (the equivalent of Wings of War’s Immelman Turn). Yowza, that’s flying!


Flip the ship and kick in the rear deflectors, Chewie!
Oh, and that's my little ship on the lower right, avoiding rocks.

But even fancy flying is no match for the blasters of four TIE fighters all aimed solely at you. The YT-1300 took a hammering, losing all its shields by the fourth turn, and taking multiple critical hits from the Advance TIE (due to its pilot’s “Marksman” upgrade). At the end of turn 5 it was all over for the YT-1300. Which was a good thing for me, as I was running late to pick up my wife from her law school study session. (Talk about possibly getting on the Dark Side...) So my little A-wing high-tailed it into hyperspace, after taking only one shot AND MISSING.


And another bunch of Rebel scum become just more gas in the nebula.
Oh, and that little ship no longer in the picture because it had to enter hyperspace?
That was mine. But I want it clear that I was recalled to base— not destroyed!

Ah, well. It was a good shakedown cruise and a fun time. I look forward to picking up the Millennium Falcon expansion set and some TIE Interceptors for my own collection.

Thanks to the guys at Wargames for an enjoyable little break in my day!

Store info:
Wargames, LLC
4825 Trousdale Drive Suite 217
Nashville, Tennessee 37220
Website: www.wargamesminis.com

If you go, tell Baxter "Hello!"