Episode V and a .V
The Search for Solo
Following the disaster at Bespin, Lando Calrissian and Chewbacca are searching for Han Solo and his captor, the bounty hunter Boba Fett. Rebel intelligence report no word of either Fett or Solo on Tatooine, the obvious destination— but then, where are they?Bribing his underworld connections, Lando learns that Fett's ship has been sighted near the Anootla asteroid cluster.
The Alliance Command issue order— disable the Slave 1 and scan her for Captain Solo's presence— or at least clues to his whereabouts.
Within hours, Lando and a small fleet jump for Anootla... but are they headed to a rescue, or something else?
Back to a Galaxy Far, Far Away
(or at least a thirty-minute drive at rush hour).
Once again my gaming buddies and I converged for an evening of X-Wing, which appears to have become our current obsession. (We do play other games— honest!) On the evening in question, our location of choice was Will's domicile— Commodore Will, for the purposes of this evening's game (and the starting college football season— Go Vandy!).
The story— an original scenario featuring the Firespray-31 "patrol and attack craft," better known as Slave 1, Boba Fett's personal ship from Episode V The Empire Strikes Back.
Although I don't own this ship myself (yet), Will had brought it to one of our earlier games, and I thought it would be good to try it out in a balanced scenario, with a theme appropriate to the devious, self-serving bounty hunter.
 |
| The Forces of Good and Better Than Good, holding their secret orders. Rebels, L t R: Lieutenant Chase, Commodore Will, Commander Jim Empire, L t R: Darth Alexander, Darth Michael (as Colonel Soontir Fel) |
I decided to go all out with this one, giving each side "mission dossiers"with their goals and battle intelligence. And yes, this meant that both sides weren't fully informed as to the other's objectives or capabilities. I knew, of course, which is why I operated the Slave 1. Its role wasn't particularly secret to either side, so I could play without having any unfair advantage. Command of the Empire forces was thus left to Darth Michael, with my son Darth Alexander fulfilling the role of eager young officer... who got his command thoroughly shot up over the course of the evening. (So he fulfilled his role well.)
The Battle Begins
 |
| The Rebels arrive... |
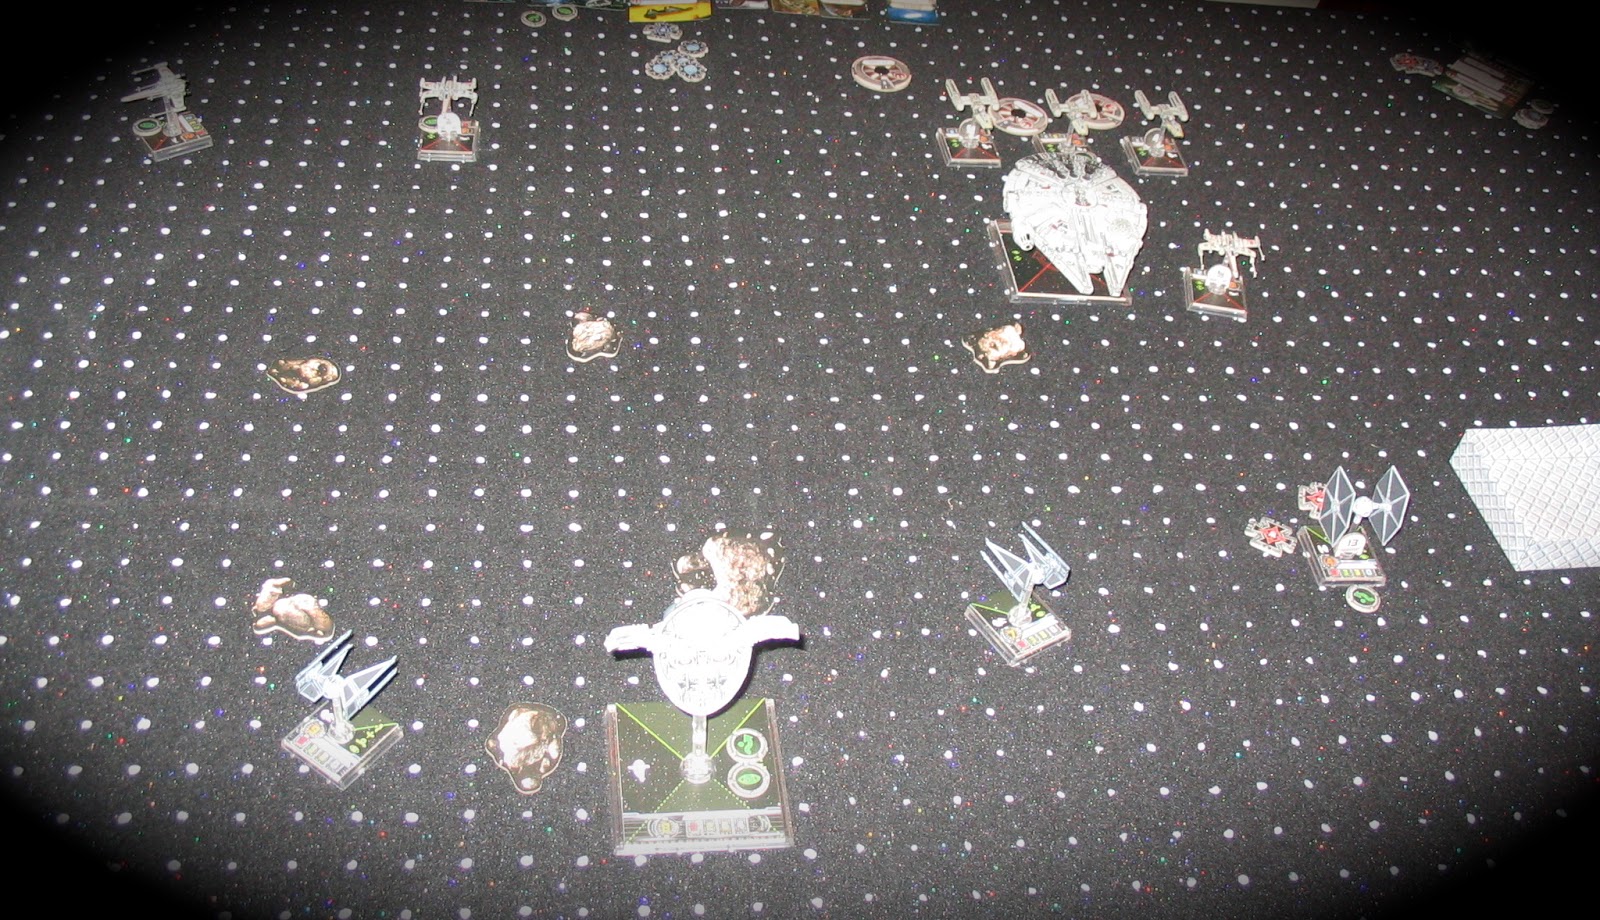 |
| ... and the forces advance. |
Starting forces:
Rebel Alliance:
Millenium Falcon, piloted by Lando Calrissian (Commodore Will).
3 X-wings: Luke Skywalker, a Red Squadron pilot, and a rookie (Lieutenant Chase, rebellious son of Darth Michael)
3 Y-wings with ion cannon turrets: "Dutch" Vander and two Gold Squadron veterans (Commander Jim)
Empire:
TIE Interceptor: Soontir Fel (Darth Michael)
TIE Interceptor: Turr Fennir (Darth Alexander)
TIE fighter: Black Squadron (Darth Alexander)
Slave 1, piloted by Boba Fett (yours truly)
Yeah, you can do the math, too, right?
First Moves to First Blood
 |
| Darth Alexander loses his first wingman on the first turn! |
Things got off with a bang— specifically, the silent "bang" created when a TIE fighter turns into so much cosmic vapor. The first TIE got fragged without firing a shot! The Rebels were celebrating an early sighting of victory as they reached the asteroid field...
Guess What...
Okay, yeah, everybody saw this coming. But it was still fun.
 |
| The Rebel commanders observe the tactical situation with dismay: "Where'd all those TIE fighters come from?" "I told you it was a trap." |
Revised Empire Forces:
2 TIE Interceptors: Soontir Fel, Fel's Wrath3 TIE Fighters: Howlgunner, Night Beast, Black Squadron Pilot (all Darth Michael)
1 TIE Interceptor: Turr Fennir
3 TIE Fighters (+1 already destroyed): Backstabber, Mauler Mithel, Dark Curse (all Darth Alexander)
Slave 1 (still me)
[Note on both sides, upgrades, secondary weapons, etc., were all fully utilized; the total points were close to 260 for each side.]
The terms of the scenario allowed the Empire to announce the added forces after the plotting phase, any time before the Rebels entered or passed the asteroid field; this turned out to be Turn 2. This allowed the new TIEs to be placed and plot their movements.
Demolition Derby
 |
| A Big Hairy Furball... and Lando just had the Falcon waxed. |
The sudden arrival of new ships messed with everyone's plotting— almost every ship found itself colliding with either another ship or an asteroid or both. (Slave 1 passed through the field and the furball unscathed, thanks to someone's amazing piloting skills. *Ahem.*)
 |
| Boom... |
 |
| ...Boom... |
 |
| ...Boom... and the Y-wings close in. |
Despite the confusion, most fighters had a targets, and the close range blasting took out shields and ships left and right. Darth Alexander's forces took the brunt of the attacks; by Turn 4, he was down to two ships, with all but one of his damaged, while Darth Michael was largely unscathed. Yours Truly lost a few shields, as did the Rebels, but they looked to be sitting pretty, and set off in pursuit of Slave 1, with ion cannons primed for action. Seeking to throw the Ys offtrack, I deployed a proximity mine. It didn't work (well, not as intended), but we did manage to blast a Y-wing off my tail— the first Empire kill of the night!
 |
| Commander Jim does not look happy. I can't imagine Y... |
 |
| Hey, he's gonna shoot you, too... |
 |
| ... another TIE bites the dust. |
The bright spot for the Empire forces came with the destruction of Luke Skywalker, after a brutal team-up by Darth Michael's and Darth Alexander's commands.
 |
| No, lieutenant. There is nothing that will save you now. |
But the Empire was still taking losses, and the remaining Y-wings were catching up to Slave 1.
 |
| And another one's gone... |
Yours, Mine and Ours
Commander Jim proved to be too skilled a pilot for my deadly traffic cone... unfortunately, Darth Michael did not— my very own ally flew into the mine, barely surviving with a hit and a critical hit! |
| Darth Michael makes a wrong turn... "click— BOOM!" |
Turning the Tables
 |
| Boba Fett fights back... scratch another Y-wing! |
Y Becomes the Final Letter in the Alphabet
The final shot came down to Darth Michael. At this point, all but three of the TIEs had been destroyed, and the remainder were not likely to survive much longer. But on Turn 7, Michael lined up a long range shot on the sole remaining Y-wing... and blew her out of the asteroid cluster.
 |
| Y did we shoot you? Because we could! |
Now unable to fulfill their mission objectives (get four ion counters on the Slave 1 in one turn), the Rebels abandoned the field. Lando would have to travel to Tatooine to find his frozen friend...
Well, That's a Wrap.
All in all, the evening was a success. We had a great time, and the scenario made for a fun mix of vessels and tactical options. It's hard to say after one play whether all the objectives worked. Jim had concerns that the Rebel task— score 6 ion hits on the Slave 1 in a single turn— was too unlikely with only three Y-wings. He's probably right, but as the Ys took a long time to catch up to the Slave 1, and took hits along the way, they never managed to get into a coordinated range for an attempt. In retrospect, I think reducing the goal makes sense, as well as allowing at least one of the hits to be a "carryover" from a previous combat round (per the large ship rules regarding ion hits). I also think a fourth Y in place of an X-wing is a good call as well.
The "It's a Trap" moment was a hit. Jim confirmed they suspected reinforcements would arrive... but not in the middle of the asteroid field, which caught them by surprise. I think they had also planned their entry around an attempt to eliminate the escort and then pursue the Slave 1. In retrospect, the Ys probably should have started from the center of their battlefield edge, not their left, and gone for the Slave 1 from the start.
The Empire objective worked well, and given the losses they took remained in doubt till the end of the game.
As Boba Fett, I found myself questioning my presence on the battlefield. As bait, it became clear to me that Fett needed other motivation to hang around besides just luring Y-wings into a death trap. Yeah, group effort, take one for the team, blah, blah blah— he's a self-serving bounty hunter, not a professional decoy! So I may tweak that a bit, especially as I like the idea of a three-way objective split. (Heh, heh, heh.)
And I'm going to eat my words regarding the Firespray-31 spaceship. I had said I wasn't interested, as I never really cared for the design (like somebody stuck a Viper onto a computer mouse and stood it on its nose...), and also because the Slave 1 never engaged in combat in the original films. (We shall not speak of the "prequels," which Do Not Exist in my Star Wars universe). But FFG have turned the Firespray into a must-have vessel, with unique tactical elements and abilities. I like the fore/aft firing arcs, and the ability to drop mines and bombs. It was a lot of fun to "fly" the Firespray and plot my targeting arcs. And when my own ally flew into the mine... getting to razz Michael about his piloting skills— well, that's just gaming gold! (Seriously, he had to maneuver into the mine to hit it; if he had just flown straight or turned left, he would have been safe. Yet another product of the Imperial Fighter Pilot Academy... "Blow up all you want; we'll clone more.")
Coming Soon: Wave 3 Ships (I've got my pre-order in)
Yes, I'm expecting a B-wing, a TIE Bomber, a Lambda Shuttle, and the Moldy Crow (it's from a Star Wars video game)— probably next week. You can bet I'll be testing them out and posting here.
Till then, cue the Imperial Death March and celebrate the victory over the Rebel scum!