Building Toshach Miniatures “Kragenvale Keep”
 |
| "Once more into the breach..." ... wait, wrong movie. |
Ever since I purchased Games Workshop’s Battle of the Five Armies game (Bo5A), I’ve dreamed of using it to recreate the famed Battle of Helm’s Deep from The Two Towers. My dream, of course, required the creation of Rohan’s mountain fortress— and I have to admit that my terrain building skills are rather untested. I’ve kept my eyes open for manufactured structures, but I never found a 10 mm resin or plastic model that would suit both my limited gaming budget and the scope of the battle I wanted to do. I had thought of paper models, particularly PDF files I could print myself, but the ones I found were either intended for much larger scales, or weren’t quite the right “look.” So when Toshach Miniatures announced the release of “Kragenvale Keep,” a PDF paper model clearly intended as a version of Helm’s Deep itself, I needed very little persuading to give it a try. A download later, a run of cardstock through my Canon MP-160 color inkjet printer, and I was ready for an afternoon of fortress building.
My initial approach was simply to see how easy this model would be to construct for a novice paper modeler such as myself. As the keep consists of PDF files, I wasn’t concerned with a perfect appearance— I knew I could always print it again and build it again if I made any uncorrectable mistakes.
Materials and Tools
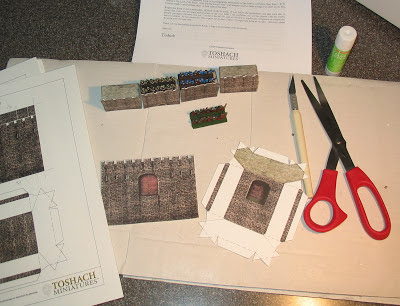 |
| Building Kragenvale Keep— Tools, parts and little friends. |
A few quick notes. The instructions call for 80 lb. cardstock; I used 110 lb., as I find it to be sturdier and more durable (and I had it on hand). However, 110 lb. cardstock can be tougher to fold— I wondered how the model would handle it. Also, while the instructions call for using a craft knife to trim the model components out, I found that for all but the little crenellations a pair of scissors worked quite well. Most of the cuts are straight lines, and there are very few tricky corners or shapes to worry with. Overall, cutting went quickly and easily— although there are a lot of pieces to cut. For glue I used ordinary glue sticks from Staples— which turned out to be both less than satisfactory but a bit beneficial in the end. More on that later.
The Instructions
The instructions are very clear and easy to follow. In fact, most of the modeling can be done by simply looking at the large, clear photos. While you could do this simply by consulting the PDF file of the instructions, I chose to print the relevant pages on my laser printer to have them more easily to hand.
Dipping My Toes In: The Valley Wall.
 |
| Closeup of completed valley wall and tower sections. |
I started with the “valley wall,” which represents the long, lower wall across the valley of Helm’s Deep in the film and novel. The Kragenvale Keep model treats this wall as a series of component parts rather than a single piece. This has versatility for how long you choose to make the wall, how you orient it with regards to the main fortress, the look you prefer, and even alterations during gaming. The components consist of short crenelated straight wall sections and protruding “towers,” which are the same height as the wall sections, but jut forward like a bay window. The wall sections are slightly larger than 4 cm wide x 2 cm deep— sized for a typical Warmaster/Bo5A infantry base. Unfortunately, this makes them unsuitable as-is for forward facing artillery, though one could simply make a second row of sections to give the needed depth. One wall section includes a printed “culvert” for the Deeping Comb (the stream in the valley)— a nice touch. The protruding “towers” are about 2.5 cm wide by 2.7 cm deep; insufficient to accommodate a stand by themselves, though perfect for the round character bases used for the heroes of Warmaster/Bo5A.
Building the valley wall sections is quick; these are basically small boxes with a glued-on facade for the parapet wall on one side. I had no trouble folding and gluing these, and got through them quickly. My one mistake was failing to trim out the crenellations immediately after folding the parapet double and before gluing the facade to the box shape. Coming back to cut them out later without damaging the box portion proved a bit tricky. (My mistake, as I failed to follow the instructions on this.)
The towers were almost as easy to build, though the angle of the “bay” portion requires careful gluing and a bit of holding while the glue sets, to keep the paper from popping open. (This latter effect may be less of a problem with the lighter cardstock recommended in the instructions.)
Hmmm... No Right Turn
 |
| Valley wall tower section; note blank side. |
I quickly noticed that the sides of the walls are mostly blank paper, not printed stone. I believe this is to make it easier to glue the wall sections to each other if desired (the instructions don’t mention this), but it also means that the wall must run in a straight line; there are no provisions in the current model for turns, even at right angles. That’s okay, but I’d prefer that at least one end of a wall or tower section be stone, so that I don’t have to find some other piece of terrain to abut to the wall. A simple solution, though, is to just trim out an extra bit of battlement facade and glue it to the side of the wall. In the future I may give this a try. Also, for aesthetic reasons, it’s clearly better to alternate between wall section and tower, as the protruding tower effectively disguises the seam gap you would otherwise notice between each wall section.
All told, it took me about an hour or less to complete all of the valley wall components on my first go. I suspect with a little more experience and forethought, it would go even quicker.
Putting on my Master’s Cap: Building the Courtyard Wall
The most daunting portion of the model is the outer wall and courtyard of the keep itself. These sections have unusual shapes and corners, and I found them a bit tricky to glue together. The instructions tell you to start with the main gate, although the back wall is identical in construction. I’d actually suggest starting with it, as the main gate is of course the more prominent side. Doing the back wall first gives you a little practice before you tackle the front.
 |
| Main Gate components, ready for gluing. |
The main gate and back walls have protruding bays on each end, similar to the valley wall towers, but integral to each piece. There are very dark folding lines printed on the front of the pieces to act as guides. The lines are dark enough and thin enough to be unnoticeable in the final product— but they’re also hard to see when folding. The instructions recommend scoring the folds with a craft knife, but of course you don’t want to do this on the front of the model, and as naturally there are no lines on the back, you’ll need to be very careful adding your own corresponding fold lines by hand. Again, as I was doing a quick build, I decided to skip the scoring step. On my first attempt (regrettably done with the main gate), I simply tried to curve the paper rather than try for a tight crease. At first, this looked like it might work, but it caused problems later when I went to the gluing step and tried to attach the flat inner tabs to my overly-curved surface. Oops. But I was able to to correct my mistake with a little careful pressure on my curves to create the folds. Unfortunately, this did cause some mild concave buckling of the paper, though nothing truly noticeable.
When it came time to fold the back wall, I held a flat ruler against the unprinted side of the paper, lining it up with the ends of the folding lines. Pressing the paper tightly against the ruler, I was able to fold the paper around the edge and produce a nearly perfect crease. This technique worked well, and I used it throughout the rest of the project.
 |
Sidewalls, with door and without. Battlement walls already folded
and glues, with crenellations trimmed. |
Next came the two courtyard side walls. The set provides three versions of these walls, one with a printed door to create an “east” access way to the valley wall, one with a printed door to create a “west” access way, and a third with no door that can be used for whichever side you wish (or even both). I chose to follow the general plan of Helm’s Deep and used a door on the “east” wall and no door on the “west” wall.
An interesting aspect of the side walls is that the ends are different. One end is designed like an attached box lid with tabs on the end. You put glue on the tabs and fold it closed, slipping the tabs inside the wall— rather like closing a pizza box. The other end, however, is simply open, with thin tabs that will be attached to the back wall or main gate sections, depending on orientation. I couldn’t figure out the reason for the difference, and the instructions make no mention of it. It didn’t seem to matter much when it came time to complete the courtyard wall, but it was an interesting oddity.
Does This Meet Code? Attaching the Courtyard Wall Sections
 |
The walls ready to attach. Notice the side wall ends—
one open, one closed— I don’t know why. |
Although the side walls and the two end sections were easy to build individually, putting them all together soon proved trickier than I had imagined. I had a difficult time lining up the parapet walk evenly, especially when also trying to line up the crenellations, as these overlap slightly where the edges of the end sections meet the edges of the side walls. A small variation in my folding of the crenellations produced a stair-step effect at these points. At tabletop distances, it’s not visible, but to avoid this I’d advise being as precise as possible with your folds.
Of more significance became the effort to line up the parapet walk. I soon found that my glue stick glue wouldn’t hold, as the paper would bow and pop apart, and because the parapets wouldn’t match up, I had a number of unsightly white gaps. It’s also very difficult to get the glue to “catch” when holding two sections with internal tabs together. You can’t get at the tabs to apply pressure. The result was less than I’d hope for in terms of look, though eventually I was able to come back with a solution (more on that later). At this stage, though, I decided to continue with my build.
 |
| Mind the gaps! (Not as easy as it looks.) |
“Ground Floor— Horses, Warriors, Invading Orcs”: Adding the Courtyard Surface
An interesting element is that the internal courtyard is actually a raised surface, to match the main gate and the external access ramp. This is an elegant approach, but it’s not so easy to build. The instructions tell you to set the courtyard wall assembly on top of the courtyard sheet and trace the outline of wall on to the sheet. You then trim away the excess, and once the courtyard support section is in place, slip the courtyard inside the wall and glue it to the support section.
 |
Uh-oh. This isn’t going to work quite right. Notice the visible
white space on the courtyard sheet? Be careful with the walls! |
Unfortunately, two problems developed for me. The first was that my wall sections were a little uneven, so that the area outlined by the base of the courtyard wall and the area in the middle, where the courtyard surface was to go, were not quite the same. The second was that the action of sliding the courtyard components inside the walls put the walls under tension— my walls promptly started popping apart! The instructions mention this possibility, and recommend allowing the glue to dry, which I had done. Either I hadn’t allowed the glue sufficient time, or I had cheap glue (true), or the tabs simply hadn’t “caught” well in the first place. I suspect it was a mixture of all three. After some hasty re-gluing, I was able to get my courtyard walls to stay together around the courtyard support. Only now the shape of my courtyard didn’t match the shape outlined by my walls. Aaargghh!!! I didn’t want to slide the support back out and retrace, fearing this would pop the walls apart again, so I just took my scissor and “eyeball” trimmed away the edges of my courtyard until it fit— not perfectly, but close enough.
Hexy Things: Building the Main Keep & Tower
 |
| The Keep! |
Fortunately the remaining sections were a bit easier to handle. The main keep is a hexagon made in two halves, with the roof made like an internal lid. It folds and glues easily, and took me no time at all to construct. The whole thing slips inside the courtyard walls, but as it abuts only three sides, there’s very little tension. Thankfully, it didn’t produce the separations caused by the support piece. The keep has a large door at its base, for access to the courtyard, and a smaller door located at parapet level on the opposite side. As with all doors and gates of the model, these doors are printed onto the surface; they are not functional parts.
The small keep tower comes in two orientations— a central tower and one that fits off-center on one corner of the keep (see photos below). The latter has slits to cut along the edge so it can fit snugly over the parapet of the keep. Once in place, you really can’t see the overlap. Although only one tower is needed, to be used in either orientation, the kit includes two on the same sheet, one with guides for the slits, the other without. In the photographs I show both orientations, along with three stands of elves on Warmaster bases. You will notice that with the corner tower in place, it’s not possible to have the elves facing all sides, but that is the only position usable with the central tower. If either is a concern, you don’t have to use the tower at all.
There’s enough room on the keep roof to hold three corner towers, though that would leave no room for any Warmaster stands, much less a whole unit. The tower itself is too small to hold a stand, but it can accommodate a round character base. (A general on a rectangular base is out of luck.) In actual gaming, then, the tower doesn’t provide much use, except perhaps as a place for a wizard to toss fireballs from (or a certain dwarf to blow a horn).
. . . And a Matching Purse: Building the Accessory Parts
With the keep and its walls complete, I went on to the accessory pieces. These consist of stairs for the valley walls (nice, but not essential), the ramp to the main gate, and two wall breach sections for the valley wall. The set also includes large and small siege ladders, but these are just flat double folds— they look nice, but they’re hardly difficult to build, and they really aren’t necessary for play. There’s also a sheet of just water which can be cut into a stream pattern or pond. I chose not to print the ladders and the stream, as they’re not parts of the keep.
Upstairs, Downstairs
The staircase isn’t a difficult piece to build, but it is tiny, which makes it a little harder to get the tabs to glue into place. The staircase is printed on all sides, so it can be arranged in any orientation— you could even set it at right angles to the wall, though you’d probably have to glue it in place. The staircase isn’t quite tall enough to reach the parapet door printed on the keep, but the gap isn’t too bad, so if you want to create a lonely tower on the moors, this configuration would work.
 |
| Simple, but tiny. |
 |
| “Bet you I could slide down those on shield...”] |
 |
| Watch that first step; it’s a doozy. |
Ramping Up
The ramp is a bit harder, as the underside of the bridge can be difficult to glue evenly. It’s a little tricky to match the parts flush, but the underside isn’t that visible in use. Otherwise, it’s a straightforward build. I wish, however, that the upper back edge of the ramp, where it sits against the courtyard wall, was covered with the printed pattern as well. If the fold isn’t perfect, the white portion is easily seen in the gap. I used a marker to color it in, which is a satisfactory solution, but I’m not certain why it was left unprinted in the first place.
 |
| The ramp parts are nice and simple. |
 |
| Note the unprinted end of the ramp. |
Once More Into the... Dang, I Already Made That Joke.
The breach section is one of my favorite bonus bits to the Kragenvale Keep set. You can use it to replace any of the valley wall sections (though not the towers), leaving a nice “collapsed wall” effect for invading forces to pour through. There are two versions of the breach included on the page— one with rubble as the base, the other showing the stream (should those sneaky Uruk-hai place a devilish device in the culvert).
 |
Breach components.
Have fun cutting your teeth! |
 |
| Caution: Bear trap! |
Both breach sections consist of two parts; the wall end sections (when folded together,shaped like a U with teeth) and the breach itself, which includes the damaged surface of the walls and a circular “rubble and ground” base. Though not at all a difficult build, all the “teeth” tabs on the wall end sections have to be folded individually, and again you can’t get inside the wall section to press them in place, making it hard to get the glue to hold. Other than that, it’s just a matter of folding and gluing the wall sides up and then slipping the base-and-breach component down in the middle.
 |
| A half-pipe for Legolas! |
Once this was all done, I set the Keep into a makeshift valley and took a quick shot of a mock battle, complete with breach (see top photo). Although a careful look at this photo will reveal a few of my building errors, it’s still an impressive piece that a rank beginner can be proud of.
Call the Contractor Back: Solving the “Gapping” Problems.
A few days later I sat down with the model to see if I could correct the little unsightly bits. By this point, more of the glue had popped, which revealed the main problem. Let me state this as succinctly as possible:
DON’T USE GLUE-STICK GLUE FOR PARTS UNDER TENSION.
It’s terrible for stiff paper construction. But the solution is equally simple:
USE LIQUID WHITE GLUE (PVA) INSTEAD.
So I grabbed my trusty bottle of Elmer’s-brand Glue-All™ Multipurpose Glue and a toothpick, and went to work.
First, I simply popped all the courtyard wall bits a part (they were doing it on their own as it was, which was the one beneficial thing about the glue-stick glue; I didn’t have to tear the paper). I made sure all the various tabs were bent slightly outwards so that they “wanted” to press against the surface they would be glued to. Then, using the toothpick to spread the glue, I put white glue along all the tabs. If a wall component itself had gaps, I used the toothpick to slip glue into these gaps. Once I had pressed everything together and held it for a while, voila! My courtyard walls held, gap free.
I then used the toothpick to spread white glue one the tabs of the other little components like the staircase, the ramp and the “teeth” tabs of the breach section (which had also split). It worked like magic.
 |
The re-done fortress. (The camera flash picks up the brown marker
where I used it for edging; this is not noticeable to the eye
under normal lighting, so don’t be put off by it in the photos.) |
A Little Dab of Magic Marker: Finishing Touches
After the white glue dried, I went over the few white paper edges and areas with a dark brown permanent marker— in this case a Bic® Mark-It (similar to a Sharpie®, but available in more colors and cheaper). I ran the tip of the marker inside each crenellation, inside the corner areas of the parapet walls, and in any minor gaps in the courtyard elements. I also used it to color in the white spaces on the sides of the valley walls and the end of the ramp. I then ran the tip along the edges of the breach section and the staircase. Although in the future I would do this edging before gluing everything, in this case it worked fine. But when working with the lighter-colored parapet walk, be careful, as darker edging colors will bleed into the paper.
 |
| A moth's eye view |
The King’s Last Words
The final pictures with the green backdrop show my return to this model for the re-gluing and finishing touches. (I also set up another battle scene using B05A figures from Games Workshop). I still see some areas for improvement in my building, such as being more careful with my cuts, folds and gluing, and doing all my edging work before gluing anything together (as the instructions advise). But otherwise, I’m pleased with the results.
 |
| I use this technique for those hard-to-see fold lines. |
How long did it take? Well, unfortunately I had to deal with frequent interruptions for family matters, etc., so it’s hard for me to judge. I’d call it about 6-8 hours, including all my “re-do” work (because of the interruptions it turned into a two-afternoon project). Now that I’ve got the hang of it, I suspect I could do another one in about half the time. A skilled modeler might even be quicker.
All in all this is an excellent piece and a relatively easy build, even for a newcomer to paper-modeling. Visually, it’s perfect for 10 mm forces, and possibly 6 mm with thicker bases. Even up close the look is very realistic, and at tabletop distances, I think it surpasses many traditional resin offerings. And you can’t beat the price— $10 (plus printing cost) for a versatile, great looking terrain piece? Even with the cost of paper and ink, I think that’s better than the price of a similar resin or plastic model, even before adding the paint.
In any case, I know that I couldn’t paint anything to look this good and this detailed. It makes an eye-catching addition to any tabletop game. I look forward to more from Toshach Miniatures— as for now, “Let the horn of Helm Hammerhand sound in the Deep once more!”
 |
| “Hey— wasn’t Gandalf supposed to go get help?” |
To purchase the Kragenvale Keep (or for other great models), hop over to
Toshach Miniatures.
--- Howard Shirley, aka Parzival of TMP


