A late wind rises above the fields, carrying with it the sounds of leather slapping against metal, the clop of hooves on stone, and high upon the breeze the sound of one lone horn calling out in greeting, “Open the gates! The lords have returned from battle!”
 |
| Forth, Eolingas! |
THE PROJECT
Every army needs a home, a place to muster, to train, and to occasionally defend in a desperate fight against overwhelming odds (or to try and assault with the same). While I have praised (and still do) the excellent paper Kragenvale Keep (review here), I also wanted something a bit more generic (and potentially more imposing). So when Sally 4th, a new manufacture based in the United Kingdom, announced a line of laser cut MDF fortresses, I was intrigued. In fact, I suggested on The Miniatures Page that they consider a 10mm line scaled for Warmaster’s 20mm x 40mm bases... and lo and behold, they did just that. When they also tacked on a sale, I couldn’t resist. Carefully leading my lovely spouse to the computer, I pointed at the screen, said “This is my birthday present from you. Click the button.” And she was more than happy to comply.
As I’d promised myself that I would complete other projects before tackling a new one, I set my present aside and waited. Finally, this weekend I put on my construction hat, opened the package, and went to work.
THE FORTRESS
I had opted to create a small fortress consisting of four towers, three wall sections, and a gateway. (Let me take a moment to praise the company. When I first received the shipment, my examination of the contents revealed a few pieces that were damaged in shipping. I sent an e-mail to Sally 4th, and promptly received all the necessary replacement parts and a bonus of 5 little siege ladders.) Not certain how long the process would take, I noted that the towers looked the least complicated, as well as the most versatile (a lone tower is a viable scenario piece, whereas a lone wall or gateway just looks odd). So I decided to begin with this piece.
THE TOWERS
 |
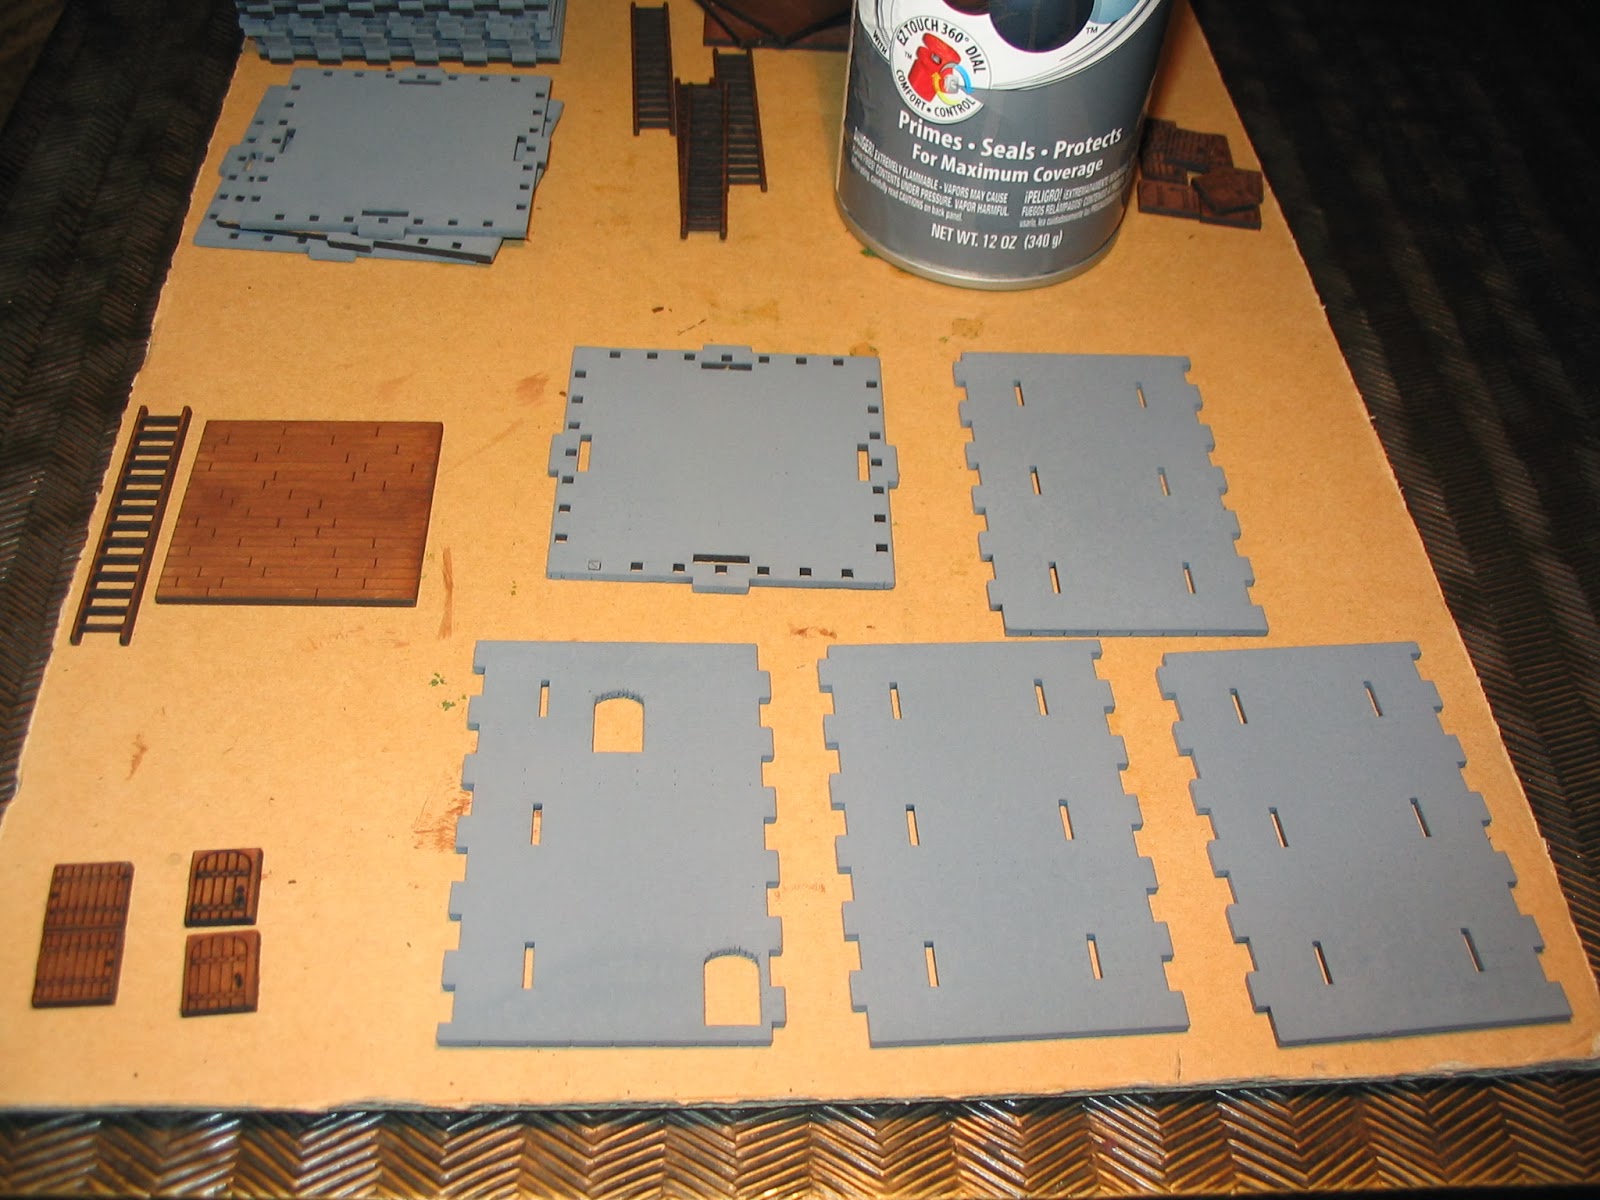
The parts of the tower.
At the bottom of the picture are two broken battlement sections
as well as the siege ladders Sally 4th sent as a bonus. |
Shown in the picture are the tower parts (and the extra siege ladders— these do not come with the product). These consist of three walls with arrow slits, one wall with door archways, four interior battlement facades, four exterior battlement facades, an interior tower floor (etched to look like wood), a roof/battlement floor (etched to look like assorted stone), four “battlement support” pieces (etched to appear like stone) that hold the battlement section in place, four interior floor supports (unetched), two arched doors (slightly different) and two trap doors (identical). There is also a guide piece used to align the floor supports.
The set does come with instructions, but I will say these are a bit sparse. Still, it’s not hard to determine from the pictures what to do.
Painting the Tower
 Although the instructions don’t call for it, since the upper interior of the tower forms a room that is visible when the battlement is removed, I decided to paint the interior parts before assembly. Since I have four towers to build, I primed all four tower sets at the same time. As the floor and doors would also be permanent once installed, I painted them as well, using a slightly thinned acrylic craft paint (Delta Ceramcoat Burnt Umber). Although Burnt Umber is a very dark brown pigment, the paint absorbed partially into the MDF, which ended up producing a “stained wood” effect that I quite liked.
Assembling the Tower
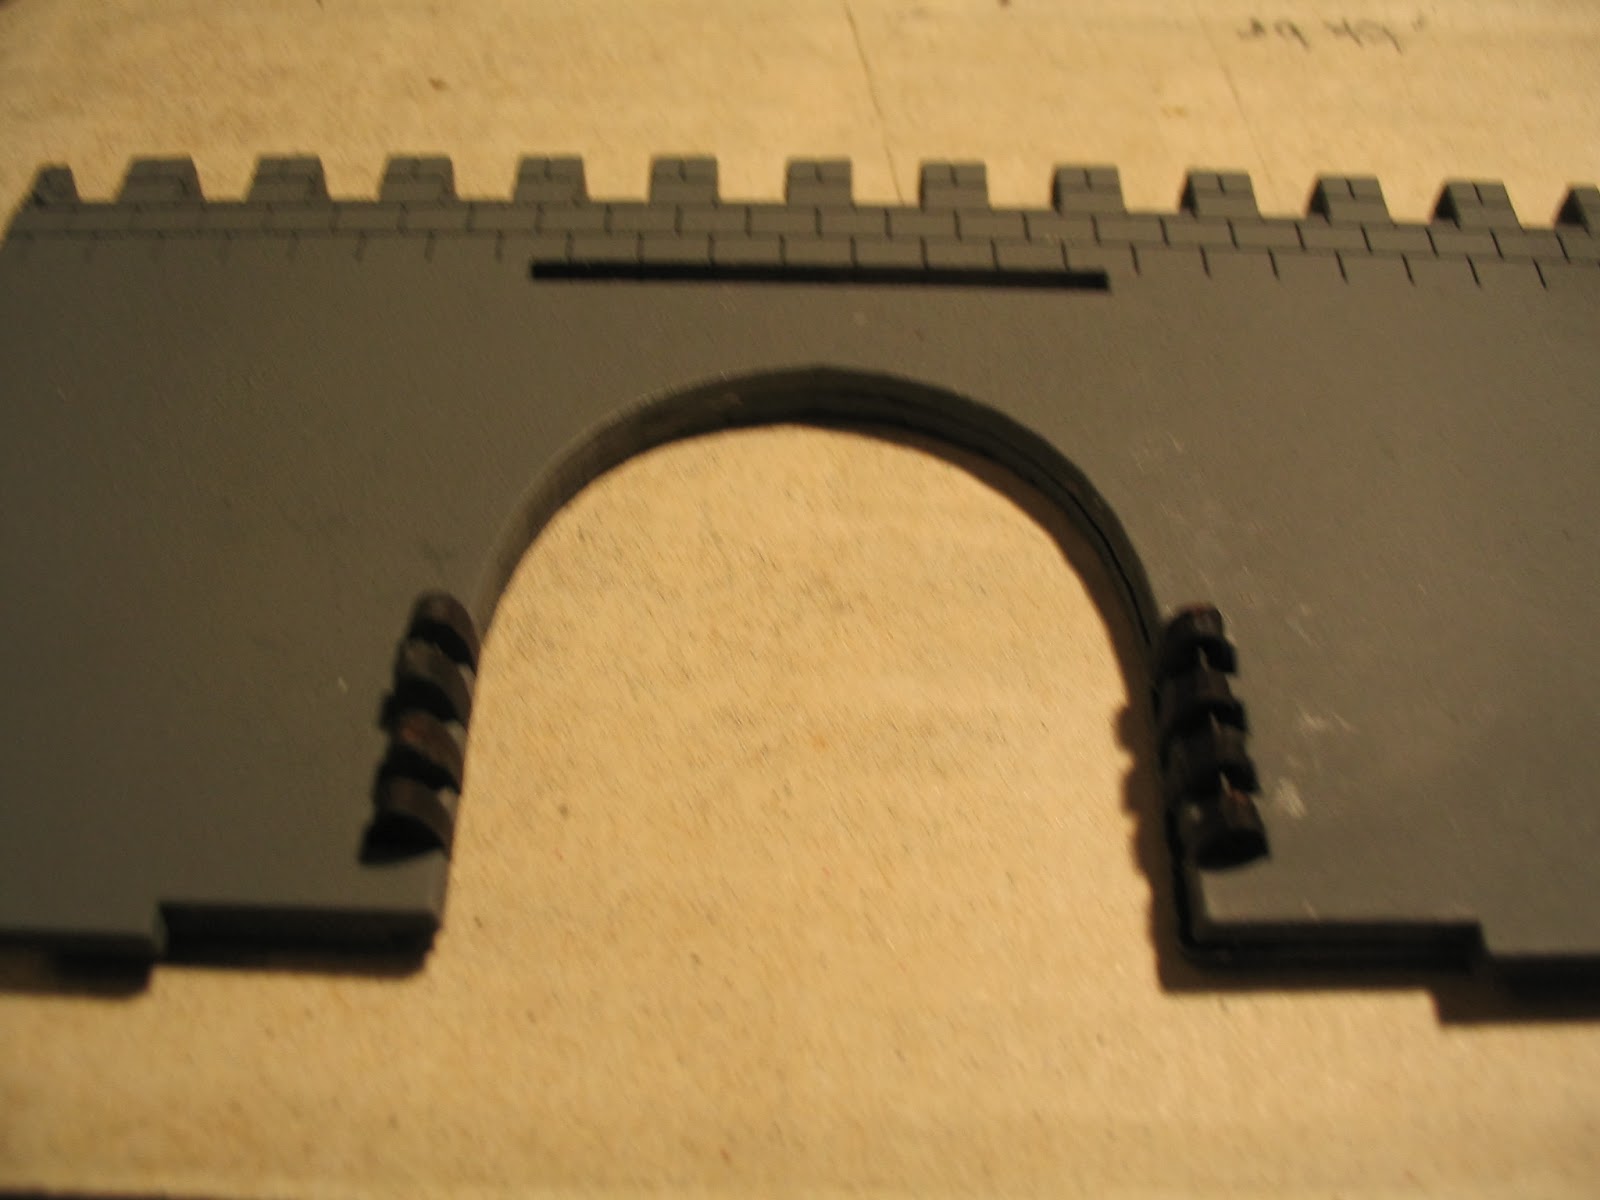
 If you look closely at the photo, you might notice that the battlement floor (or tower roof) has a series of small square holes around the edges. These are not construction elements, so I gather they represent drain holes as a real fortress might use for boiling oil! (Or, in more mundane times, rain gutters.) You may notice that one of these is not punched. I had several such elements in my various parts, but found that slight pressure with a small pointed tool popped them out with no fuss (I used a golf tee I had handy).
Walls
The tower walls were quite simple to assemble. I put a bit of white glue (PVA or Elmer’s) on the inside of the notches, and then fit the four walls together. The order of the walls doesn’t matter; they’re essentially interchangeable, and the orientation is obvious; if you find that the walls aren’t meeting equally at the top and bottom, simply turn the wall vertically 180°. Voila— perfect fit.
Note that I used one of the floor pieces as a guide to make certain the walls fit square. This is recommended in the instructions. What isn’t mentioned, and I found helpful, is to wrap the tower in rubber bands (two should do) to act as a “clamp” while the glue dries.
Floor Supports
 |
| The problem: A tight fit. |
 |
| The solution: Rubber bands. |
Next I installed the interior floor supports as the instructions stated. This proved trickier than I expected; the fit is very tight on these, and my first effort resulted in the tower springing apart... that’s when I discovered how useful rubber bands could be.
Battlements
 |
| Battlements "clamped" for gluing. |
 |
| Lower support sections added underneath |
With the floor supports in place, I proceeded to the battlement and roof assembly. This seems like it might be tricky, but it’s actually fairly simple. The four interior battlements (no notches) all have slots on the bottom that slip onto tabs along the edges of the battlement floor. Note that the stonework side on these faces inward— that’s important. The exterior sides have notches that fit into each other just like the tower walls. These are glued back-to-back to the interior battlements, with the exterior stonework facing out, matching the crenellations to the crenellations on the interior battlement. Line ‘em up, wrap with a rubber band as a clamp, and let dry.
While this is drying, you can also install the under supports. Flip the battlement over. The supports have tabs that fit into slots in the roof. The stonework faces out. Glue and set the whole thing aside to dry. Easy peasy.
The Tower Doors
Before installing the doors or anything else, I recommend painting or priming the exterior of the tower; this protects your “wood” pieces from inadvertently becoming “stone” pieces. (I forgot to remove the interior floor on one of my towers and wound up with “clouds” of gray paint on my new hardwood tower flooring! Man, was I peeved at that contractor... But I sanded it out and repainted the burnt umber. Lesson learned!)
The doors and trap doors are nicely detailed with “bands” intended to be iron straps. So before installing the doors, I also gave these little “studded” strips a quick dab of black acrylic craft paint.
 |
| Two different doors: Upper and lower. |
This step is where an eye for detail becomes important. The instructions don’t mention this, but there are two types of arched doors— one where the door is etched inside a rectangle of wood with clear wood “margins” all around, and another where the bottom edge of the door is flush with the edge of the wood. This is important, because the latter doors (flush with the edge) are for the upper room of the tower; the flush edge allows the door to sit against the upper room floor. The “margin” doors are for the bottom of the tower. So pay attention when installing these!
 |
| Trap doors (What, no elevator?) |
The trapdoors can be glued anywhere you like. One goes on the interior floor, the other on the battlement floor. I chose the center for the roof door and the side or corner for the room floor door, but the placement is up to the builder.
Once the doors are on, the battlement simply sits in place atop the tower. Nothing to it!
Below are some pictures of a tower "in action." (These also are better photos of some of my critters from the last post, as promised.)
 |
| A lonely tower on the moors, and the beasties that want to claim it! |
 |
| Smile for your beauty shot, Dain! |
 |
| Ugly Brutes! (Battle of Five Armies Hill Trolls) |
 |
| Little Ugly Brutes! (Battle of Five Armies Goblin Guard) |
 |
A poor man's Orthanc!
(Even stacked this high, the towers remain very stable.) |
THE FORTRESS WALLS
 |
| The Wall Parts. Not as complicated as it looks. |
Though the walls look complicated, and have some different bits, I found them even easier to build than the towers. The base acts to hold the assembly square (it’s basically a big rectangular box with a facade on one side). This set also didn’t need to be primed before assembly; it’s all stone, and has no exposed interior, so I could glue it completely before painting.
The walls consist of a base (with a cobblestone edge), a short interior wall (no crenellations), a stone roof/battlement walkway, an interior battlement wall (with etched stone crenellations and the rest blank), two side walls, the exterior facade (fully etched, with crenellations), and two “buttresses.” There’s also a long narrow “trim” piece that fits into the exterior facade. I’m not certain what this is intended to be except for a bit of three dimensional detailing. Looks good, anyway.
Assembling the Walls
 |
| Walls Assemble! (Basically, add glue, fit, clamp, done.) |
As I said, assembly is simple. I glued the two side walls (notches down) to the interior battlement wall (stonework facing inwards) and the interior stone wall (stone work facing away from the battlement wall). Then I glued this to the base, with the cobblestone on the interior side of the wall (it’s the courtyard floor, or at least some of it). As there are specific notches in the base for the various pieces, there’s no other way to assemble it, so you really aren’t likely to make a mistake. Just be certain the side wall has the notch side down.
Once this is in place, glue the exterior facade to the battlement wall, matching the crenellations. Stick on the buttresses, add the trim bit, and wrap with a bunch of rubber bands to dry. Prime later, and you’re done with your castle walls.
THE GATEWAY
 |
| The Gatehouse components. Notice the block of hinge parts. |
This proved to be the trickiest piece to assemble, and alas, nowhere near as easy as the others. I’ll preface this part by saying that I’m no modeler. I don’t like finicky bits, and I’m not a deft hand at trimming. Unfortunately, this would become an issue.
The Gatehouse Doors
The problem arises with the doors. Sally 4th opted to create a very realistic door design for their gateway, including working full pin hinges and gate bar brackets. I suspect this is a translation from their 28mm scale forces, and at first it seems like a neat feature. In practice, at least for me, it became a headache.
Painting the Doors
 |
| The back of the doors. |
 |
| The front of the doors. |
I had painted the doors with brown umber for the “wood” and flat black for the bands and the various parts. Though recessed into the gatehouse, the back of the door is visible from the interior, and has no detailing (I gather laser-etching is a one-sided deal, or at least double-sided etching is cost prohibitive). I experimented on an extra guide piece from the tower build to see if I could create straight lines, but abandoned this attempt, and opted to just paint the door burnt umber and hand-painted two black bands to match the etched bands on the front. But that was just painting, and not a source of any difficulty— that would be the “bits.”
The Difficult “Bits”
 |
The brackets clamped for repairs and repainting. :-(
I also chose to paint the two front wall halves near the
arches, as I was concerned the bare wood might show later. |
The problem lies in the nature of laser-etched MDF. As the pieces for the hinges and the bar brackets are small, Sally 4th left them intact within a small square of MDF, with instructions to punch them out for assembly. Unfortunately, these pieces didn’t “punch.” I had painted both sides first because it seemed like an easier step than trying to paint each individually. It’s possible that the paint added to my woes, but in any case the hinge parts and the brackets weren’t cut all the way through; I tried trimming with an X-acto blade, but the pieces still split along the plane of the MDF when I tried to remove them from the MDF piece. I had to glue the pieces together, which produced less than stellar results.
It Hinges on the Hinges
 |
The hinges with the pins in place.
Note that they can't be glue into
the walls already pinned.
(I found that out the hard way.)
But you can see how they fit.
(Click on the image to enlarge.) |
Later, when it came time to add the hinge pieces to the door, I found that the pieces were thicker than the gaps between the pieces; this meant I had to sand down the hinge parts (ruining my “quick and easy” paint job). Rather than hunt out some sandpaper, I just used a handy fingernail file. Fortunately, the area sanded was the interior of the hinge, which will mostly hidden from view.
 |
The "arch" hinges glued to the wall.
(Click on the image to enlarge.) |
The size of the hinges at 10mm scale also proved tricky. Although the set came with four black straight pins (two extra) to act as the hinge pins, lining up the hinge parts for the pin was no easy task. First I had to use the smallest bit of my pin vice to clear the holes intended for the pin (these too had not been cut all the way through). After that, it was trial and error to line up the parts, especially once the arch hinge parts were glued to the gateway wall piece.
(The instructions, by the way, are incorrect about the number of hinge parts. There are 3 “d” hinge parts for each door half, and 4 “arch” hinge parts for each door half.)
Hanging the Doors
 |
| The doors "hung" in place. |
 |
The doors inside the "archway".
Note how they actually hang back
from the walls. (Click to enlarge.) |
I was a little thrown by how the door fits into the gate arch. I had assumed that it would be flush with at least one gate wall, but from what I can tell, it’s meant to hang somewhat suspended in the middle of the gate. That seems a bit odd, and the instructions don’t say one way or the other, but this position is the only way I could see the design working due to the design of the hinges. At least, it’s how I wound up installing the doors. On the tabletop it looks fine— the doors appear to be set back inside the gatehouse, though if you pick up the gatehouse and peer closely, you can see the gap between the wall and the door.
I suspect that part of the problem is that, if you follow the instructions and the photos, you wind up with the hinge pins on the exterior side of the door— that is, the side that would face the enemy! It’s possible that I might have installed these parts incorrectly, though I tried to follow the image included with the instructions.
A Pain in the Brackets
Lastly, I found the bar brackets to be equally as difficult to work with. Like the hinge parts, these also split when removed from the MDF square. I glued and clamped them back together, but then discovered that they’re too large to fit into the intended holes on the door halves. I finally resorted to whittling off the posts to fit and painting them black.
To Beam or Not To Beam
 |
The doors opened as fully as they will go.
Note the bar brackets in place (whew!).
View is from the inside of the gateway. |
The set includes a beam to bar the door, which I only realized when I had installed the bar brackets. At first I thought this small piece of wood was merely an extra bit of scrap. But as it is, whether due to the design or the fact that I had to trim the bar brackets to fit them into the doors, and the beam was too wide to slip in the space. I filed and filed away at the fit, certain at any moment I would snap the beam. That didn’t happen, but then I also gave up on creating a strip slim enough to fit the brackets (and still be removed). I might just substitute a flat toothpick instead, if I want to bother with the bar.
Fling the Gates, Uhm, Narrow
After all this work, it turns out that the doors won’t open fully perpendicular to the wall; they strike the inner archway at about 45°. As a result, the gap between the open doors is smaller than the narrow edge of a Warmaster base. Of course, this is not a factor in play (one simply rules that a stand can fit either way in the arch), and not really a big deal in appearance— just don’t expect to “fling the gates wide.”
Assembling the Gatehouse
The rest of the gatehouse assembled very much similar to the walls. Note that the doors need to be built in before the final assembly, and plan accordingly. This means you should paint or prime the interior walls before installing the doors, or you’ll face some interesting painting headaches. Although I had taken this step, I discovered I had failed to paint the long exterior trim piece, and had sprayed the incorrect side of one wall edge after I assembled the piece. But since these were exterior surfaces, I simply masked off the doors and sprayed away.
FINAL THOUGHTS
 |
A fortress, manned (or elved) and ready!
You will see that each tower easily holds an entire Warmaster unit, as do the walls.
Bring on the orc hordes! |
The towers and walls are versatile pieces, and very easy to build. The gateway probably has more detail than is really needed with the hinge assembly and the bar brackets, especially given the effort I had to trim, paint and install them. But once it’s all together, the set makes for a great fortress, suitable for fantasy, medieval or even some ancients settings. Historical purists may not like the significant overhang created by the tower battlements, or the small buttress pieces on the walls and gates, but this is not intended to be a replica of any specific building. Rather it is a playable fortress which can support the base width and depth of Warmaster units (as well as other basing systems). For that purpose, I think it is an excellent choice. I would recommend to casual modelers that you consider skipping the intricate hinge work and opt for just gluing the gates in place, or glueing them to a simple base stand (perhaps the guide pieces from the tower) so they can be removed when “opened” or “battered down” during play. I will say, that despite the problems I had with the hingers and brackets, I still very much appreciate the quality of this product. Whatever headaches these caused, it’s still a terrific looking piece, and I’m quite happy with my purchase.
Sally 4th has also just announced a 10mm Norman Keep that will work with this set; it’s on my list (hint, hint).
WHERE TO FIND THE FORTRESS
Sally 4th sells a wide range of laser cut MDF products for 10mm, 15mm and 28mm scales. They can be ordered direct from the UK, but they now have a US distributor through Scale Creep Miniatures. I’ve purchased products from Mark, the owner of Scale Creep, both in person and on line, so I’ll vouch for his excellent service and prompt delivery. Plus, he’s just a great guy. Order with confidence!
Sally 4th's website
--- Parzival


 Although the instructions don’t call for it, since the upper interior of the tower forms a room that is visible when the battlement is removed, I decided to paint the interior parts before assembly. Since I have four towers to build, I primed all four tower sets at the same time. As the floor and doors would also be permanent once installed, I painted them as well, using a slightly thinned acrylic craft paint (Delta Ceramcoat Burnt Umber). Although Burnt Umber is a very dark brown pigment, the paint absorbed partially into the MDF, which ended up producing a “stained wood” effect that I quite liked.
 If you look closely at the photo, you might notice that the battlement floor (or tower roof) has a series of small square holes around the edges. These are not construction elements, so I gather they represent drain holes as a real fortress might use for boiling oil! (Or, in more mundane times, rain gutters.) You may notice that one of these is not punched. I had several such elements in my various parts, but found that slight pressure with a small pointed tool popped them out with no fuss (I used a golf tee I had handy).


That's a fantastic work, the walls are looking great!
ReplyDeleteA great review and some very useful information. I will be getting one of these for sure.
ReplyDelete