Showing posts with label painting. Show all posts

Monday, December 2, 2024

Ogres to the left of me, ogres to the right…

After being “stuck in the middle” for a bit, I have completed another round of HeroQuest painting. This time I took on the Against the Ogre Horde expansion pack, which, unsurprisingly, consists largely of ogres. It does have a few other elements, including two new Druid figures (a little more Celtic-looking (and realistically dressed) than the Mythic Tier set’s “Earth girl” druid).

Please keep in mind that I paint to an arm’s length get-‘em-on-the-table standard. With that out of the way…


The Little People, and some Ogre Stuff.

For starters, here are the non-ogre elements. In the rear, some nifty vertical doors, some stone monoliths (or maybe doors… I haven’t checked the text yet to know), and a stone throne (with comfy cave-bear skin through— or maybe it’s an owlbear— those could be feathers…).

Our cast includes a goblin “archer” (though she appears to be lobbing a lit grenade!), the Druids’ wolf companion, the Druids (female and male), and another goblin “archer” (with a boomerang… not exactly a dungeon weapon…). Behind these are some skeleton archers.


“About FACE!”

Shake, rattle and roll!

Next up we have two “ogre warriors.” Growl for the camera, lads!
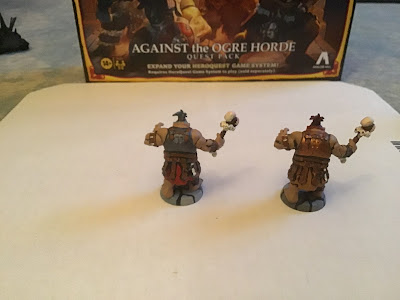

Ya’ know what they say: Some people are just better walkin’ away…

And we’ll follow with two “ogre mercenaries” (who appear to have migrated from a hockey game?), and a bunch of just plain ogres (armed sensibly with axes), the latter of which are actually from the Mage of the Mirror expansion set, but were painted on the principle of “get ‘em all done.”


A penalty box period just waitin’ ta happen.

Backside shuffle. Maybe they were offsides?


Next we have the “Ogre Commander” and the “Ogre Champion”— and yes, they are much larger than our previous runway walkers.


Not what you want to meet in a dark dungeon…

Whew… they’re moving off!

Finally we have the “Ogre Lord,” an impressive fellow with a suitably, uh, “noble” bearing, and… wait, what’s that in the background?


“I want you in the Ogre Horde! For dinner!”

“I see my Mary Ann walkin’ awaaaaay…”


Okay, intruder, you’ve made your point, but your paint job ain’t done. Back to the table with you! And save the nukes for the post-apocalyptic future wasteland.


(These AIs are gonna be a problem— ask any gamer from the ‘80s!)


Well, I’ve got loads more painting to do. But I’ll sign off with wishes for a Merry Christmas to all of y’all!


— Parzival

Tuesday, February 1, 2022

My Latest Adventure: Painting the New HeroQuest Figures!

 In this blog I've shared some of my miniatures painting efforts. Up until now, I've worked almost solely with 10mm fantasy figures. It's an easy scale, as block colors and a dark general wash are sufficient to produce decent results on the tabletop. I've honestly been reluctant to attempt larger fantasy figures out of concern that I'm not skilled enough as a painter to produce decent results. But I've begun playing this game with friends over a Discord video channel, and since part of the charm of HeroQuest rises from the miniatures and scenic pieces. After two games with bare figures, I want to surprise my gaming buddies with some gaming eye candy. So I decided to face my fears, take up my paintbrush, and enter the painting dungeon... 

Did I succeed in my quest? I'll let you be the judge— no, wait, I won't. This ain't a contest. I wanted to produce a look that was GETGW— Good Enough To Game With— and I wanted to GEOTT— Get 'Em On The Table. With "arms length quality" as my goal, I knew I wouldn't be doing much in the way of highlights or shading. But I figured I could indeed pull off that quality.

Here are my results. 


Our heroes assemble for inspection!

This better be the only time you show 'em your backsides!

Skeletons, zombies and mummies— oh my!


A torture rack, a vile altar, and surely that's just a statue in the middle, right?

Oh no! Not the comfy chair!
Plus a nice weapons rack (or a rack of nice weapons) and an Alchemist's table.
Gulp— I hope that's just red ink...


Two bookshelves for perusing, and a cupboard.
I'm sure there's nothing dangerous lurking in there.


These dread creatures are still "orcs" in process.


A dungeon of color!

For the above images, while you can peruse them closeup, that's not the effect I was going for— these figures are intended to be viewed while seated at a table, or about arm's length, which is honestly how I recommend anyone approach painting miniatures. Yes, on the 'Net you will see gorgeously painted figures with subtle shading, highlights, and faux lighting effects done with paint— and if you've got that kind of talent, more power to you. But to my fellow "I just want to play" gamers, don't be afraid to just do what works for you. My approach was to come up with a few key colors and stick with those. I think I did fairly well. Good enough for me, anyway!

I've still got more to paint (I bought the Mythic Tier set, which has a LOT of figures— plus there are all those bloomin' doors (literally blooming-- for some reason they're all sculpted with vines growing on 'em. In a dungeon underground with no sunlight. I may just ignore those...

In any case, I hope you enjoy the eye candy.

-- Parzival, aka Howard Shirley

Thursday, December 24, 2020

Pandemic Painting

Greetings fellow lockdown-cabin-fever sufferers! 

Well, I finally realized that I could use all this externally imposed downtime to tackle the lead pile. Painting is not my favorite element of this hobby— I like to have painted more than I like to paint. But it can pass the time, especially when watching this bizarre sports season, where I only half-pay attention to which NFL/College team which I don't root for beat up some other NFL/College team I don't root for either. Great for painting, or at least getting hobby stuff done.

So far, this is what's happened before my brushes surrendered to chaos:


These are all 10mm scale, mostly Copplestone Castings' fantasy line, with one Games Workshop 10mm Dwarf Archer unit from their OOP Battle of Five Armies line on the far right, between the cavalry and a unit of spearmen.

The units are, from left to right, starting with the front row:

Half-orcs (Uruk-hai) with Swords (three units), Half-orcs (Uruk-hai) with Spears (two units), Horse Tribe Horse Archers

Rangers (Dunedain or Ithilien, take your pick)

Horse Tribe Foot Archers (two units), Dwarf Archers (one unit)

Horse Tribe Infantry (three units)

The half-orcs currently have bare bases because I'm going to use sand for their "ground" rather than grass, and I don't have any sand in the house. Though I admit the basic black look is growing on me. Hey, they're Saruman's Army, so the whole black thing works for them.

I'll post more detailed closeups of each in the future, but for now not a bad little painting run (for me, anyway).

--- Parzival, the Wargamesmonger

Wednesday, August 20, 2014

Space Rocks!

Yep. Been silent here lately. But it's been the deep, dark silence of space!

(Okay, not really. But it makes a good segue.)

Because my biggest current gaming obsession continues to be Star Wars: X-Wing from Fantasy Flight Games.

If you've bought the Core Rules boxed set (and if you haven't, good heavens, what galaxy have you been in?), then you know the game comes with six beautifully illustrated asteroid tokens which you punch out and scatter about your gaming space to create obstacles for your dogfights. (Nasty, annoying, frustrating obstacles, that is.)

BUT as lovely as these tokens are, something is lacking in the visual experience. Your spacefighters are sculpted and painted miniatures of high quality, mounted on posts to soar above your tabletop... and the asteroids they are crashing into are flat bits or cardboard laying flat on the surface. 2D versus 3D, and the third dimension demands to be served.

ROCK YOUR (SPACE) WORLD

Never fear, fellow space travellers, the Force is with you. Creating a terrific alternative is cheap and easy.
Now, that's a space rock!

All you need are:

The tokens from the game.

One golf tee per token (a mix of long, medium and short will be best).

One "lava rock" per token.

A small drill and masonry bit.

Glue. (Elmer's or white craft glue is fine for this.)

Flat black primer spray paint.

Dark gray, light gray, and flat black acrylic craft paint (sold at stores like Michael's, JoAnn's, Hobby Lobby, or whatever they call craft and art stores in your arm of the galaxy.)

Some cheap small paint brushes you care nothing about.

Water (distilled water is best, but tap water should be fine if you don't have too high a mineral content on your planet).

"Lava rock" are those red bits of volcanic rock sold at do-it-yourself home improvement stores as garden decor and "grilling rocks" for gas grills. This stuff is dirt cheap, but is often sold in big bags weighing several pounds (or a few kilograms, if your droids only interpret metric units). You can either buddy up with a lot of friends, give the excess to your favorite grill cook, or surprise your sweetie with a decorative flower bed. "Honest, honey, I just wanted to do it for you."  (Alternatively, you can just ask your local supplier if they'll let you have a handful of rocks. Mine gave me around a dozen at no charge.)

STEP 1: Drill holes about the diameter of the golf tee shafts in the center of your rocks. Try not to drill all the way through. NOTE: This makes a good bit of fine, red dust, so be prepared.
TIP: Only use a masonry drill bit. The rock will destroy drill bits meant for wood. Masonry bits are cheap, and who knows— maybe you'll need to use 'em for something else.

STEP 2: Glue the golf tees into the holes in the rocks. (Just spread the glue on the tee and jam that puppy in there as tightly as you can.) Let dry.

STEP 3: Glue the "heads" of the golf tees onto the center of the asteroid tokens. Yes, this will be permanent. Suck it up, soldier! TIP: Orient the rocks to try to match the general orientation of the tokens' shapes, and be certain to center things as well as you can so the token acts as a steady base.

STEP 4: Spray the entire assembly with flat black primer paint. The rock will absorb the paint, so you may need to make several coats. Yes, you will be completely covering the illustrated image on the token with paint (Remember what I said about sucking it up?). If you can't deal with that, spray the rocks and tees assembly before gluing on the tokens. It'll look weird, but you can do it that way.
Let the paint dry.

STEP 5: Dip a paint brush in the dark gray craft paint, then wipe it off until only a small amount remains on the brush; the less you leave, the lighter and more realistic the results. Rub the brush vigorously across the lava rock. This will leave gray paint on the raised surfaces, but not in the recessed areas. This is called "dry brushing." You can be a bit more generous with the dark gray paint, as you're going to create highlights with the lighter paint next. Continue to paint until you think you have a good contrast between the high bits of the rock and the darker black elsewhere.

STEP 6: Dry brush with the light gray paint, this time with a little less vigor. The point is to add a highlight effect to the most raised parts of the rock. Note that all this dry brushing will mangle your paint brush. That's why you use a cheap one.
Let the paint dry.

STEP 7: Mix a little black craft paint with water. You want a very watery paint that is still black. Using another brush, slap this paint into any deep recesses in the rocks; it's okay if a little gets on the highlighted areas; it will mostly run off. Again, the rock my absorb this, so you may have to make more than one coat. This step is called a wash, and the point is to create a deep shadow effect in the holes in the lava rock.
Let dry.

Stand up on the bases, and you're done! (You can spray everything with a protective clear matte sealant if you wish, but it's not necessary.)
Rocks in Spaaaaaaccccceeeeeeeeeeee!!!!!

This method produces gray asteroids. You can use browns and tans if you want other colors. Experiment with a lava rock before you go whole hog, to make certain you like the effect.

USING THE ROCKS

The treacherous asteroids of the Great Blue Nebula of Willstabul!
Note nifty new ships: The E-wing, the Z-95 Headhunters,
the TIE Defender and the TIE Phantom.
Also, one old TIE fighter that got dragged in as blaster fodder...
In the game, the same rules still apply. The area covered by the asteroid is the area of its base, not the lava rock (just as the space occupied by a spacecraft in the game is defined by its base, not the miniature). This rule makes things considerably simpler, as the maneuver templates have as much to do with determining a collision as the fighter bases do.

You don't have to be a great painter to do this, and the whole thing can be accomplished in a single afternoon.
If you want more asteroids, either get another Core Set for bases (and more ships), or trace the bases on a piece of stiff plastic or masonite and cut out with a jigsaw.

Hope you enjoy this little tutorial. Stick around for more, because next I'm gonna be dealing with monsters... the King of All Monsters, in fact!

Sunday, December 15, 2013

The Royal Guard of the Golden Hall

Led by that bold warrior Hama, the Royal Guard ably defends King Theoden, body and soul (despite Hama’s gullibility regarding elderly gentlemen with walking sticks).
Summon the guard for arming day!

Now the paintbrush of yours truly has brought these brave men to life, in the form of Copplestone Castings’ “Horse Tribe Royal Cavalry,” another bit of excellent sculpting work from their 10mm fantasy “not Lord of the Rings” line.

I won’t go into a detailed account of painting these, as the process is essentially the same as the Horse Tribe Cavalry I painted in my last post, so I’ll just list the colors from this round and go straight to the pretty pictures.

Almost done— time to do the "washing", and then paint and flock the bases.
Horses: Bays (Burnt Sienna), Light Bays (Light Cinnamon), Brown (Milk Chocolate), Roan (Gray), Tan “Palomino” (Honey Brown).
Manes and Tails are Black, Dark Brown, and French Vanilla (Palomino) with a Dark Brown wash.

Tunics, Tackle and Scabbards: Russet (Wine)

Armor and Weapons: Gunmetal

Helms: Gunmetal and Bright Gold

Stirrups, Greaves (yes, they have greaves), Stirrups, Hilts, Shield Bosses, Shield Rims: Bright Gold

Cloaks & Shields: Hunter Green (“Evergreen”), with Golden Yellow cloak hems. (“King’s Gold”)

Gloves: Golden Brown

Hair: French Vanilla with a Dark Brown wash and Spice Brown.

Helm Crests: French Vanilla with a Dark Brown wash.

Hooves are Black, lance shafts are Dark Brown.

All minis have a black wash except over the French Vanilla portions, where black can produce a greenish tint (little known fact: “Black” pigment in paint is actually a very, very (very, very, very) dark blue. I learned this in my college Stage Design class, and now I plan my shading accordingly).

Guard to the right!
(Note: flag has artwork that got washed out by the flash.)

Guard, to the left, in echelon!
(Banner is from Toshach Miniatures' free Horse Tribes decals download.)


SOUND THE CHARGE!

That’s about it— again, this was a very quick project with roughly a two-day turn around. I’m getting faster!

More To Come...


The Rohirrim continue to muster...

The Horsemen of Rohan (so far).
L to R: Cavalry, Royal Cavalry, Cavalry, Horse Archers

Tuesday, December 10, 2013

The Muster of Rohan: Painting Copplestone Casting’s Horse Tribe Cavalry

Sound the Horn— It's Painting Season! 

My painting set up: Ikea tray, old mug, block of styrofoam to hold the brushes.
The blue and green stands are "photo holders" I found in Target's bargain aisle. 

This season has become catch-up time with a number of my projects, so I thought I’d share another one of my latest efforts. The figures are from my growing collection of 10mm fantasy figures for the Warmaster game system. The project in question is a long-term one of gaming battles from The Lord of the Rings, one of my favorites being the Battle of Helm’s Deep between the forces of the Rohirrim and Saruman’s fearsome Uruk-hai. Fortunately for fans of Tolkien’s works (and Peter Jackson’s films), Copplestone Castings in the UK has a terrific, if small, “generic” high fantasy line. His stand-ins for Rohan are the “Horse Tribes,” and like Tolkien and PJ, they’re very clearly based on a mix of Anglo-Saxon England with a dash of Post-Roman Britain (indeed, they’d be strong contenders for the latter).

In my earlier posts, I had images of one unit of Copplestone’s Horse Tribe Cavalry, and another of the Horse Archers, which represent the heavy cavalry and missile cavalry depicted in the books and films. Copplestone also has Horse Tribe Infantry and Foot Archer units, so the line offers a well-rounded selection for a Rohirrim army, including the infantry actions which dominate the Battle of Helm’s Deep in both novel and film. While the foot soldiers are in my painting pile, I had a unit of cavalry already primed, so I thought I’d give it a go one weekend and share the results with my readers.

Note: Click on the pictures to see a closeup!


Color Choice and Paints

I don’t go for the big name miniature paints. I’m certain they’re quite good, and worth every penny, but I don’t have a lot of pennies to put towards the hobby. Instead, I opt for the much cheaper craft paints sold at hobby chain stores like Michael’s and Jo Ann’s. They work for me, and I’ve found most of them cover even black primer with a single coat. Brighter colors like reds and yellows may take more coats, but as I said, this stuff is dirt cheap, especially with the coupons the retailers send out.

For Rohan, I take the movie images as my cue. While the most obvious choice is the very dominant hunter green used in the films, other colors also stand out, including a deep golden yellow and a burgundy or russet color. I like to have some differentiation in my units so it’s easier to define which is which in the midst of a battle— especially as Warmaster battles can quickly become mass melees involving multiple units! Also, as the Rohirrim are more of feudal militia or levy than a standing force, I feel their attire would not be a national uniform, but rather a reflection of each units home region (such as the Westfold, etc.). As my last cavalry unit was traditional Rohan hunter green, I decided to opt for a different “Rohan” color for this unit, and chose russet or deep maroon as the dominant hue. For the remaining bits, I decided to keep the hunter green in the mix for bits of tunic and/or saddle blankets, and left the rest as the metal or natural leather suited for these smaller details.


Getting Started

I operate on an in-to-out approach with painting 10mm figures, meaning I start with the “innermost” layer of a figure and work outward, rather like someone putting on clothes. So this meant painting skin, or in this case, faces. For this I use a very pale Coral craft paint. (I prefer to use this straight out of the bottle with elves; with men and dwarves I might actually paint a thin layer of red first, which will bleed through the lighter coral to produce a ruddier complexion. In this case, I knew so little of the flesh would be seen that I didn’t bother with that.)

With the units primed in black, it’s hard to pick out which details are face and which are beard or helmet. But as skin is the first layer, any overlaps would get covered by darker colors as the miniature “gets dressed,” so if my dabs got too big, it didn’t matter.


Grooming the Horses

Faces, horseflesh and metal finished (not counting touch-ups).

After the faces, I decided that the ponies needed some grooming, so I painted their skins next. Again, I like a little subtle variety in the look of the horses, and try to capture a natural color scheme. People often think of horses as being primarily brown, but in truth the dominant color is the classic “bay,” which tends towards a reddish tone. So my choices of color for the horses were Burnt Sienna (a deep reddish brown), Milk Chocolate (a mid-level brown) and Light Cinnamon (another mid-level brown hue, also with a slight red tint). I like the command horse to stand out a bit, and this time I opted for a “roan,” horse, which is a shade of grey with black elements rather than white.

Although in larger scales, horses are notoriously tricky to paint realistically, at the 10mm size a straight color works fine, especially if you follow up with a dark wash afterwards. So my little force got 5 bays, 4 chestnuts, 3 light browns, and the commander’s striking roan.


Arms and Armor (and Other Shiny Bits)

Closeup of horses: Light Brown, Grey Roan, Bay (Burnt Sienna).

After the horse flesh, I opted to arm and cloth the men. The chainmail is an easy paint, almost a dry-brush approach with a Gunmetal shade (a dark grey metallic paint). This is a very dark paint that is hard to see against the black, so it’s okay if you get a bit more than the typical dry-brushing expects, especially as 10mm is really meant for arms-length or birds-eye viewing— you want to see a block of metal; a black wash will help create the texture of it.

The Copplestone helms are terrifically detailed, with crest rims, nose guards, and chin guards. They also vary from figure to figure, which fits the levy nature of the Rohirrim’s muster. Just a dab of gold metallic paint on the various helm features creates a great look. 

I also hit the horse’s bridle rings and the stirrups with the gunmetal paint, except for the commander who got a bit of gold bling with his tackle. Spear points, sword blade and shield bosses are also Gunmetal, though again the commander gets the gold treatment on his shield boss. Sword hilts and scabbard tops get gold dabs as well.

Later, I realized that the horses also have headpieces above their foreheads, and these would eventually be gold as well (though gunmetal would have been fine. Maybe the commander of this regiment has a thing for shiny stuff...). I would also come back later and add spur bands of gold on the men’s boots (again, I hadn’t noticed this detail yet).


Tunics and Cloaks

Cloaks and banner.

With the metal done (mostly), I went with cloth next. Starting with the green, I painted tunics and/or saddle blankets. I decided not to give all the saddle blankets or tunics the same color, in part because some of the men don’t have cloaks, so I need to confine their tunics to the russet color, and again, I didn’t want a “uniform” feel.
Green done (two coats of Evergreen, as it’s very dark and needs to be built up so as not to appear black), I pulled out the russet, which was actually a Wine paint. This took three coats, especially on the wide cloaks.


Bit and Bridle (and Other Leather Stuff)

Closeup of cloaks, shields and tunics. Color is "Wine."
You can also see the tackle, gloves, scabbards and other bits.
Only the lance shafts, hooves, manes and touch-ups remain.

Next I hit the tackle, using a Golden Brown camel color. I also used this for the riders’ hands. Although this is a bright color, it makes for a good contrast against the darker horse flesh. While in a larger scale model that might seem odd, in 10mm scale you want as much contrast as you can get so that the details still “pop” out once the figures are moving about the tabletop. 10mm scale, after all, is about grand spectacle and immediate troop recognition rather than the subtleties of light and shadow. Plus, once a dark wash is done at the end, the tackle color subdues to a deeper tan, which looks nicely realistic, even up close. I did have some painting error here and there, but I always come back to the horseflesh with a touch up coat, so I knew I would cover these slips. I also hit the straps of the bedrolls with this color, as well as the stirrup straps and a few of the saddle blankets, the latter to again avoid the “uniform” effect.

Pulling out some Spice Brown (a mid-to-dark brown), I hit the blanket rolls, pants, scabbards, belts and boots of the riders. Dark Brown (only slightly darker than Spice) serves as the lance shafts.


Grooming the Men and Manes

Done with clothing and accoutrements, I hit the men’s hair and beards with either brown (I think spice in this case), or French Vanilla, which produces an easy bright “Scandinavian” blonde effect, fitting of Tolkien’s Rohirrim. The horse's manes and tails are either black or dark brown (the roanI painted black, but the others I varied, just as real horses vary in their coloring).


Final Touch-up and a Quick Wash

After that, it was all touch-up, covering up mistakes or picking out details that now could be seen. I also gave a few of the horses white "socks" and "blazes" for a little more character.

Main painting done. Painting the bases and preparing the wash.

After giving the bases a quick slap of flat black paint, I used the same paint to create a shading wash. Others may use a precise mix, but I confess to the quick and easy method— a just add drops of distilled water to the paint to make it thin and runny, then slap it on the figure. I used the same brush to gently flick away pools of paint (as on the shields and cloaks) and dabbed with a paper towel if too much watery paint puddled into the space in the chest and lap area of the riders. This method isn’t perfect, and I wound up not entirely happy with the cloaks (though from a distance they look fine), but it’s definitely easy, and the horse tackle, horse muscle and armor bits gained definition, while the overly vibrant tackle bits were muted. (I asked my lovely bride’s opinion, because I wasn’t happy with the cloaks. She’s not a gamer, and has no real opinion of my “little men” (except that she doesn’t like “the ugly ones,” meaning the orcs). But she had seen the figures before the wash, in their vibrant state, and felt the washed tones were more realistic. I’m not going to argue with her!)


Behold the Warriors of the Westfold!


All told, this project took me three days of painting, though only for a couple of hours each day (largely while half-watching football games). For me, that’s the fastest I’ve ever completed any single unit.

So there’s hope yet that I will reach my goal of a playable Helm’s Deep force in a reasonable time frame. And then, on to the Pelennor Fields. ;-).


--- Parzival of TMP