Showing posts with label Risk. Show all posts

Thursday, January 2, 2020

I Resolve To Conquer Europe (well, on a tabletop).

Happy New Year, or, I Resolve to Conquer Europe


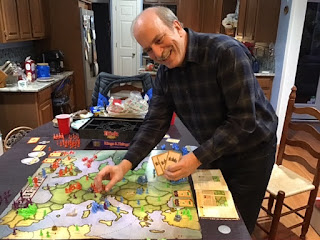
Welcome to a New Year and the return of my blog! To kick off 2020 A.D., a few gaming buddies and I decided to go back a thousand years or so to those giddy, happy days of 1020 A.D. (or thereabouts) and do what everybody did back then to celebrate the turning of the year— conquer their neighbors! (Hey, when you don’t have fireworks, you gotta find another way to make some noise.)

Our game of choice this evening: Risk: Europe.

Ooo! Flaming catapults! (Actual fire not included.)
This game entered my collection a couple of years ago, but this was the first time it made it to our tabletop. I had only ever read the rules, so none of us had any experience with the game. This evening would be a baptism in fire for everyone!

Europe On One Silver Coin a Day
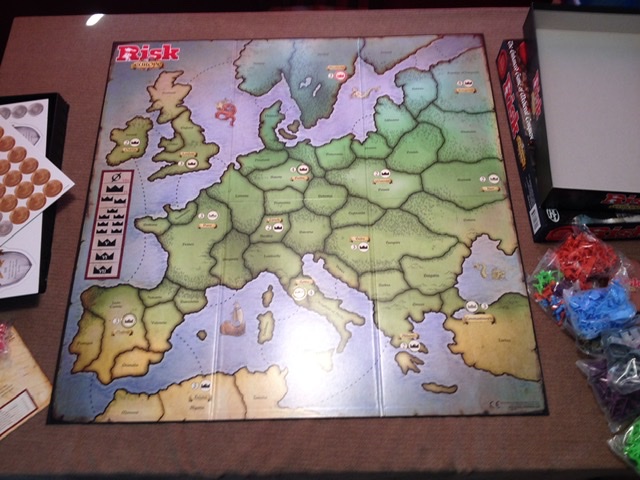
Medieval Europe, or a Reasonable Facsimile Thereof 


It’s time for a lightning tour of Europe. As you can see, the map lists various medieval kingdoms and fiefdoms, as well as the standard dashed-line “sea lanes.” New to Risk gamers will be the cities (indicated by a white circle with a crown) and capitals (white circle with shiny gold border and gold crown). Each city also shows a number, ranging from 2 to 4. You will note there are no “continents”, nor the classic “continent bonus” chart. Instead there is a chart showing various numbers of crowns, and Roman numerals ranging from V to VII, then in red VIII to X. Curious, indeed!
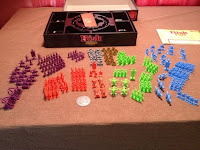
The armies of Europe. Plus crowns.
Also included are a number of plastic gold crowns (equal to the number of cities), a silver plastic First Player token, some gray plastic castles, cardboard silver and gold coins, several cardboard shields bearing the name of each of the capitals and some special text, a deck of cards, and a lot of dice— more than your typical Risk game. But what stands out are the inhabitants of this medieval world— rather than the typical Risk game where all the forces are identical figures, these differ not only in color, but with designs unique to each color. The figures represent a (somewhat fanciful) military force from the Middle Ages, divided into Footmen, Archers, Cavalry, and Siege Engines.

As may be evident, Risk: Europe is a considerable departure from the Risk franchise. Although conquest is indeed part of the game, commanding the entire map isn’t the goal, nor is it even likely. Everything from units to turn decisions to combat are substantially changed from anything Risk players are used to—which of course alters strategies in radical ways.
Siege Engine awesomeness, from left to right: The mighty catapult, the powerful sling trebuchet, the deadly spear-throwing ballista, and... three guys with a log.

It’s All About the Crowns, Baby

The goal of Risk: Europe isn’t to conquer the world— it’s to acquire crowns. The first player to collect seven crowns and hold them at the end of a round (more on that in a moment) wins the game. You collect crowns by conquering cities and capitals, but you may also purchase the crowns (in the basic game), or achieve crowns by completing secret “Kingdom Missions” (in the advanced game). So the objectives to your goal are two-fold— claim cities and/or amass coins to purchase crowns. But there’s more to it than that.

The Medieval Round

The game is divided into rounds, during which each player issues two orders (and only two orders). Each player will issue one order, one at a time, going around the table. Doing this twice around the table is a round. At the end of the round if any battles are possible, these are resolved. At that point if a player holds 7 or more crowns, the game is over.

Your Orders, My Liege?

The orders are not a simple set of options as in standard Risk; you do not simply place forces and decide where and when to attack. Instead, each player has a deck of 8 cards with specific orders written on each card. The orders on the cards are divided into two choices. For example, a card may read “Tax” on the top half and “Spend” on the bottom. When the card is played, the player may choose to do only one of these orders— either tax his cities to collect coins, or spend his coins for troops, castles, or crowns; he cannot do both. Some of the cards also contain special actions that occur no matter which choice is made. Each round begins with all of the players secretly selecting two order cards to use and placing these on the table face down. The top card will contain a player’s first order of the round, the bottom card the second. Once the cards are played and the order chosen, the cards are discarded, leaving the player with two fewer cards to choose from, and so on. Once all cards are discarded (equaling four rounds), the players begin again with their full decks.

The cards control troop movements, and limit them as well. At most a player will only ever be in a position to attack four territories in a single round, and that only if they play two specific cards back to back (and there are only two of these cards in each deck).  Also, since two cards (and thus two orders) will be played by every player before any battles are resolved, it’s possible that a player could reinforce his army in a disputed territory before the battle happens. Keeping track of which cards your opponents have played is an important strategic element in the game!

As a result of these cards, a player will be forced to decide if and when he will collect coins, if and when he will buy forces (and which ones), and if and when he will advance against the enemy or reinforce threatened territories— you may end up able to do any two of these in a round, but never all of them, and as cards are used, some actions will no longer be available until the decks reset.

First Rank...Volley!

Combat takes a distinct change from Risk in that the actual unit types matter— they aren’t stand-ins for amounts, but behave as the troop types they actually are, to a limited degree. (This is somewhat similar to the classic MB/Eagle Games Conquest of the Empire.) In Risk: Europe combat is broken down into four “Ranks,” which occur in order. First, Siege Engines get an attack, forcing the opponent to remove troops for all hits rolled (for a Siege Engine, any result of 3 or better on each die rolled). Then Archers attack, followed by Cavalry. A player may only use such troops as are in the specific battle— for example, if Green has no Archers in the battle, he does nothing during the Archer Rank action, except potentially lose troops. Once all three of these attacks occur, all of the forces (including those which just attacked) are counted up, and a final general attack is rolled using the same dice rules as standard Risk (in this instance all of the units participate, even if they attacked as part of a previous Rank). Then the Ranks begin again, the entire procedure continuing until one side or the other (or even possibly both) are eliminated from the territory— that’s right there are no retreats in Risk: Europe! It’s do or die for your troops!
Castles allow for the defender in the territory to re-roll any and all Rank results— but the defender must re-roll all the dice, including successful hits, and replace these with the second roll results, even if worse. (So if you have one hit and two misses, do you re-roll all three in hopes of getting more hits, at the risk of having none, or keep your single hit?)

Not-Risk Risk

You will note that unlike standard Risk:
  • There are no territory cards. None at all.
  • The game will not begin with all territories occupied. In fact, most territories will likely never be occupied in the game.
  • There are no bonus continent/region reinforcements, or per territory reinforcements. In fact, the number of territories controlled is irrelevant to the number of troops in play. Only cities and capitals matter, as they can be taxed for coins.
  • An entire round can go by with no one attacking anyone, but expansion and maneuvering still occurring.
  • Engaging in battle is deadly. You either win, or you lose all your men in the battle— that’s right, all of them. No retreat, no surrender, and no quarter!

In Which Our Heroes Play Game 1, or, Whoa, That Was Fast

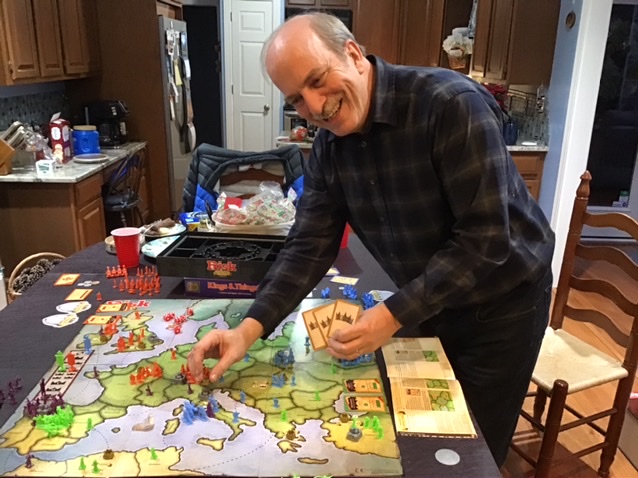
My Opposition: Caleb, Christian, and Mr. Blurry.
So, after one round, no combat, but...
Money to spend = Money to win
After a quick overview of the rules, we stuck right in. Each of us collected our forces, picked widely separated capitals, and went at it. Only, we never actually went at it. Instead, we slowly and cautiously advanced into unclaimed territories, adding forces and collecting coins. After two rounds, Caleb noticed what I had not— that I was destined to win. All I needed to do was buy two crowns. No one was adjacent to my crown territories, and therefore could not claim them from me. And though that had not been my plan, my second card in that round was indeed a Spend order. I bought the crowns, gaining seven, and the game ended with no combat of any sort having happened!

Once More, With Feeling, or, The Long(ish) Game


Once more into the breach!

Actual combat! Hooray!
Wiser now to these strategic quirks, we quickly regathered our forces from the board and began another game. This time around there was considerable combat, plus some wheeling and dealing— no matter the variations, Risk will always have that! Will and I started off slapping each other around in the east (though I suffered the brunt of that), while Caleb advanced in Spain and France, and even claiming Rome (which is worth two crowns). Christian amassed forces in Britain, surging into a land campaign across the channel which brought him Zurich. Desperate to recover from my losses in the east, I proposed a truce with Will, encouraging him to assault Caleb’s purple Saracens in Rome while I sent a massive force into Madrid. This was a mistake. I failed to realize that Will’s capture of Rome would throw the victory to him. I did notice that Christian bordered Will’s weakly defended hold on Berlin, and assumed Christian would see this and attack there as well. But I failed to voice this, not wanting to alert Will to the danger. Alas, there was no danger— Christian was content to sit on Zurich. Will seized the Papal fiefdom and claimed the crowns of Rome— and with them, victory. All hail William the First, Holy Roman Emperor! 

Hail Good King Will!

Worth the Coin?

While we did have fun, our two plays ended with the jury undecided. Overall we enjoyed the game, but none of us really had a good feel for how it would play out over the long haul. Our play went very slowly, taking more time than was truly necessary to resolved each round. But I believe that had more to do with our unfamiliarity with the rules. We just weren’t quite certain how to proceed, which left a lot of musing over card and order choice. I suspect as we grow more confident in our understanding of how the game works, the play will be quicker and more dramatic. It’s clear that this is a game where the fun comes when you take risks worthy of the game’s name. However, it allows for play that is cautious and even non-combative, which can be a dull way to go about things. Still, we’re all willing to give it another go, and that’s a good sign.

Final assessment: An interesting— if not entirely Risk-like— variation on Risk. The thematic flavor is spot on and the components are largely well done (the cardboard coins are a bit boring, but the figures and their variety make up for that). The combat system may be my favorite element— having the troops act as what they represent is an enjoyable twist on the classic Risk approach to battles, and “feels right” in a medieval setting. I also thought that the limited maneuver and expansion choices fit the history of warfare in the Middle Ages, as did the brutal battle results!
Although the game claims to be for 2 to 4 players, with 4 players we still found it a little too easy to avoid conflict (as evidenced in Game 1). There are rule adjustments for fewer players (one neutral force becomes “mercenaries”), but I think the full 4 -player complement is probably the best bet for an enjoyable game, provided players lean a little more toward aggressive action than combat avoidance.
Overall, this hasn’t leaped to the top of my favored Risk variants. However, that reaction may be more because in so many ways this game is really not Risk, but something different. I do look forward to seeing how that difference plays out as it hits the tabletop again.

Until my next entry, Happy New Year, and Happy Gaming!


Parzival, the Wargamesmonger

Sunday, April 6, 2014

A Legacy of War!

Once again my gaming group assembled for an evening of warfare, and this time we stepped away from our recent obsession with a galaxy far, far away, and instead went with an alternate Earth— in this case, that alternate Earth is the premise behind Hasbro’s Risk: Legacy. Rather than the standard Earth of classic Risk, the setting is a parallel Earth. After centuries of global warfare (most beginning in Australia, it appears), Earth’s scientists have discovered a method of transporting people (and their weapons) to alternate, uninhabited, duplicate Earths. In Risk: Legacy, you lead one of five factions attempting to colonize this new Earth and avoid the past of the old Earth. Naturally, you ignore that latter noble sentiment and begin whacking on your neighbors as soon as your forces arrive on the new planet. It’s the simple things that make us human, after all.

Q: So, how does this world work?
A: Very well.
The Generals, L-R: Yours Truly, Michael, Will, Chase
Taking photo: "Warlord Jim"


 So, If It’s the Same Map, How Is Anything Different?


Yes, if you look at the map, this is the exact same layout as classic Risk (with a handy sea-link to note that, yes, the Middle East is connected to East Africa). And your forces are the same in that one troop figure=one “army” (or “battalion” or whatever) and a tank (or some other impressive military device) is equal to three armies, and so forth. No change there, and no change in the combat rules of three dice vs. two dice, ties to defender, etc.. If you’ve played Risk, you’re familiar with all that.

What makes this game different is that the game changes as you play. And, the kicker is, it changes permanently. Depending on what happens and what you choose to do, you alter the map with stickers and even pen and ink— and those changes are in effect the next time you play. You may even wind up altering the rules or (gulp) destroying components as you continue to play! On top of this, how those changes are applied will be different for any group who plays the game. Once the game has been played just one time, that map and the assorted elements will be unique to that copy of the game. My group’s experience with Risk: Legacy will be different from your group’s experience of the game, and grow even more different each time we play ours or you play yours.

If you’re the type who likes to repeat gaming experiences in exactitude, or view a game as a pristine work of art, you’re going to have a conniption fit about this game. My advice: get over it.

The Grand Opening: Welcome to Earth You


The Legacy box is unique among Risk games from the start. It has a carrying handle, making it like a cardboard briefcase, and bears a tape seal reading: Note: What’s done can never be undone. Yes, that’s intimidating, but it also has a nice challenge aspect to it— as if to say, “Don’t open this unless you have what it takes to handle this.” Okay, maybe that’s a bit over-the-top for a board game, but it sets the mood for getting into the whole premise of the game, right from the start. My group very much approved.
The Founding Fathers sign in.
I think America began this way...

When we opened the box, we were first faced with the back of the game board, and upon that another label and another challenge: We, the undersigned, take responsibility for the wars that are about to start, the decisions we will make, and the history we will write. Everything that is going to happen is going to happen because of us. (Cue Billy Joel: We Didn’t Start the Fire…)
We would not be dismayed. We signed in blood! (Okay, not really. Will found a cheap ink pen, and we all used that.) Note that Jim got a little bit of a big-head and gave himself a title— “Warlord.” Right, Jim. Dream on, buddy.

Beneath that board were a series of five large “Faction” cards naming the groups we could lead, a sticker sheet containing cities, fortifications and more, a large cardboard side board to track the card decks, a bunch of punch-out missile tokens, a bunch of punch out Red Star tokens, Territory Cards, Coin Cards, Scar Cards (with Scar stickers) and Faction special abilities cards (with special abilities stickers), five bags of the different factional army miniatures (each faction has figures unique to that faction in both design and color), dice, and the rulebook— and bunch of sealed envelopes and compartments with different instructions printed upon them, like “Open when all 9 Minor Cities have been founded,” and “Open the first time a faction is eliminated from the game,” and so on. Very tempting, these sealed bits, but per the game instructions we left them alone. We’ll find out what happens if and when it happens.

The cards are a bit flimsier than most board games, but in part that’s because certain events may cause you to literally destroy a card— yep, tear it up and throw it away. (Some of you are screaming “NO! I CAN’T! I WON’T! YOU CAN’T MAKE ME!” Trust me, it’s not that big of a deal. Not that we’ve had to do it yet…) Otherwise, the components are good quality and the art work is excellent— and for those of you who care about such things, the board does have the dreaded “American valley.” Not of much concern to us, and it doesn’t really affect anything except aesthetics. We did like that each of the factions had unique figures, as well as unique HQ markers, all sculpted to match the fluff for each faction.

Time to Face the Strange Ch-ch-ch-changes


The first difference in Risk: Legacy is that the faction you choose in the game is your faction for the remaining games— a full 15 game campaign, in fact. So pick the flavor that you like, or accept what fate decides to deal. We did the latter, but declared that swaps were allowed if someone preferred.
We then assumed command of the factions as follows:

Chase Fleming— Imperial Balkania (think Edwardian Britain and Star Wars’ Imperial Guard.)
Michael Fleming— Die Mechaniker  (we think that should be pronounced “dee me-kahn-ick-ur”, but it will be far more fun to shout, “Die, Mechaniker!” when attacking him.)
Will Sensing— Enclave of the Bear (looks like a cross between Braveheart and Conan the Barbarian)
Howard Shirley (yours truly)— Saharan Republic (Mad Max-style super models with heavily armed dune buggies, and a hint of Dune’s Fremen warriors. Works for me!)
“Warlord” (snicker) Jim Weaver— Khan Industries (yes, I did shout “KHHHHAAAAAAANNNNNN!!!!” when reading about them.)

And with that, the first component change begins, as you select one of two possible faction powers, listed on stickers, and affix them to your Faction card. Your faction will now have this special ability throughout the remainder of your wars in the world of Risk: Legacy. (To quote the old Crusader, “Choose wisely.”)

Each player then receives a “Scar” Card. These cards hold stickers that at any point in the game can be played to alter a territory on the board, for good or ill. Once altered, that territory remains altered for all future games. If you scar it, it’s scarred for life. The starting Scars consist of Bunkers (which give a territory a permanent bonus on defense, regardless of who holds it) and Ammo Shortages (which give a territory a permanent penalty on defense, regardless of who holds it). We suspect other Scars are in the sealed envelopes, but don’t know yet. We’ll find out…

Next comes another component change. Resource Cards containing “Coins” are used to purchase extra troops during the beginning of a player’s turn. This takes the place of the “three of a kind” card rules from classic Risk. It allows you to turn in much quicker, as the lowest turn in value is 2 coins for 2 armies, but it also limits the sizes of the armies you’re likely to be able to afford. The more coins, the more armies. Also, Coin Cards and Territory Cards are together counted as Resource Cards. Turn in four of these, regardless of coin value, and you can purchase a Red Star token (needed for victory). So the strategy here is whether to turn in or to save for a Red Star token, or to sacrifice a high-coin-value card as one of the four for that token (you don’t get “change”). The game comes with each Territory Card equal to one Coin in value— but before the first game, you must select up to twelve Territory Cards and give them additional coins, increasing the value of the card and the strategic importance of the associated territory (more on this later). You can decide how this is done in any manner your group chooses. We shuffled the Coin and Territory cards together (they have identical backs) and dealt out four groups of three cards, assigning each group three coin stickers. If a Territory card was part of a group, it got a coin sticker. If the group had one or more Coin cards, any Territory cards with it received the extra stickers. We did rule that at least one territory card had to be from each of the seven continents to get a coin before any duplicate continent territories could get a coin, preventing Asia from getting too many valuable cards.

With these changes permanently done, we began the game.

Winning At Some Cost

Winner takes all... well, or at least some...


In addition to the Scar Cards, during your first game each player starts with a Red Star token. The object of the game is not to eliminate all the opponents (though you can win that way), but to collect four Red Star Tokens, or a combination of tokens and faction HQs. Each faction HQ is worth a Red Star for whomever holds the territory the HQ is in. Yes, you can capture an enemy HQ. Once placed on the board, it remains on the board for the game (but can change starting locations in other games). It has no attack or defense value and does not count towards a defender’s troops. If the last defending troop is lost in an HQ territory, the attacker moves in and gains control of the territory and the HQ. So you don’t have to buy Red Stars to win— you can simply (ha!) conquer three other HQs (and hold your own) to win the game.

Collecting Resource Cards is slightly different than in regular Risk. You do have to conquer enemy territories to gain a card, but you only gain a Territory card if you control a territory that matches one of four Territory cards which are face up on the deck tracking board. If this is the case, and if you’ve conquered any territory on the board (not just an exposed one) you may select the matching exposed Territory card for your hand (if you control more than one match, you pick the matching card you want). If you don’t hold a matching territory, you draw a Coin card. In the latter case, if no Coin cards are available, you don’t get any resources. Sorry, general.

The game begins largely with an expansion phase. Unlike normal Risk, all your forces begin on a single starting territory (of your choice), and you only begin with 8 troops. In the first turn you can expand into adjacent empty territories. Although it was a little unclear, we ruled that you could only expand into empty territories immediately adjacent to your controlled territories at the start of the turn. That might have been wrong, but it seemed to follow the rules which stated that eliminated factions could return to the game through unoccupied territories— which we figured couldn’t happen if everyone suddenly expanded everywhere in the first turn. Attacking troops, however, could “steamroller” on as in classic Risk.

Our game quickly became divided by continents. Will established the Enclave of the Bear in Australia, and nobody opted to begin in Asia to block him. Instead, Chase claimed South America, Jim started in the frozen north of North America, I opted for the climes of Africa (seemed to fit my faction, after all), and Michael fittingly established his vaguely German “Die Mechaniker” troops right in the middle of Europe (Germany, in fact).

I decided to move quickly, wishing to grab leads early. Chase had moved into Northern Africa from Brazil, so I slapped him out, and, overextending myself unwisely (as it turned out) I drove north into Europe, claiming the Die Mechaniker HQ. I had a Bunker Scar Card, which I thought would help me hold off any counter attack.

Meanwhile, Jim quickly claimed all of North America and established a truce with Michael “for three turns” between Greenland and Iceland, and proceeded to enter Asia, where Will was quietly expanding uncontested.

Chase responded to my efforts by charging back across the Atlantic from Brazil. I bunkered North Africa (our first scar!), but even with the advantage, I still lost the territory. Meanwhile, Die Mechaniker proved that desert babes with dune buggies don’t belong in Europe, and trashed me out of his HQ, scarred Egypt with an Ammo Shortage, and kicked me back towards southern Africa. He then established a truce with Chase, and I thought my goose was cooked. I began egging Jim on to attack Chase in South America.

At first, Jim seemed content to kick Will around Asia, plucking up territories. Michael left him alone, as promised, but both were building up bits and pieces on the Iceland/Greenland border. Truces are uneasy things, after all. Chase ignored both of these other threats, and hammered me down to one lousy army left defending my HQ. Just when I thought we’d be opening the “faction eliminated” envelope in our very first game, my dice turned lucky— my one army held on against four assaults by Chase! As I was celebrating this moral victory, Jim finally considered my communiques, and poured into South America, claiming Chase’s HQ… and I began to worry that maybe I’d traded the Brazilian piranha for a Great White Shark.

But Michael at this point made his play. He began by giving up four Resource Cards, buying the first Red Star token purchased in the game. He then piled his forces upon Iceland, overwhelming Jim’s Greenland wall, and surging across to face the lone trooper who thought he’d pulled easy duty standing outside the HQ… till a bunch of German mechas came marching across the tundra. The Khan HQ fell, and “Master Michael ‘Lucky’” claimed the win and the first war.

But Wait, That’s Not All!

The New World Has Begun.
In addition to winning bragging rights, Michael got to sign the board and, out of a number of options offered in the rules, chose to rename North America into “Mikeburia,” inscribing that name permanently upon the map. (Not sure what I think of living in “The United States of Mikeburia.” Mikeburia, the Beautiful… nope, that does *not* work for me.) For future games, if Michael manages to claim the continent of North America Mikeburia, he and he alone gains an additional bonus army. “Die, Mechaniker!” indeed.

The rest of us at least got the lovely consolation prizes of founding and naming a Minor City. (Minor cities gain small bonuses when calculating additional troops at the start of a turn.) Placing stickers once again on the board, we carefully chose the names their citizens would forever revere. Thus the towns of Chaseburg and Sensingville (Will’s) naturally appeared. I, in honor of the spirited defense of my HQ, dubbed my metropolis Holdonburg (as “Hold on! Hold on!” was how I admonished my troops during those desperate hours). Jim, however, chose to commemorate the feeble and fickle nature of diplomacy, dubbing Greenland forever after as “Villain’s Pass”. (In retrospect, I think this was a rules flub, as I believe you had to actually hold the territory to found a city in it, but “what’s done can never be undone.” And it was funny.)

The World Has Changed Forever

And thus begin the annals of our wars. A quick consult of the rules reveal that our next game will already have different rules because of completing the first one… and what changes will our later conflicts provoke? Only time and the vagaries of war can tell.

I for one, can’t wait to find out.

Sunday, February 17, 2013

Risk of the Rings


Well, it has turned out to be unexpectedly quite the gaming weekend for the Wargamesmonger. Friday morning I received an e-mail from my buddy Michael, asking if the lad and I were available for an impromptu game night.

Why even ask the question?

So we bundled ourselves and a selection of games over to Michael’s Haven of Hospitality (basement den) and proceeded to choose a favorite for an evening of strategy, tactics, and inevitably bad dice rolling.

The choice of the evening? One of my favorites: Risk: The Lord of the Rings, Trilogy Edition— based, of course, on the noted novel and the Oscar-winning film trilogy. This game is perfectly suited for a four-player evening of conquest, and is far more than just Risk with a pretty wrapping (though that wrapping is terrific).


The Beginning of the Beginning of Middle-Earth.
Left to right: Alexander (Sauron), Michael (Michaelfindel) and Chase (Saruman)

Rules of the One Ring

I won’t go over the rules of Risk again— this game has been a wargaming staple so long it needs no introduction. However, The Lord of the Rings edition is a truly variant game, with special rules of its own that go beyond just the gorgeous map of Middle-Earth. A quick summary:


  • The game is played in teams, 2 “Good” players versus 2 “Evil” players.
  • Every army has two Leaders at the start of the game. Leaders add 1 to their side’s highest die roll in combat (assuming the Leader is in the warring territory), and allow you to gain special cards and achieve special missions during play.
  • The game has a deck of Adventure Cards that trigger special events, allow players to take special actions (like attacking through normally impassable barriers), or give extra troops to certain “Sites of Power” territories (like “Edoras” or “Weathertop,” etc.). They also boost victory points at the end of the game.
  • Ports allow for sea-born attacks between connected ports.
  • Certain territories have “Strongholds” that add one to the highest defense die roll when that territory is attacked. Stronghold and Leader bonuses add together, so a +2 advantage is possible (and darn hard to beat).
  • The One Ring is a token in the game that serves as a randomly progressing game clock. It moves from Hobbiton to Mount Doom, following the path of the Fellowship. The game ends when the Ring is successfully cast into Mount Doom (a die roll).
  • Card combination bonus troops are set at a flat rate rather than an escalating progression. The rates are 4, 6, 8 or 10 armies, depending on the specific combination turned in.

The changes are fairly simple, but they add a great deal of variety and twists to the game, and the best strategy prepares for these twists (as will be seen).

Hasbro offers the rules as a free download.  (This link is directly to the PDF, so expect a download and a bit of a wait).


The battle for Middle-Earth begins...

Good vs. Not As Good

The boys both clamored to be the “bad guys” (what is it with teenagers?), while the two dads joined forces as defenders of all that is “good and green in the world.” We set aside our armies and divided the board up. The initial deployment is determined according to “Good” and “Evil” status— 16 Good territories are randomly assigned to the two Good players, 16 “Evil” territories to the two Evil players, and the remaining “neutral” territories are done through the “take turns picking one” method. From there it was a matter of piling our starting armies about, and then the great War of the Ring began.

Michaelfindel (gold armies) would be first, followed by Chase (red armies— think “Saruman”), then myself (“King Howarden” green) and last Alexander (black— think “Sauron”).

A play by play of a Risk game isn’t likely to be worth reading, so I’ll stick with highlights.


The War Begins

We opened with fighting to secure the two extremes of the world (like that never happens in any Risk game). Rather than South America and Australia, this fight would be over Rhûn (northeast bonus region) and the Haradwaith (southeast bonus region). Mordor was going to be solidly Sauron’s almost from the start— Alexander had black over nearly the whole thing, and the only other spaces were held by his ally, Chase (red). Meanwhile, the central areas of Mirkwood and Rohan would be contested largely by yours truly (green), while my ally Michael (gold) held the majority of Arnor.

Early moves saw Saruman-Chase (red) claiming Rhûn and Harad, but he never managed to hold either long enough to collect a bonus, thanks to constant attacks by Michaelfindel, who also quickly established control over Arnor for the 7 point bonus, and kept Sauron-Alexander from gaining control over the Eriador bonus region in the northwest.


Rhûn falls to Saruman, but Michaelfindel holds Arnor.
I managed to claim most of the Rohan bonus region which would likely fall on my next turn, and my ally broke into the Haradwaith, inflicting severe harm on Saruman-Chase. I managed to follow up by driving the forces of evil out of Mirkwood the Great, gaining yet another bonus region. Michael and I openly discussed using my forces in Rohan to break Sauron-Alexander in Mithlond via the sea route, putting his Eriador forces between the golden hammer and a green anvil.

Alas, that plan would never come to be...


Rohan rising— only Minhiriath and the port blocks my path.
Oh, and there are some goblins in Moria. Nobody worries about them.

“They Have a Cave Troll”


Thinking ourselves secure in Arnor and Rohan, and assuming that Saruman-Chase would contest us primarily for Harad and Ithilien, where his armies and leaders were, Michaelfindel and I had unwisely ignored the goblin stronghold of Moria, leaving only token defenses near it. Saruman-Chase saw our folly, and poured out of the curséd depths of Khazad-dûm with a terrifying army— they did indeed have a cave troll in Moria. (And a ringwraith!) Bursting through Eregion, Chase broke Michaelfindel’s hold on Arnor and shattered my feeble forces in Rohan, claiming even the sea port of Minhiriath, and eliminating my leader there!
Unholy Balrogs! Where did those orcs come from? Oh... right. Moria.
 Things looked bleak indeed as a great shadow spread across the realm of Middle-Earth. The Valar were with the Free People, however— Saruman-Chase drew the event card “The Mustering of Middle-Earth,” which ended up adding battalions to lands held by Michaelfindel and yours truly. Quoth the sage Michaelfindel: “You kicked our butt, and then you put a bandaid on it.” 

Resisting the Shadow

Minas Tirith and Mirkwood are both in peril!
Though set back, the will of the Free Peoples remained indomitable. Though I surged back in Rohan, I could not take it nor protect it. Fortunately, I still held the great forest of Mirkwood, and built up the southern woodlands to defend against a certain break-out by Mordor. 


Angmar sneak attacks the Carrock! Hold, elf, hold!
 But Sauron-Alexander was far craftier, and countered by cutting across Arnor instead, and laying down a “The Way is Under the Mountains” card from within the realm of Angmar to assault my lone battalion in Carrock! If he succeeded, my bonus in Mirkwood would be lost... 
Angmar is foiled!
So in the forgotten realm of the Carrock, one lone elf looked up to see the orc hordes emerge from hidden tunnels beneath the Misty Mountains. Undaunted, he raised his bow, and took aim... and stood his ground! The orcs could not break him, and Mirkwood remained free.

The Return of Some Relative of Isildur (or Someone Important Like That)

Sailing into Gondor. Didn't somebody else do this once?
The relief of both the North and South fell upon Michaelfindel (Isildur’s Heir’s Second Cousin’s Third Great-Nephew, Twice Removed). He began by driving Sauron-Alexander’s forces completely out of the North, seizing Eriador, and also driving Saruman-Chase out of western Rohan, also blocking the bridge across the Wold as added security (“None Shall Pass” card). In the South, he drove up into Gondor, putting pressure on Saruman-Chase in an effort to lift the siege of Minas Tirith, alas to no avail. Minas Tirith fell to Saruman-Chase’s forces, who drove up into Rohan— but could not reach either Arnor or Mirkwood. But the Dead Marshes were teeming with orcs, and Mordor looked strong...


The North is free (or at least cheap)! But look at Mordor...

Saruman makes his move...

The Scouring of Mordor

... but the Rohirrim and Elves had done some recruiting! Amassing every troop I could muster (and I mustered quite a few), I went all out, slamming directly into the hordes on the Dead Marshes. They could not withstand the charge of the Rohirrim, and broke. The way lay open into the Black Gate, and I took it, storming through Mordor with wrath and fury, claiming the heights of Mount Doom, the fortress of Minas Morgul, and even Sauron’s great dark tower of Barad-dûr (where I repeatedly poked a stick in the eye of Sauron— because I could). Only the fields of Nurn remained in Sauron’s hands—‘twas a furious battle, but Sauron-Alexander’s lone orc proved that he could be as feisty as an elf on the Carrock, and held his ground. Mordor was not yet done...


Minas Tirith avenged! But what's that white stuff?!?

Last Stands

Sauron-Alexander turned in, gaining ten battalions for his orcs in Nurn, and seized the Gorgoroth plains. But once again, the Valar had intervened— winter storms had struck, and the Udun Vale, which had not known any covering but the ashes of Mount Doom, lay waist-deep in pure, white snow— a more formidable obstacle than any gate built by men, elves, dwarves or orcs. With no path to break out, Sauron-Alexander bided his time, marshaling further forces.

Michaelfindel contemplates his move.
Behind him, Sauron tries to generate power for a hair dryer to melt the snow.
Michaelfindel turned his focus on Saruman-Chase. With ample recruits, and facing a divided enemy, Michaelfindel split his forces into the realms of Haradwaith and Gondor. Marching north up the great river Anduin, Michaelfindel struck the red orcs with unmatched resolve, retaking Osgiliath, Minas Tirith, the Gap of Rohan and finally breaking Saruman-Chase from the stronghold of Isengard. The orcs were also driven from fair Ithilien— only the distant Haradrim Encampment survived his onslaught.
The Haradrim could do no damage, however, and the final act would fall to yours truly.


Saruman's last grasp. His arm has grown very, very... short.
And Sauron's hair dryer scheme doesn't appear to be working.
 Intelligences suggested that Sauron-Alexander had access to many hidden forces (he held a large hand of territory cards, and he and Chase were openly discussing his next move). Fortunately, I too had discovered a Way Under the Mountains— and this time the lone orc in Nurn could not withstand my onslaught from Minas Morgul. The forces on the Plains of Gorgoroth proved otherwise— I could not crack them, and Sauron-Alexander laughed with glee.... but he had not accounted for two small hobbits.

Dang, those are tough orcs— but who's that climbing up the volcano?
It ain't Edmund Hillary...

Throw It in or Jump in with It— We're Not Picky!

 The One Ring had reached Mount Doom. Would Frodo succeed in his quest? Or would Sauron have his moment of revenge? Every eye watched as I lifted the lone die to the top of the Tower of Fate...
Clatter...
clatter...
clatter...
...thunk.
6.
The game was over— the One Ring perished in the fires of Mount Doom, and the shadow was banished from Middle-Earth with the gentle blow of the West wind.

The Ring is consumed by the fires of Mount Doom— Middle-Earth is free!
(Note Sauron's cards in Chase's hands— doom was at hand, if not for Frodo.) 

FINAL NOTES

It was a great evening and a fun game. Even the boys enjoyed it down to the end, despite the slaughter of their forces. Perhaps a little more building and a little less rampaging on their part might have turned the tide in their favor, but the dice rolling really hit them hard at the last.

This remains one of my favorite Risk variants, and not just because of the setting. The cards give the game unexpected moments that keep the end from seeming inevitable. I also like the team-play aspect— it does eliminate the wheeling and dealing of the classic Risk game, but the open plotting of strategy fills the void and keeps the interaction strong. (You can, of course, play the game without teams, still using the Adventure Cards, and keeping the scheming in place, if you prefer).

Alas, the game itself is Out of Production, which is a shame. If you don’t have a copy, you’ll probably not find one cheaply. Be aware that there are actually two versions— the “Conquest of Middle-Earth” version released after the first movie, which plays the same but has only a partial map and fewer Adventure Cards— and the Trilogy Edition, which you see in the photos. Hasbro did release an expansion set for the first version, so ask if the seller has that, if you cannot find the final edition.
Hopefully Hasbro will re-release it or a Hobbit-themed edition as the new movies come about. In the meantime, if you can get a copy, do so.
But you’ll not get mine...

Okay, I'm really not *that* obsessed.
Really.
Despite what my wife says.
:-)

Thanks for reading!