Thursday, January 2, 2020

I Resolve To Conquer Europe (well, on a tabletop).

Happy New Year, or, I Resolve to Conquer Europe


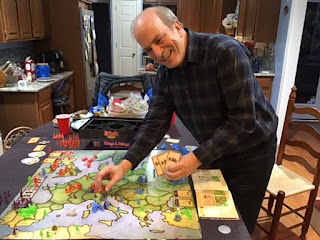
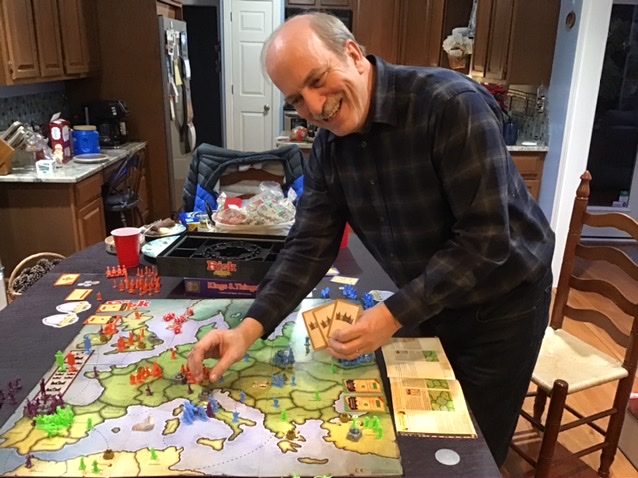
Welcome to a New Year and the return of my blog! To kick off 2020 A.D., a few gaming buddies and I decided to go back a thousand years or so to those giddy, happy days of 1020 A.D. (or thereabouts) and do what everybody did back then to celebrate the turning of the year— conquer their neighbors! (Hey, when you don’t have fireworks, you gotta find another way to make some noise.)

Our game of choice this evening: Risk: Europe.

Ooo! Flaming catapults! (Actual fire not included.)
This game entered my collection a couple of years ago, but this was the first time it made it to our tabletop. I had only ever read the rules, so none of us had any experience with the game. This evening would be a baptism in fire for everyone!

Europe On One Silver Coin a Day
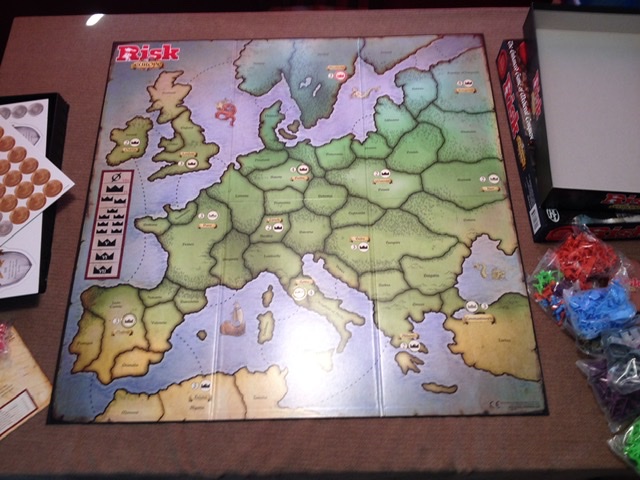
Medieval Europe, or a Reasonable Facsimile Thereof 


It’s time for a lightning tour of Europe. As you can see, the map lists various medieval kingdoms and fiefdoms, as well as the standard dashed-line “sea lanes.” New to Risk gamers will be the cities (indicated by a white circle with a crown) and capitals (white circle with shiny gold border and gold crown). Each city also shows a number, ranging from 2 to 4. You will note there are no “continents”, nor the classic “continent bonus” chart. Instead there is a chart showing various numbers of crowns, and Roman numerals ranging from V to VII, then in red VIII to X. Curious, indeed!
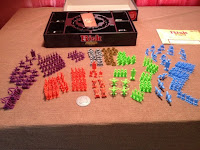
The armies of Europe. Plus crowns.
Also included are a number of plastic gold crowns (equal to the number of cities), a silver plastic First Player token, some gray plastic castles, cardboard silver and gold coins, several cardboard shields bearing the name of each of the capitals and some special text, a deck of cards, and a lot of dice— more than your typical Risk game. But what stands out are the inhabitants of this medieval world— rather than the typical Risk game where all the forces are identical figures, these differ not only in color, but with designs unique to each color. The figures represent a (somewhat fanciful) military force from the Middle Ages, divided into Footmen, Archers, Cavalry, and Siege Engines.

As may be evident, Risk: Europe is a considerable departure from the Risk franchise. Although conquest is indeed part of the game, commanding the entire map isn’t the goal, nor is it even likely. Everything from units to turn decisions to combat are substantially changed from anything Risk players are used to—which of course alters strategies in radical ways.
Siege Engine awesomeness, from left to right: The mighty catapult, the powerful sling trebuchet, the deadly spear-throwing ballista, and... three guys with a log.

It’s All About the Crowns, Baby

The goal of Risk: Europe isn’t to conquer the world— it’s to acquire crowns. The first player to collect seven crowns and hold them at the end of a round (more on that in a moment) wins the game. You collect crowns by conquering cities and capitals, but you may also purchase the crowns (in the basic game), or achieve crowns by completing secret “Kingdom Missions” (in the advanced game). So the objectives to your goal are two-fold— claim cities and/or amass coins to purchase crowns. But there’s more to it than that.

The Medieval Round

The game is divided into rounds, during which each player issues two orders (and only two orders). Each player will issue one order, one at a time, going around the table. Doing this twice around the table is a round. At the end of the round if any battles are possible, these are resolved. At that point if a player holds 7 or more crowns, the game is over.

Your Orders, My Liege?

The orders are not a simple set of options as in standard Risk; you do not simply place forces and decide where and when to attack. Instead, each player has a deck of 8 cards with specific orders written on each card. The orders on the cards are divided into two choices. For example, a card may read “Tax” on the top half and “Spend” on the bottom. When the card is played, the player may choose to do only one of these orders— either tax his cities to collect coins, or spend his coins for troops, castles, or crowns; he cannot do both. Some of the cards also contain special actions that occur no matter which choice is made. Each round begins with all of the players secretly selecting two order cards to use and placing these on the table face down. The top card will contain a player’s first order of the round, the bottom card the second. Once the cards are played and the order chosen, the cards are discarded, leaving the player with two fewer cards to choose from, and so on. Once all cards are discarded (equaling four rounds), the players begin again with their full decks.

The cards control troop movements, and limit them as well. At most a player will only ever be in a position to attack four territories in a single round, and that only if they play two specific cards back to back (and there are only two of these cards in each deck).  Also, since two cards (and thus two orders) will be played by every player before any battles are resolved, it’s possible that a player could reinforce his army in a disputed territory before the battle happens. Keeping track of which cards your opponents have played is an important strategic element in the game!

As a result of these cards, a player will be forced to decide if and when he will collect coins, if and when he will buy forces (and which ones), and if and when he will advance against the enemy or reinforce threatened territories— you may end up able to do any two of these in a round, but never all of them, and as cards are used, some actions will no longer be available until the decks reset.

First Rank...Volley!

Combat takes a distinct change from Risk in that the actual unit types matter— they aren’t stand-ins for amounts, but behave as the troop types they actually are, to a limited degree. (This is somewhat similar to the classic MB/Eagle Games Conquest of the Empire.) In Risk: Europe combat is broken down into four “Ranks,” which occur in order. First, Siege Engines get an attack, forcing the opponent to remove troops for all hits rolled (for a Siege Engine, any result of 3 or better on each die rolled). Then Archers attack, followed by Cavalry. A player may only use such troops as are in the specific battle— for example, if Green has no Archers in the battle, he does nothing during the Archer Rank action, except potentially lose troops. Once all three of these attacks occur, all of the forces (including those which just attacked) are counted up, and a final general attack is rolled using the same dice rules as standard Risk (in this instance all of the units participate, even if they attacked as part of a previous Rank). Then the Ranks begin again, the entire procedure continuing until one side or the other (or even possibly both) are eliminated from the territory— that’s right there are no retreats in Risk: Europe! It’s do or die for your troops!
Castles allow for the defender in the territory to re-roll any and all Rank results— but the defender must re-roll all the dice, including successful hits, and replace these with the second roll results, even if worse. (So if you have one hit and two misses, do you re-roll all three in hopes of getting more hits, at the risk of having none, or keep your single hit?)

Not-Risk Risk

You will note that unlike standard Risk:
  • There are no territory cards. None at all.
  • The game will not begin with all territories occupied. In fact, most territories will likely never be occupied in the game.
  • There are no bonus continent/region reinforcements, or per territory reinforcements. In fact, the number of territories controlled is irrelevant to the number of troops in play. Only cities and capitals matter, as they can be taxed for coins.
  • An entire round can go by with no one attacking anyone, but expansion and maneuvering still occurring.
  • Engaging in battle is deadly. You either win, or you lose all your men in the battle— that’s right, all of them. No retreat, no surrender, and no quarter!

In Which Our Heroes Play Game 1, or, Whoa, That Was Fast

My Opposition: Caleb, Christian, and Mr. Blurry.
So, after one round, no combat, but...
Money to spend = Money to win
After a quick overview of the rules, we stuck right in. Each of us collected our forces, picked widely separated capitals, and went at it. Only, we never actually went at it. Instead, we slowly and cautiously advanced into unclaimed territories, adding forces and collecting coins. After two rounds, Caleb noticed what I had not— that I was destined to win. All I needed to do was buy two crowns. No one was adjacent to my crown territories, and therefore could not claim them from me. And though that had not been my plan, my second card in that round was indeed a Spend order. I bought the crowns, gaining seven, and the game ended with no combat of any sort having happened!

Once More, With Feeling, or, The Long(ish) Game


Once more into the breach!

Actual combat! Hooray!
Wiser now to these strategic quirks, we quickly regathered our forces from the board and began another game. This time around there was considerable combat, plus some wheeling and dealing— no matter the variations, Risk will always have that! Will and I started off slapping each other around in the east (though I suffered the brunt of that), while Caleb advanced in Spain and France, and even claiming Rome (which is worth two crowns). Christian amassed forces in Britain, surging into a land campaign across the channel which brought him Zurich. Desperate to recover from my losses in the east, I proposed a truce with Will, encouraging him to assault Caleb’s purple Saracens in Rome while I sent a massive force into Madrid. This was a mistake. I failed to realize that Will’s capture of Rome would throw the victory to him. I did notice that Christian bordered Will’s weakly defended hold on Berlin, and assumed Christian would see this and attack there as well. But I failed to voice this, not wanting to alert Will to the danger. Alas, there was no danger— Christian was content to sit on Zurich. Will seized the Papal fiefdom and claimed the crowns of Rome— and with them, victory. All hail William the First, Holy Roman Emperor! 

Hail Good King Will!

Worth the Coin?

While we did have fun, our two plays ended with the jury undecided. Overall we enjoyed the game, but none of us really had a good feel for how it would play out over the long haul. Our play went very slowly, taking more time than was truly necessary to resolved each round. But I believe that had more to do with our unfamiliarity with the rules. We just weren’t quite certain how to proceed, which left a lot of musing over card and order choice. I suspect as we grow more confident in our understanding of how the game works, the play will be quicker and more dramatic. It’s clear that this is a game where the fun comes when you take risks worthy of the game’s name. However, it allows for play that is cautious and even non-combative, which can be a dull way to go about things. Still, we’re all willing to give it another go, and that’s a good sign.

Final assessment: An interesting— if not entirely Risk-like— variation on Risk. The thematic flavor is spot on and the components are largely well done (the cardboard coins are a bit boring, but the figures and their variety make up for that). The combat system may be my favorite element— having the troops act as what they represent is an enjoyable twist on the classic Risk approach to battles, and “feels right” in a medieval setting. I also thought that the limited maneuver and expansion choices fit the history of warfare in the Middle Ages, as did the brutal battle results!
Although the game claims to be for 2 to 4 players, with 4 players we still found it a little too easy to avoid conflict (as evidenced in Game 1). There are rule adjustments for fewer players (one neutral force becomes “mercenaries”), but I think the full 4 -player complement is probably the best bet for an enjoyable game, provided players lean a little more toward aggressive action than combat avoidance.
Overall, this hasn’t leaped to the top of my favored Risk variants. However, that reaction may be more because in so many ways this game is really not Risk, but something different. I do look forward to seeing how that difference plays out as it hits the tabletop again.

Until my next entry, Happy New Year, and Happy Gaming!


Parzival, the Wargamesmonger

Friday, September 28, 2018

How To Make a Dog Fly

So, after reading about the daring exploits of the World War One Flying Ace, I know you are clamoring with questions:

“Did you make that?”
“Can I get one?”
“Does he have all his shots?”

Well, I’m pretty sure you don’t have to worry about rabies from this dog, so we’ll let that last one go (and the nice men in the white coats will be along to assist you shortly).

But for the other two, the answers can be (mostly) found here!

Answer One: “Sort of.”

Answer Two: “Probably.”

Here’s how it all came to be.

I was strolling with the lovely bride through our local Walgreens, checking out the clearance possibilities in their toy aisle, when this little beauty caught my eye.

 Normally I’m not into kitsch collectibles, but I knew a Wings of War/Glory night was coming up, and this just screamed “BUY ME! CHANGE ME! HELP ME SHOOT DOWN PLANES!” The clearance sticker also screamed “$0.87”!

No self-respecting Wings of War player can pass up a potential flying Snoopy for under a buck.
And even I couldn’t resist.

Home Snoopy came (reference intended), bravely preparing for the essential surgery that would change his future forever.

I pulled out my array of miniature crafting tools, and looked at the rivet structure bolting the wheel chassis and hot-rod engine parts to the bottom of the doghouse. Of the objects at my command, well, actually none were truly suited for the job. But I began by thinking “If I drill out the center of the rivet, it might just pop off.” So I grabbed the pin vise and the largest bit for it and drilled away.

And drilled away.

And drilled away.

And noticed that my thumb hurt.

And noticed that I needed a bigger drill.

So I pulled out my massive, battery powered power drill, put in a bit that matched the size of the rivet head, locked Snoopy in a clamp (for his safety and mine), but bit to metal, pressed the trigger...and the battery died.

So I transferred the bigger bit to the pin vise (it barely fit), and drilled away.
And drilled away.

And noticed that my thumb really hurt now.

And then remembered that I had an old turn-crank hand drill from my youth (a gift from my Dad to use for building pinewood derby cars in Cub Scouts, and I still have it).

So I grabbed that, and went to town, to the grateful relief of my now blistered thumb.

After some furious crank turning (and the thought “I need a Dremel”), I *finally* could pop the chassis and engine from the doghouse, leaving an inconvenient shaft that I realized I couldn’t cut away (without a Dremel, at least).

But when held upright, the shaft was completely invisible.

Originally my plan was to glue a Wings of Glory support post underneath the doghouse. But the metal rivet shaft made that plan impossible without some method to cut it away.

So I punted, and instead found a chunk of styrofoam, cut it into a cube sized to fit the inside of the doghouse, painted the exterior with black acrylic paint, and just jammed it inside the doghouse, around the shaft. I then stuck the whole thing on my plane support post, et voilá! One  flying beagle!
And a handsome fellow he is, too!
So if you want one, search around your local toy store for their Hot Wheels selection, grab a Dremel (or at least a drill with a fully charged battery) and cut away.

I love easy conversions.

See you on the tabletop!

— Parzival, the Wargamesmonger

Thursday, September 20, 2018

Dogfight Over France!

A Most Suspicious Breakfast


The skies were clear over the Western Front— clear except for the enormous roaring monster that was a German Gotha bomber. The great beast was on a typical mission— to bomb a bridge and a factory deep in Allied France. Though quite well armed, the commanders had spoken, and two escorts rose along with her— none other than the Red Baron himself, once again in the cockpit of his beloved crimson triplane. He was joined by an older, yet capable Albatros D.III, a brother in its markings to the the Baron’s own pride and joy. There had been a slightly “off” taste to the morning’s sauerkraut, but neither the Baron or his wingman thought much of it. One accepted what one had here on the front, and a fine wine had washed it down all the same.

But as they approached their mission’s target zone, the aces began to doubt their vision and their decision to fly the mission. Oh, the three rising Allied attackers were not a problem— they were two-seater fighters, a threat to the bomber, of course, but no match in maneuverability or speed for the German fighters. But that fourth...object...racing in from the south...how did it fly? Who—or rather what—was its pilot? Mein Gutt! What was in that sauerkraut???

World War One Flying Ace with Favorite Beverage.

A New, uhm, “Plane” for the Dawn Patrol.

It was time again for yet another evening of Wings of War/Wings of Glory, this time at Commandant Will’s domicile. And as promised, I had a surprise up my sleeve (okay, in my miniatures box).

Yes, that’s exactly who it looks like. The Red Baron’s greatest nemesis (if he had only known)— or maybe just the result of some bad sauerkraut— the Famous World War One Flying Ace...Snoopy, and his trusty Sopwith Camel...uh, red doghouse.

(Where did he come from? How did you make him? Where do I get one? Well, that’s a different blog.)

For the purposes of the game, Snoopy was a standard Sopwith Camel (Barker’s plane being the one I replaced). I attempted to argue that Snoopy’s guns, being imaginary, could not be jammed. To which Captain Michael replied, “Snoopy’s bullets, being imaginary, shouldn’t do damage.” So I waved away the former if he would wave away the latter, and we got on with the game. (Really, Michael, you were supposed to be my ally, as you were flying British planes!)

So, after quaffing burgers with root beer (the drink of choice for the World War One Flying Ace), we took to the air.

The Dogfight Begins (Pun Intended)


First strike to Snoopy!
As you can see, the Red Baron and Snoopy encountered each other from the start. A brief burst from Snoopy’s paws...uh, guns...and the dogfight had begun.

He was trying to read the lettering on the tires.
(And apologies as I have no idea what the German is for "beagle.")
Initially, Snoopy and the Red Baron engaged in incredibly tight maneuvering, too close for either to get off a shot. The Crimson Albatros turned in to aid the Baron, a tactical error for the Germans as this fight was not actually about Snoopy, as awesome as he of course is. The Bristol/RH4 trio closed in on the Gotha, taking fire from the giant’s two guns, but responding with their own— and also catching the Albatros in their fire as well.
Snoopy takes a hit! (But Albatros makes a mistake...)

Nice flying, Snoops!
Snoopy, knowing the Gotha would require a lot of bullets to down, and unable to get a bead on his nimble nemesis, decided to go straight for the bomber. He quickly realized this was a mistake, as he wound up behind the Bristols and unable to fire through them at the bomber. Perhaps, the beagle thought, maybe his true job was to harry the German fighters and protect the Bristols while they did the task of taking out the Gotha.

A Bridge Too Close.
In the meantime, the Bristols were doing a good job of that, as a lucky strike killed the Gotha’s rear gunner, leaving the beast unable to bite the hunters on its tail. Despite this, the bomber reached its first target, a bridge that clearly served as a key supply route for the Allied lads in the trenches. Unfortunately for the Germans, bad luck continued to rule their day, as the first load of bombs were only capable of dealing partial damage to the bridge. The span would require a second pass, a dangerous delay considering that a second target also needed to be struck.

Meanwhile, Snoopy showed just how skilled he was as a pilot, executing a swift Immelmann turn to race back directly at the Red Baron. Snoopy took serious fire at this point (“Curse you, Red Baron!”), and was much concerned about the continued airworthiness of his doghouse (9 damage against a max of 13).

Brief action interlude! With awesome special effects! And one killer 'stache!
Brief inaction interlude!
Quite a fight and mighty tight!
The Bristols/RH4 continued their pursuit of the Gotha, pouring heavy fire into the behemoth of the skies, and taking fire both from it and the Albatros, and even the Red Baron (it had become quite a tight little scrum at this point). 
Back to the shooting!

Everybody dance now!
It's raining lead!
 The Albatros, however, fell away, struck down by the rear gunner of a British Bristol. 1st kill to the Allies!
1st kill! The flying half & half cookie takes out an Albatros!
(Oh, come on. That's exactly what that Bristol white & brown color scheme makes you think of, isn't it?)

Snoopy Comes Out On Top!

And then, quite unlike his typical experience chronicled in comics and television, Snoopy achieved his ultimate dream— he downed the Red Baron! Yes, the dreaded scarlet triplane plummeted from the skies, pursued by the triumphant barking of the brave beagle.
Baron down! Baron down! Bark bark bark bark bark!

Snoopy executed a victory barrel roll over his fallen foe as he sped now to aid his comrades against the lumbering Goliath— but there was no need. The steady British flyboys had done their work. The Gotha too was gone. The bridge was intact, the munitions factory in no danger. Snoopy and the lads had saved the day!

And a Round of Root Beers for Afters

This was quite an enjoyable evening. The group got a kick out of Snoopy’s appearance in the game, and I had a lot of fun flying him, hamming it up, “firing” my arms at the enemy, and making appropriate Snoopy sounds throughout. Will even pulled up the classic novelty song Snoopy and the Red Baron as the theme music for the night.

A Little Artistic Serendipity-Dog

As for Snoopy’s “banking” turns visible in the photographs, these came about by happy accident. The inside of the doghouse contains styrofoam, as I hadn’t had time to come up with a more substantial way of attaching the post from my Sopwith Camel base. Instead, the styrofoam is simply jammed on the post, with friction holding the assembly in place. As a result, a little accidental nudging caused Snoopy to appear to “bank” (and also allowed him to be easily straightened, too). I quite like the effect. I suppose in the long run I’ll need a more permanent and durable fix, but having Snoopy appear to fly was a fun little element for the game.

Up next: How I “Made” Snoopy, or Quick and Cheaply Letting Someone Else Do the Hard Parts.

But for now, thanks for reading!

--- Parzival


Thursday, August 16, 2018

Death in the Clouds

The Coldest Dawn

“Mein Gott! Must we fly in this?” The new leftenant waved a thickly gloved hand through the swirling flakes that descended in the gray dawn. He glared at his crew, as if daring them to disagree.
“We fly when the Fatherland needs, no matter what God sends our way— or the Devil.” The voice was young, but there was a coldness to it, deeper than the frozen air, as of someone who had danced with Death many, many times.
The leftenant’s crew snapped to attention, as he spun around to face the speaker. “I am Leftena—” he started, but cut off his speech, his face blanching as one with the snow. “I-I- forgive me, Herr Commandant!” The glove snapped up in a salute.
The commander waved the salute away. “It is of no matter, leftenant. I am none too fond of this weather myself.” He looked up. “But it will be a fine day above these clouds, with the mother Sun behind our backs.” The veteran pilot smiled. “But do not expect her to warm them much. Icarus must have flown higher than I to catch her heat.”
“Sir, I just hope we shan’t catch our deaths in this cold!”
The commander stared at the leftenant. “It is war. Someone always catches Death. And it is always cold.”
The Red Baron turned and walked across the snowy aerodrome to his crimson triplane, which blazed like fresh blood against the snow-streaked ground.

A Flight for War and Glory

Recently my group gathered for an evening of Wings of War/Wings of Glory, featuring my as yet unblooded Gotha GV bomber. We had a new victi— that is, player— joining us, who eagerly selected the bomber as his plane of choice. A bit much for a rookie to the game, but he was insistent, and we felt we could coach him through any difficulties (though admittedly, none of us had ever flown one of the “Giants of the Air” either!). (I apologize for the fuzzy photos— aerial photography is hard!)


DOGFIGHT!

For simplicity’s sake, our scenario was simple: The rookie bomber pilot would have two targets for his bombs; a factory placed in the center of the table, and a bridge placed towards the farthest corner from his entry point. If he could succeed with both bomb drops, the Central Powers (Germany) would win; if he was shot down without achieving this goal, victory would go to the Allies (Britain).

The table, as you can see, is triangular, making for an unusual set up. We took advantage of this to create a three-point entry situation: The Gotha from one corner, the Allies (all Brits) from another, and the German fighter cover from the third (as if on advanced patrol near the targets).

We paid no attention to points, but merely allowed each side to select their favored aircraft. As the rest of us were experienced pilots, and we felt the bombing run was rather simple, we allowed the Allies fighters (Michael and Chase) to take four planes (two per player), while Will and I commanded three— Will, a lone Albatros D.II, and myself an Albatros D.Va and the famous crimson Fokker Dr.1— the Red Baron himself. The British planes were a Bristol F.28 two-seater fighter, an R.E.8 two-seater, and two Sopwith Snipes. (Clearly, we also didn't pay attention to concurrent service years, either.)

I had not packed my traditional green felt table cover, so we used the table’s existing white pad as our surface, which we decided represented a snowy dawn over France, with enough break in the clouds to reveal the bomber’s target (“The Devil always leaves a path for Death,” says the Red Baron).
Duel above the clouds! Or the snow! Take your pick!
The fight started off with a rather lengthy approach (due to table size), which included the Rookie inevitably miss-plotting and turning back across (and off) the table. In our group we call that “pulling a Fleming,” for the hapless pilot among us who first pulled this error (and still does, from time to time).


Not this Fleming, but not the other one, either. "The rookie did it!"
"Of course I can fly it. See? I turned around all by myself!"
Having corrected for this mishap by allowing the bomber to return to the field, the fight began in earnest. Early hits went to the German aces, but soon the first victim plummeted through the clouds to the frozen lands below— the Red Baron himself! (Truly, the Fokker Dr.1 is just too fragile an airframe, maneuverability or not. Though admittedly losing that maneuverability in the first fracas didn’t help!)

No! Not the Baron!
Jammed rudders suck.
After the death of the Baron, the fight finally reached the Gotha, and she began taking hits— and dealing them. But not before a second German plane went down— prompting its pilot to abandoned his loyalties and take up arms for the other side! (Will claimed one of the extra Allied craft so as to stay in the game— a poor excuse for treason as ever there was!)
Another German down! So sorry, Will. You shall be avenged— uh, Will? Why are you in a British uniform?
But the Central Powers pressed on, and soon the first British plane spiraled into the ground— and the bomber reached her first target. Down went the bombs, and the factory was ablaze. “That one’s for the Baron!”
British take a long fall.
BOMBALAMA BOOM BOOM!
On to the bridge, a desperate chase— the Allied suffered another loss, the Albatros finally making good on its presence. Fire continued to pour into the Gotha, but on she flew, inching ever closer to victory— closer, closer, almost there... (Wait, wrong movie.)
Stay on target...
Stay on target......
And down she went, just shy of that final break in the clouds. The Devil got his due, but the Kaiser did not.
Well, so much for that!

The lone Albatros abandoned the field, returning to bring news of mourning to the aerodrome.

Final Briefing
It was generally agreed that had not the bomber “pulled a Fleming,” the victory might well have gone the other way. The delay in reaching the first target certainly allowed the Allied planes the time to close. We were stunned at the amount of hits the bomber took— he kept drawing card after card after card— but the tale of the deal showed that many were 0s, resulting in no actual damage to the craft. As the British had chosen planes armed with weaker B guns, this had much to do with the Gotha’s longevity in the fight.
A lotta bullets and a lotta blanks.

Wings of War (or Wings of Glory, as it is now sold) is always a satisfying game, and a real pleaser for rookies. We’re already set up for return engagements of the game. I for one, relish getting in the cockpit again— though not the Dr.1. No, I have something (and someone) more exciting to fly...but that surprise will have to wait.

‘Til then, thumbs up and watch your six!

—- Parzival, the Wargamesmonger

Thursday, August 9, 2018

The Hap-Happiest Day of the Year

It Came From The Future, Or At Least Texas


Oh happy day! I return from my morning Sonic run to find a “yuge” box on my front porch… a box from Texas… which can only mean…

MY OGRES ARE HERE!

Da Box!

(Not to mention a whole lotta tanks.)


Whole Lotta Stuff inside!
Anudda Box!
 It was like what you always imagined the experience would be like when you ordered the “footlocker” of toy soldiers from the back of the comic book; only this time, the imagination paid off, in SPADES!


Happy Happy Joy Joy!
For clarity, this is the Ogre* Miniatures Set 2 “Many Minis” box from Steve Jackson Games’ Kickstarter (I already have Set 1, though this time I went whole hog…)

Envy Me

I’ve got
Ogres (Mk III, Mk IV, Mk V— all AI übertanks)
Fencers (and Fencer-Bs— also AI übertanks, with lotsa missiles)
Super Heavy Tanks (two big guns)
Heavy Tanks
Missile Tanks
Light Tanks
GEVs (aka “Hovertanks”)
Light GEVs
Transport GEVs
Howitzers (Not actually tanks)
Mobile Howitzers (okay, not really tanks, but they move and have Honkin’ Big Guns)
Infantry (In power armor, so kinda like pocket tanks for one dude each.)
In da box!
In da udda box!
Goodies!

I’ve got ‘em in Red and Blue, Blue and Red, Green, Gray, Black and Glow In the Dark (so I could play Ogre in the dark— I already have the glow-in-the-dark die—,though to be honest it would be dang hard to see the map or read the combat chart…)
More goodies!

I’ve got 290 of the things now… (actually, more than that… somewhere close to 400 of ‘em, all told, when you add in previous purchases!)

And I’ve got the latest rules and scenarios, some nifty punch-out markers for special situations, and a nice big map for scenarios. And another black die, which you can never have too many of.
Rules, Map and More!

Now, Steve, bring on the Combine forces.**

In the meantime, I’ve got a whole lotta sprue clipping to do…
Get ta work! Those tanks ain't gonna build themselves!

Yours atomically,

Parzival, the Wargamesmonger

*If you don’t know what Ogre is (or what GEV is), please turn in your Gamer Geek card, because you aren’t one. (But you can gain it back. Hie thee to Steve Jackson Games and feast your eyes on OGRE, the Greatest Future Cybertank Game Ever Created. Get it, or find a gamer friend who has it, and play.)


**Except for the Ogres, the forces in Set 1 and 2 are from the Paneuropean Forces in the game setting. The Ogres are from the North American Combine army (you can see some of these designs in this blog entry (the figures there are metal miniatures produced about 20-30 years ago).