Showing posts with label game review. Show all posts

Wednesday, April 30, 2025

First steps into First Light

Exploring HeroQuest: First Light

In my previous post I unboxed the contents of the new Target exclusive edition of the HeroQuest Game System, First Light. This is not an expansion of the game, but a stand alone, somewhat independent introductory version at a much lower price (less than half the cost of the standard set). If you're familiar with HeroQuest, you know that the rules themselves are not the game- it requires a collection of adventures, called quests, which combine into a full mini-campaign, typically with an overarching story behind it all. First Light thus also includes its own First Light Quest Book, an entirely new collection of adventures different from the ones included with the standard HeroQuest set or the expansions.

Unfortunately, it's not really possible to review any quest collection in great detail without risking revealing the secrets and surprises of the quest— and I will not do so here. But I can offer some general impressions, note quirks different from the main game set, and report on how the quest feels as a player.

A peak inside the covers— rulebook on the left, First Light Quest Book on the right. And, spoiler, you will be fighting the Dragon. But you probably guessed that, so not much of a spoiler.


A few minor rule notes:

The Dwarf's Weapon Dilemma: Only one rule change is mentioned in the rulebook itself. Unfortunately, it happens to be incomplete. The original game gives the Dwarf hero a "Shortsword" as his starting weapon, which allows the Dwarf to roll two dice in combat. First Light changes this starting weapon to a "Hand Axe," which better fits the miniature included (in either set). The Hand Axe also grants two attack dice, but it can also be thrown at a distant target as a two dice attack. However, once thrown the Hand Axe is lost... and that's where the incompleteness comes in. Nowhere do the rules explain what happens to a hero who no longer has a weapon for combat. The book is utterly silent on this manner. Which leaves the possibility that either the Dwarf can no longer attack, or he can still attack at 2 dice because his card says he can, or something else is going on.

Now, if you have the standard HeroQuest set, you will learn in that game's quest book that a hero who has no weapon always rolls one die for an attack (this becomes important about halfway through that quest book).

But First Light has no such rule mentioned in its quest book, and no quest where the matter becomes obviously significant. So the purchasers and players of First Light will be left to derive the answer to the situation themselves, without aid from either rulebook or quest book.

Pass It Around: In the main set, the rule book is a little unclear about whether objects may be shared among the Heroes, or how or when it may be done. Only “artifacts” and “potions” are specifically mentioned as being shareable, but where the Heroes have to be located to share such things isn’t covered. Fortunately, the creators of HeroQuest appear to have realized this oversight, and clarified both in the First Light rulebook and the quest book that any item may be shared— even equipment— but only when two heroes are adjacent to each other, and neither may also be adjacent to a monster. While this not noted as a change in the rules, it is at least a much needed clarification!

A Break in the Search Rules: In the standard game, and in the First Light rulebook, the location of a Hero when searching a chamber for treasure, traps, or secret doors has no bearing on what they find or don't find. The Hero is assumed to have explored the room in detail, and the Zargon player must reveal the treasure, trap or secret door mentioned in the quest book, if any.

However, in the First Light Quest Book, this pattern is broken. In the very first quest, the players are told they need to search certain objects they will find for specific clues. But the quest book does not alert the players that their Hero will have to be adjacent to the object on the board to search it. A latter quest does the same thing, for entirely different objects— indeed, for objects commonly considered searched even if the Hero is located on the opposite side of the room. This to me is bad design— the players must know if the rules have changed, and there is nothing about either quest to indicate that they have. It’s possible for the Zargon player to realize this and inform the players of the change, or simply assume that any search is “adjacent” to an object, whether the Hero’s figure is or not.

Fire Feels Good: Finally, a new concept is added to the game— the “Healing Hearth.” Essentially, in any room with a fireplace, a Hero who searches in the room for treasure may opt to either draw a Treasure card (assuming no special treasures are present), OR heal 1 lost Body Point. Each Hero may do this once in the same room. Of course, if all heroes choose to heal, then all Heroes have given up their chance to search the room for Treasure cards. Granted, this is a clever thing to do with the fireplace, and a nice if minor boon for the Heroes mid-adventure, but the questbook also offered the Healing Hearth effect every time a fireplace appears, which begins to feel a little less mysterious and special.

Cabinets Hold More Stuff: The First Light Quest Book also introduces a "Sly Storage" rule— when searching a room with a cabinet, the first searching player may draw two Treasure cards and resolve both of them (assuming no special treasures are listed for the room). Of course, one or both cards could be Wandering Monsters or Hazards, which makes this a somewhat dubious “bonus.”

Li’l ‘Zilla loves being Zargon. And yes, this is an early quest, using the flipside “cavern” map, complete with “Portals.” Be careful where you step through! (And that’s the only visual clue you get in this review)

So, Other Than That, How Was the Play?

Good Quests, Buggy App: I used the HeroQuest Companion App for playing and reviewing this questbook. (If you’re new to HeroQuest, the App is not required to play; it just gives everyone a chance to play as Heroes with the App taking over the role of Zargon.) Unfortunately, there were a few bugs involved, as some unusual rules kicked in for certain quests, which the Companion App handled poorly. In one case, the app stacked more than one figure in a single square, which neither the rules or the physical nature of the game allow. This was clearly a programming error— hopefully Avalon Hill will address it soon. There was also a special situation where Dread magic was supposed to make certain monsters less vulnerable and more dangerous— but instead, the Companion App wound up freezing these monsters in place— they didn’t attack, but they wound up blocking passage until a lucky die roll allowed them to be permanently eliminated. (I finally got frustrated enough to just declare a die success for each incident of this, as otherwise the effect did nothing but slow the game down.) But these were problems with the app, not the quests.

Happy (and Challenging) Adventuring: App frustrations aside, this is a fairly ingenious campaign. The story is interesting, and there are some curious bits which occur that aren’t fully resolved by the quest, but are linked to other elements in the standard set’s quest book— essentially, this campaign takes place roughly along-side the events in the standard set quest book, and is assumed to involve a different group of heroes (despite having the same makeup of Barbarian, Dwarf, Elf and Wizard). The challenges are solid, and experienced players won’t be disappointed in the variety of what happens.

Nothing Comes Easy: What this quest isn’t, however, is an easy beginning for novice young players. Unlike the standard games’ quests, there is no “introductory” adventure (as difficult as that one— “The Trial”— actually is). This one starts off from the getgo with traps, trickery and tough battles, as well as quest goals that must be fully completed, and might not be if players don’t make the right choices in certain situations. Inexperienced players may therefore find this set a rough start— but then, learning how easy it is for Heroes to fail (and outright die) isn’t a bad thing. The best game should be a challenge, and this one was for me. My advice for either the experienced or budding novice Zargon is to know the rules well, and give the players a break on the above-mentioned searching oddities— or at least remind them that the Heroes should be searching for crucial information, possibly in unique conditions.

So, to sum up, First Light offers a well-done quest series, but with some challenging oddities that might be harder for beginners than is ideal in a starter set. Unfortunately, the Companion App doesn’t rise to the challenge of these oddities, either. But that latter shouldn’t stop you from picking up and enjoying the First Light game with friends and family.

L’il ‘Zilla says Five Atomic Breaths.

— Parzival

Tuesday, March 12, 2024

Come Sail Away with Me PART II — Playing the Game

Sails Ho! Playing Armada for the First Time 


With my fleets out of dry dock, it was time to see how well the rules work. Although Mantic does offer some solo play scenarios on their website, I decided to play both sides straight myself, doing the best I could for each. I chose the introductory scenario from the rule book, “Maritime Patrol.” Although intended for the standard starter set of four ships each, I put all twelve of my ships on the board because what admiral wouldn’t? This scenario runs for 8 turns, after which damages, sunken vessels, and surrendered vessels are totaled to determine the victor. 

All the tools… (Well, the tokens are just one example of each.)

Precision Instrumentation for the Successful Navigator

Obviously, there’s more to Armada than just ships (and bases). The starter set includes:
 • 3ft x 4ft printed paper play “mat.” At the side midpoints and corners are elements of a compass rose. The edge is printed with alternating 6-inch bands, which helps set up. 
• Several full-color, die cut cardboard tokens and game implements: 
— 8-inch range and movement ruler
— “Ship Turning Template” guide for 30° or 45° ship turns, depending on a vessel’s capability
— “Firing Arc Template” guide for bow and stern guns (if any)
— “Wind Rose” wind direction marker (resembles a compass rose)
— Several tokens and markers: Activation, Speed, Identity, Blaze, Fired (cannon), Damage, Loot, Ship Upgrades. You’re gonna want a lot of baggies or storage elements for these.
— Islands, rocks and shoals and fog/storm pieces (one divided for some reason into quarters, perhaps to use on play area corners?). Printed double-sided for different elements.
— And a fancy Armada logo that I haven’t yet read a purpose for. 
• Ten-sided dice: 3 red, 3 blue, 3 black, 1 green 
• 2 six-sided dice with the Mantic Kings of War helmet logo instead of the six side (no in-game purpose that I can find— it’s just a fancy bit that counts as a 6.) 
• Ship Cards corresponding to each model, showing its abilities and other stats, and used to track damage and other game events. Although one Ship Card is needed for each ship, my set was short one card (for a “Basilean Gur Panther”). Fortunately, this was one of the damaged models Mantic replaced, so with that I received a card with the ship’s information. I noted the stats and played down one card. I’ll probably just scan this in and print a replacement. 
• A full cover, very thick Armada rule book. The cardboard tokens are thick and sturdy, and the art on all of these is excellent. 

My set came with additional laser-cut MDF upgrade tokens unique to the Basilean and Orc fleets. I would have liked for these to be printed cardboard, but that’s a minor quibble, as there’s really no need for these to be painted; they sit on the ship card, not the playing space. 

The play mat is a little disappointing— the color is muted and blurry, and it’s just thick poster paper, which won’t last long with repeated folding. Alas, it comes heavily creased, so smoothing these out isn’t possible. A neoprene mat is available from Mantic, and several third party game accessory companies sell “sea” print tablecloths. You could also hunt in a fabric shop/craft store for a blue mottle cloth. Or you can play on a bare tabletop; the play mat is just for looks. 

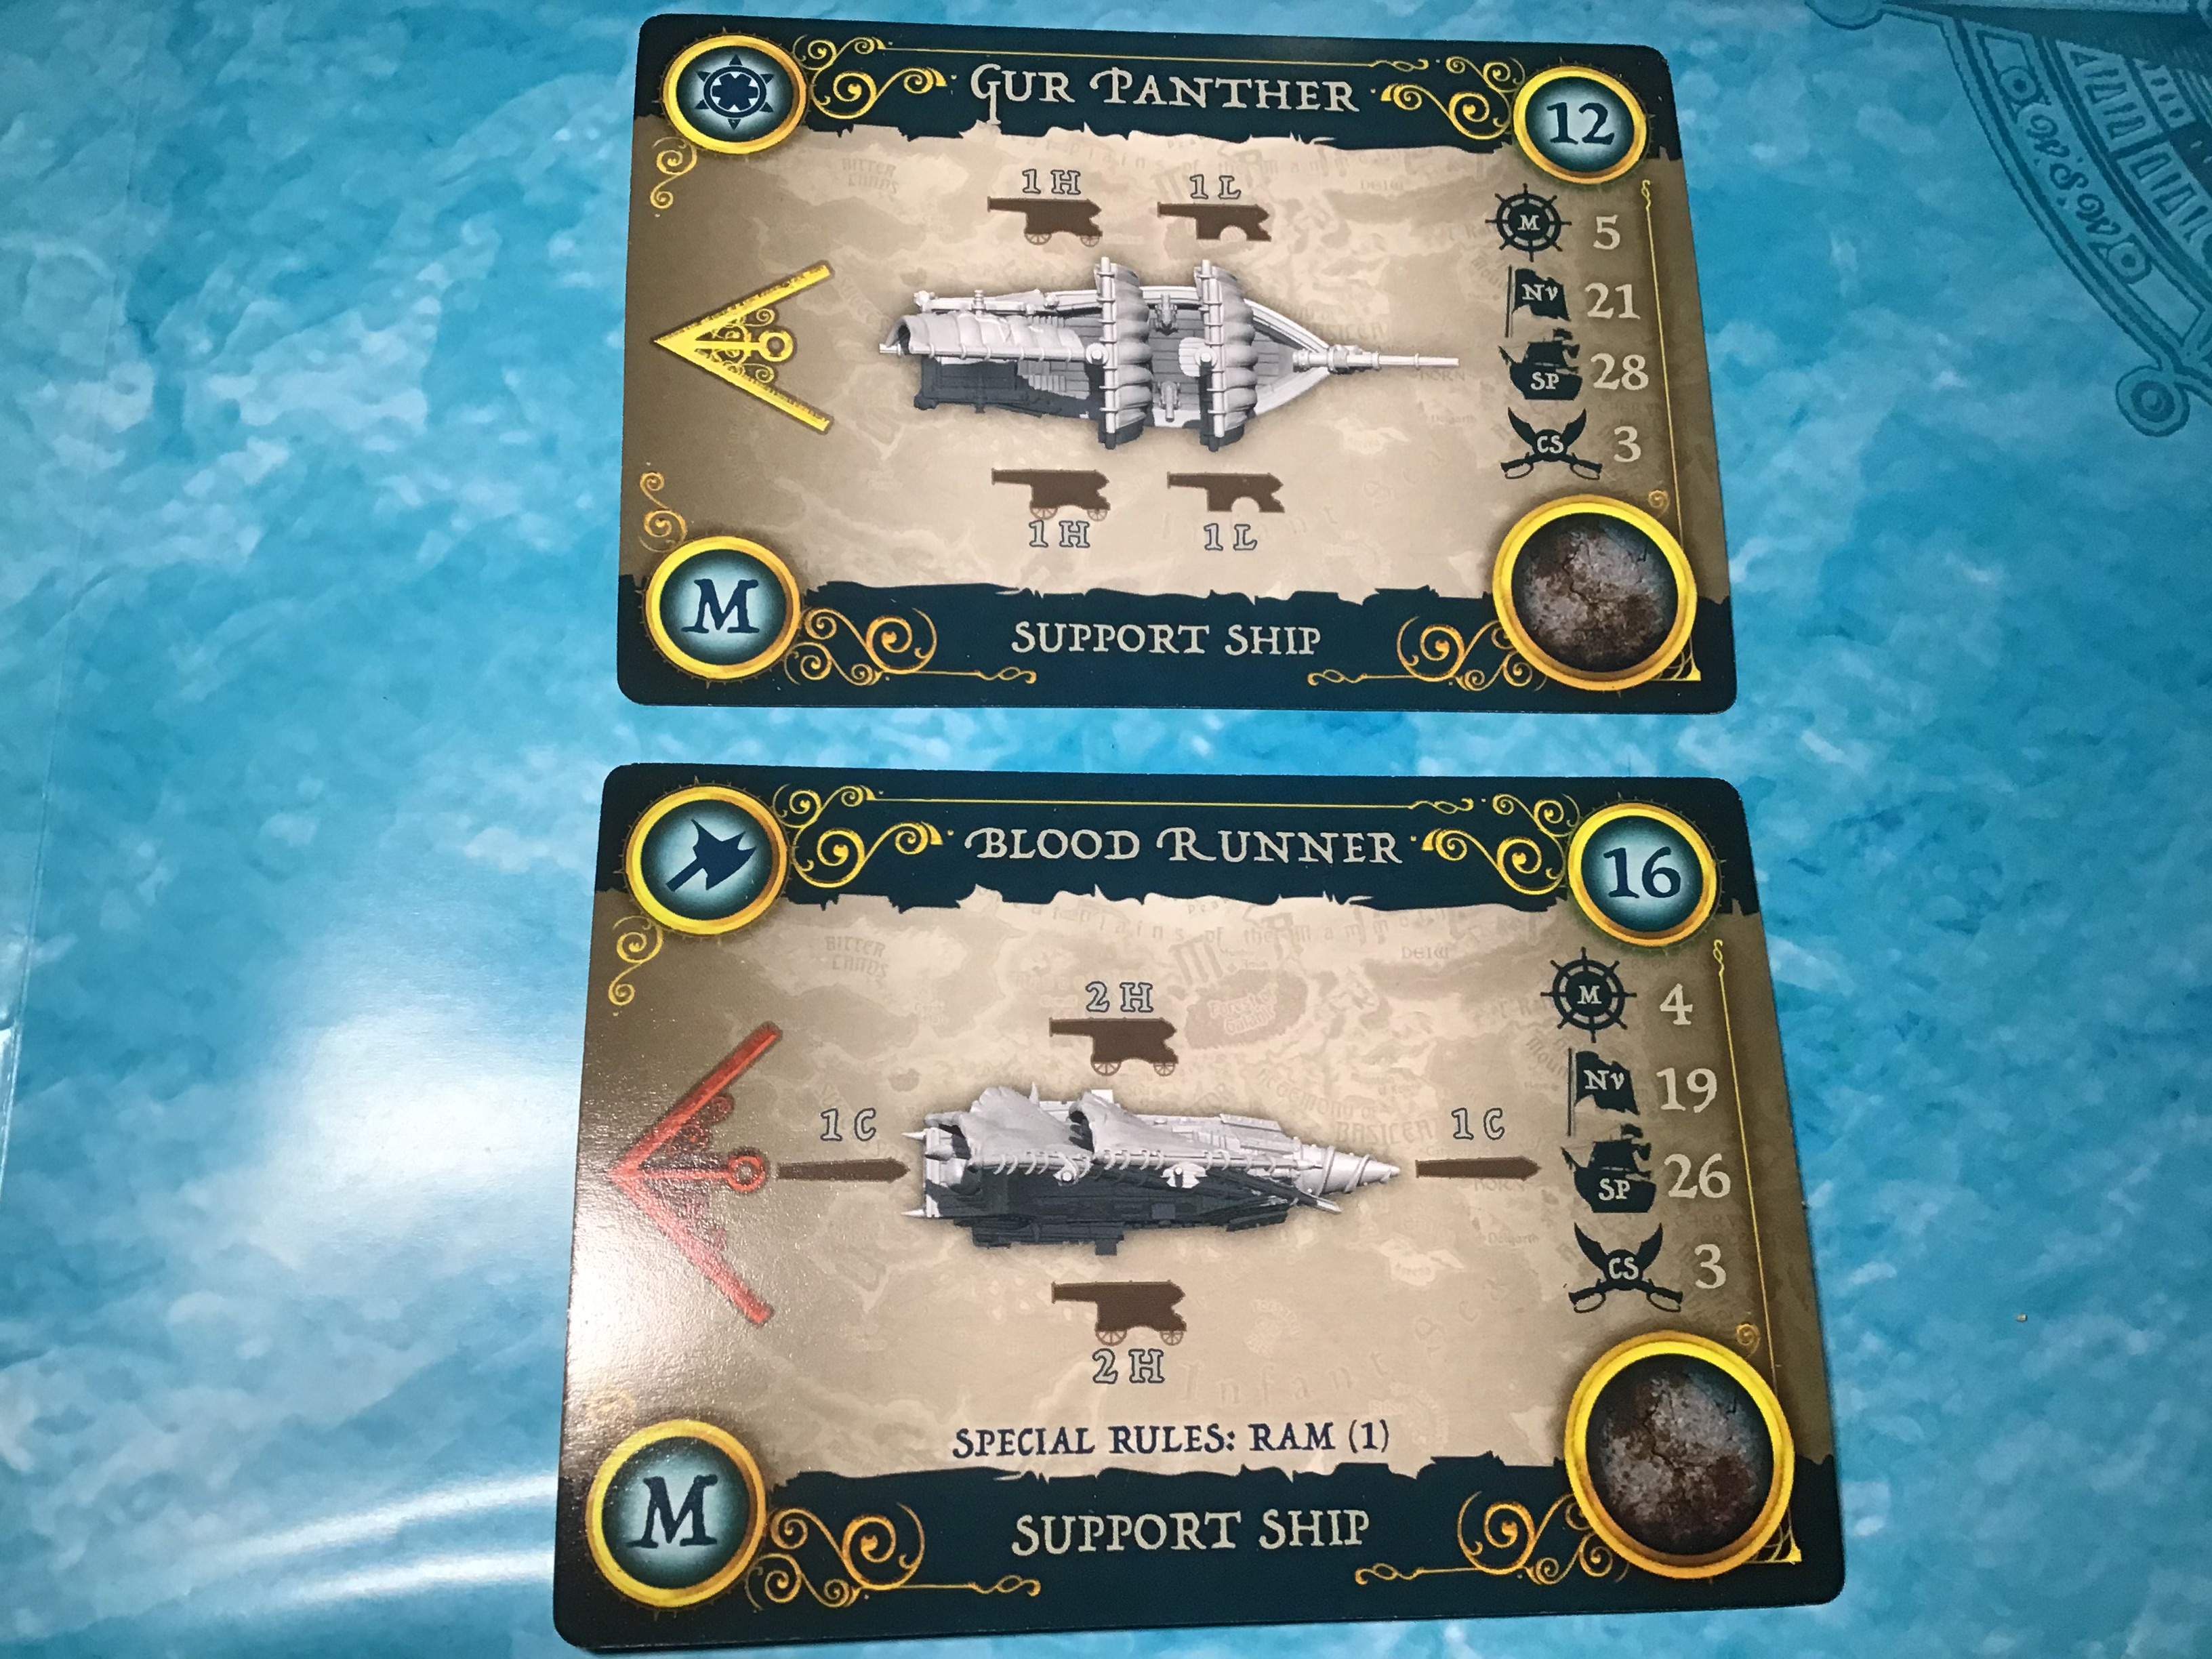
Ship Cards: Basilean Gur Panther, Orc Blood Runner.
Notice the “Turn Angle” symbol on the left. How is that bulky Blood Runner scow more maneuverable than the sleek Basilean vessel? Uh… magic?

The card art depicts an overhead view of a ship, showing its faction, name, weapons and their orientation, and lists the relevant stats: Point Cost, Speed (in inches), Nerve (the amount of damage the ship can take before its crew loses effectiveness) Structure Points (the amount of damage the ship can take before sinking) Crew Strength (for boarding actions). There’s also a “Turn Angle” symbol that indicates whether the ship uses the yellow 30° maneuver or the (much better) red 45° turn. You will have to find a spot on your table for each of these cards, as you will be placing damage markers and other tokens on them over the course of play. In my case, I simply had to leave them on top of the play mat, and moved them aside whenever the action came too close.

Wow, the Captain’s Log Could Be Ballast 

The rule book is, honestly, overproduced. But that’s typical for UK-based gaming companies who want to create a full-blown “world history” for whatever over-the-top generic fantasy factions they sell to eager gamers. Over half the book (49 pages out of 97) is therefore nothing but fluff, backstory and non-essential art. I’m not reviewing any of that. Read it if you like that sort of thing. The actual rules could probably be distilled even further; the remaining 48 pages contain numerous examples and illustrations, with lots of empty page space. So don’t let the book size daunt you; you can pick up the gist of the rules quickly, and look up special details as they arise.

Bit of a scrum today, Leftenant, eh what?

Just a Taste of Sea and Blood

Obviously, I couldn’t test all of the rules in a single setting. For one thing, the rules include both a basic movement method which ignores any wind effects, and a wind-based movement section with rules for tacking and speeds dependent on wind location. For simplicity’s sake I opted to ignore these for my first run through, though they aren’t particularly complicated (tacking is simply turning a ship to catch the wind). 

Also, different factions have different capabilities for their vessels, most of which are listed as “upgrades” with a point-based cost. You add upgrades (or not), increasing the point cost of the ship, and then you plan battles based on roughly equal point costs for all players. Again, for simplicity’s sake, I set these aside to try out later. Instead, I went with the barebones elements of the ships as listed on their ship cards— which, for the orcs at least, did indeed add some special rules, which will come up below.

Anyway the Wind Blows…

Initiative and activation in this game is based on two factors: The direction of the wind and crew experience. The scenario sets the direction of the wind, and after the first turn dice are rolled to see if the wind changes direction by one compass point (and only ever one each time). The compass rose wind marker is placed on the midpoint or corner from which the wind is blowing; in my case this was from the East, so the wind marker went on the midpoint of the Eastern side of the play mat. (The center compass rose on the map determines this orientation; for the photos, I was standing on the North edge of the map, so the wind is coming from the viewer’s left.) 

Ships then move and take actions based on their closeness to the side or corner from which the wind is blowing. For those of you who do know something about age of sail battles, this nicely simulates the tactical advantage of “having the weather gauge,” meaning being between the enemy and the source of the wind. In real life battles, this gave a sailing vessel an advantage in speed and maneuvering, and captains always sought to gain the weather gauge whenever they could. For Armada, this is simply to imagine a straight line parallel to the edge of the map from which the wind is blowing, or perpendicular to a corner if the wind is there. Move the line in your mind from the windward side to its opposite; whichever ship the line crosses first is the first ship to take action, and so on. If two ships are at equal locations with regard to the wind, then the ship with the more experienced crew activates first, or if both location and experience are the same, a six-sided dice is rolled for each vessel to resolve any ties. 

As a result of this system, any ship could wind up moving first (or last) on any given turn, and ships can be maneuvered to take advantage of the wind position— to have that important “weather gauge” on the enemy in a subsequent turn. (Note that “weather gauge” is not a term in the rules; but it is this concept which the rule clearly represents.) 

The “Gur Panther”, Speed 5, has moved one Movement Step of 5 inches.
Depending on its current speed level, it could move up to two more times (“Full Speed”).

Steady at the Helm

When a ship activates, it must move (unless it is anchored or grounded) shoot, and possibly take other actions. A ship completes all possible actions it can take, after which the activation passes to the next ship in the wind’s line. Movement, except for anchored ships, is mandatory. There are four speeds in the game: Full Speed, Battle Speed, Steady Speed, and Anchored. A ship at Full Speed must move at its Speed rating (on its card) three times. At Battle Speed this is reduced to two times, at Steady only one time, and when Anchored not at all. The player may declare that a ship will either increase or decrease its movement by one level when the ship activates and before it moves. If a ship wants to drop from Steady Speed to Anchored, it must still move once before doing so. Otherwise the ship’s movement drops or increases immediately as declared.

The Gur Panther has turned 30° to port, guided by the handy “Turn Angle Template.”
It could have turned less than 30°, but not more. The red side of the template, however, offers a 45° turn angle for more nimble vessels.

A single move of a ship’s speed is called a Movement Step. So, for example, my Basilean Gun Brig has a speed of 4. This means that at Battle Speed it will take two Movement Steps of 4 inches each. At Full Speed this would be three Movement Steps, and at Steady Speed only one. After each Movement Step, a ship may change its heading. The Maneuvering Tool is placed behind the ship’s base, and the ship pivots at the rear corners up to the angle allowed for that vessel. Afterwards the ship may continue to move (and maneuver) in the same manner until all Movement Steps are completed. Anchored ships can Maneuver immediately without moving, or before moving if the ship changes to Steady Speed. (Note that the above are for the basic rules, and ignore the effects of wind.) It’s a simple movement system that’s easy to use, but can catch the unwary commander off guard, especially in a crowded sea— always know where your ship is headed, and consider where the enemy is headed, too. Otherwise— CRUNCH— you may find yourself colliding, a bad thing for nearly all involved. 

 Collisions are generally discouraged, with colliding ships required to make an “Evade Test” (roll a d6) to avoid such things. If either side succeeds in this test, no crunching occurs. However, certain factions (notably, the Orcs are one) can opt to deliberately ram opposing vessels. In this case, they don’t roll; only the target can Evade. In this case, the Orcs have specially designed vessels which increase ramming damage against a target.

Everybody shoot everybody. The Orc Bombboat in the left center uses the Firing Arc Template to see if the distant Basilean ship can be targeted by the Bombboat “Indirect Weapon” (yes, it can).


Run Out Your Guns

The ships in Armada are universally armed with cannons, classified into four types: Light guns (doing 1 point of damage), Heavy guns (doing 2 damage), Close guns (doing 3) and Indirect Weapons (doing 1d6). They each have ranges, generally less range by damage type, though Indirect Weapons have the longest possible range (22 inches). Shooting is by rolling 1d10 for each weapon listed; results of 6 or better are a hit, natural rolls of 10 (or “0” on the die) are a Critical Hit which triggers a roll on a Critical Hit table for more damage and possibly extra effects (like being set on fire). Range and other tactical elements may modify the die rolls up or down, or sometimes both. Shooting is restricted by firing “arcs” to the fore, the aft, and the sides, and can only be made at vessels within such an arc. If only a portion of a vessel is within the firing arc, the chance to hit it may be reduced. If all of a target vessel is within an arc, and the target’s bow or stern is facing the shooter, the target may take extra damage from “raking fire.” 

Fire As She Bears

Typically, a ship shoots only after moving. However, the “Fire As She Bears” rule allows a vessel to attempt to shoot while moving or when a moving vessel crosses her firing arc, provide the latter vessel has not yet activated for the turn. In this case the shot is reduced in accuracy, and the vessel must note which guns have fired, as each cannon can only fire once per turn. (This is the closest thing the game comes to acknowledging the limited fire rate of muzzle loading cannons, a major consideration in the real world Age of Sail.) I didn’t use the Fire As She Bears rule in my test, though I should have; it’s a neat concept and my fleets would have benefited. 

Generally there’s a lot of chance to “exercise your guns” in the game. The ranges are sufficiently long that there’s always someone you can reach out and touch, though one has to be careful with one’s firing position… many times I thought I had a shot lined up, only to discover my movement had caused me to not have any targets within my intended firing arc— which I should have covered by declaring an FASB beforehand, but did not. Live and learn. 

The Orcs Expect Every Orc to Smash Everybody Else. Duh.

First Blood goes to the Basilean Gunbrig, with a Critical Hit on the Orc Hammerfist.


 So how did it play out? I began by maneuvering both fleets to try to seize the weather gauge and out flank the other. Very quickly I had a veritable scrum tracing along the Eastern edge of the mat. First blood went to a Basilean Gunbrig, with a well placed shot into an Orc Hammerfist. However, the shot (a lucky Crit) didn’t otherwise affect the target enough to cause any concern.

Most of the battle went this way, with ships pouring fire into each other with little significance aside from attrition of hit points. The Basileans did sink the sole Orc Bombboat— an indirect fire ship— for the first kill. I also declared two vessels “lost” when they sailed over the edge of the world— that is, the play mat— though the actual rules provide a method for return which I opted not to implement. 

“Stand by to repel boarders!” An Orc Hammerfist rams a Gunbrig, grapples, and starts a slugfest on deck.
(Upper left)

Getting In Close and Personal…

When an orc vessel found itself moving into the same Gunbrig, I decided to use the Ramming rules (the orc vessel being so equipped), and branched into the Grapple and Boarding Action rules as well. This resulted in the Hammerfist and the Gunbrig becoming immediately “Anchored” by the orc’s successful grapple attempt, and the crews fighting out. The Gunbrig had a Crew Strength of 2, while the orc had a Crew Strength of 4. Each side got 1d10 per CS value, with hits being the same as with cannon fire. (Honestly, I found this a little uninspiring. I was hoping for something more crew-oriented in terms of damage for a boarding action.) This went on for two more turns until the Gunbrig escaped (Huzzah!)… only to be sunk one turn later by an orc broadside (not-so huzzah). 

Oddly, there doesn’t seem to be a function in the game for actually capturing an enemy ship. A ship is either “surrendered” or “sunk”— and the surrendered status only means it’s out of the fight— it still apparently “belongs” to its original side; or at least, the rules don’t say differently. Apparently, you can still fight boarding actions on a surrendered ship, but there doesn’t seem to be much point in doing so, especially for the boarder. (The one exception is a single scenario where loot— “victory points”— can be claimed from a boarded ship.) Maybe this is supposed to reflect an attempt to recover the surrendered vessel for its original force, but if so, the rules don’t provide for this, or say what would happen if you do so (Can it fight? Sail off? Scuttle itself? The rules don’t say).

A battered Hammerfist lowers the colors, and managed to find an unsoiled hanky somewhere to wave instead. (Certainly counts as a miracle in itself.)

White Flags in the Sunset

Getting back to the fight, the Basileans were able to catch another Hammerfist away from its fleet, and multiple ships pounded it with their cannons, breaking its crew’s Nerve Rating (about ten hit points shy of its sinking), causing it to be “Crippled”— that is, less effective in its various efforts— and within another turn it surrendered on a failed Skill Test from this status, leaving it afloat but out of the fight. 

A few turns later it was all over. Final score was a whopping victory for the Basilean fleet, especially thanks to the surrendered vessel. I hadn’t bothered to count up the point cost before starting, but I discovered that technically the Orc fleet far outclassed the Basilean fleet in strength, yet I never noticed this in play. Perhaps if I had attempted more rams or boarding actions, it might have made a difference. But the cannon fire seemed about equal throughout, and the Basileans were taking lumps too… just not as many as the Orcs suffered. 

“Time!” The battle ends. Now to review the tab.

Aside From the Eye, How was the Battle, Horatio?

Armada plays quickly, and even using the basic movement rules there’s a definite “sailing” feel to it all, thanks to the ingenious Wind rule. The rules were generally easy to understand and I was up and playing quickly with only a cursory read. I was a bit disappointed in the rules compared to the ships. The orcs had two ships with some funky ramming weaponry— the Blood Runner, with a prow like a giant wood screw, and the Hammerfist with what looks to be a ridiculous spinning pair of huge metal fists. But in play these amounted only to a +1 and +2 ramming damage advantage, respectively, without any other consideration of what the rams resembled. I call that somewhat unimaginative. However, I acknowledge that additional “specialty” rules for these implements might have been kludgy and slowed things up. In some ways, though, I’d rather they’d have toned down the silly on the ship models than leave me with a milquetoast +2 damage as the design effect. If you’re gonna go for silly fantasy, own it! Make the enemy fear the fists and be wary of the screw. The ramming rules really didn’t set that up. 

Similarly, the prow of the top Basilean “Elohi” ship features a massive figurehead bearing a fiery torch— painted with magical blue flames in the Mantic rulebook art, and mentioned in the ship fluff as being divine in origin. What do these mystical flames do in the game? Absolutely nothing. 
Boring. 

At least give us something like the fabled Byzantine “Greek Fire” flamethrowers (seriously— their early medieval ships carried frickin’ flamethrowers!!!), or some sort of magical affect. Yes, the ship card mentions a “Halo of Light” ability, tied to some Basilean upgrades, but even so there’s little tie in. As is, the design is disappointing (not to mention fragile for the model— that ‘spear of fire’ will snap in two if you sneeze on it). 

Shall We Set Sail Again, Captain?

Despite my criticisms above, I like this game. I’m pleased with the look of the ships, and the game play was engaging and entertaining. The rulebook offers some scenarios which introduce sea monsters and other aspects, so hopefully that will dial up the fantasy levels. I’m looking forward to introducing Armada to friends. There are some other factions I’m eyeing (the Dwarf fleet has armored, steam-powered vessels reminiscent of American Civil War ironclads— hard to pass up on that!) So it’s been a winning purchase for me, and I expect to play it repeatedly. What more can you really ask than that? 

Game Rules & Play

Rulebook: Clear and easy to follow. Way too much fluff, but the fluff doesn’t overly intrude into the rules themselves. 
Accessories: Top notch, although the paper play mat is lackluster. 
Game play: Good sailing feel. Plays quickly, easy to jump right in and know what you’re doing. Needs a little more variety and imagination among the starter forces’ ships’ abilities. The “fantasy” is a little low. 4 pennants out of 5. 
Over all product rating: 3 1/2 pennants.


Tuesday, November 30, 2021

Kickin’ Orcs Old School: The Return of HeroQuest, Part II

HeroQuest, if you don’t already know, is a “dungeon crawl” game. A “dungeon crawl” typically features a small team of classic fantasy heroes exploring an underground labyrinth, encountering dangerous monsters and deadly traps which they must overcome or escape, while looting the place of all sorts of fabulous (or even magical) treasures. And if you think “that sounds like Dungeons & Dragons” you would be right— the whole idea is lifted straight from the origins of the famous father of all role-playing games. But unlike D&D, which typically places heavy emphasis on developing and improving a “realistic” fantasy character in an in-depth, grand fantasy world, a dungeon crawl just deals with the basic guts— kill the monsters, take their stuff. The heroes don’t have elaborate backgrounds or long lists of equipment. They’re archetypes— the Barbarian, the Elf, the Dwarf and the Wizard— and their abilities are largely static and unchanging. And while there may indeed be a thematic plot sold in epic hero terms, that’s really just fluff— the game isn’t about that, it’s about “shootin’, lootin’ and scootin’.” 

And that’s essentially what HeroQuest is— each player controls one of four archetypal heroes, working together as a team to defeat the monsters, complete the goals of a quest, and get out with plenty of gold. There’s no heavy roleplay involved, nor any character or world development.


The heroes are ready. The quest awaits...

Now, as I said, this game is actually quite “old,” being essentially a reproduction (and minor revision) of the original Milton Bradley game of 1989. So this review probably won’t cover any ground-breaking revelations. There aren’t any “cool” new mechanics or ideas involved. It’s old school, 1980’s era game design— but that old school style is still a lot of fun, and worth the reviving.

How It Works

Play is simple. The game can be played by 2 to 5 people (or, with the new app, solo— which I’ll touch on in a later blog). One person must be “the evil wizard Zargon,” which is really just the person who controls all the monsters and reveals the areas and surprises of the dungeon as the game goes along. The other players take on the roles of the four heroes, who must enter the various dungeons in the game and face Zargon’s vile minions. Ostensibly, Zargon “wins” by defeating the heroes— either killing them, or forcing them to flee without completing the goal of a given quest. The heroes “win” by achieving that same goal and acquiring treasure in the process. However, Zargon losing isn’t really much of a loss— the pleasure of being Zargon comes from seeing the others struggle against the challenges of the quest, even if the heroes win. So while the game is set up as oppositional, that’s not the heavy emphasis, and it doesn’t have to be played that way.


Heroes take turns, in order, performing a limited selection of possibilities: Move and take one of six possible “Actions:” Attack, Cast a Spell, Search for Treasure, Search for Secret Doors, Search for Traps, or Disarm a Trap. The action can be taken before or after moving, but moving cannot be split around an action. Two dice are typically rolled to see how far a hero can move, but the hero doesn’t have to move the full amount (and at times won’t be able to do so).

An attack is done by rolling a number of dice equal to the attacker’s Attack Strength; the target may then roll a number of dice equal to the target’s Defense Strength. The dice are unique to the game, featuring images of skulls (three of these), two white shields and one black shield. Hits are made when skulls are rolled; shield results block hits (white shields for heroes defending, the black shield for monsters defending).

Spells are on cards. Cast a spell, and it’s gone— it cannot be recovered for the current quest. Spells typically do things like heal heroes, cause special attacks against monsters, boost a hero’s attack or defense, or grant a hero a one-use special power (as moving through walls).


Once all heroes have each had a turn, the monsters take a turn, moving and attacking as the Zargon player wishes, in the same manner as the heroes. Some monsters can also cast spells.


Those are pretty much the rules, aside from some details about how traps and secret doors are handled. Treasure is found in two ways— certain rooms have unique treasures or other discoveries defined by the Quest Book. Otherwise, treasure is randomly drawn from a deck of cards— but this deck also contains surprises like “hazards” (unavoidable traps) and “wandering monsters” which immediately attack the searcher. Otherwise the whole game simply involves exploring the dungeon and dealing with what you find, then getting out.


How It Plays

I started my experience with the game playing solo against Hasbro’s new (free) HeroQuest Companion App (I have the iOS version for my Apple iPad). This app handles the role of Zargon, so that a game can be played solo (with the player controlling all four heroes), or so a group of four can play the game with everyone being a hero, and the app being Zargon. (More about the app itself in a later blog.)


At first, I’ll admit that I found the board game play very simplistic, and the initial quests very easy. But after getting several quests under my belt, I suddenly ran into one that nearly wiped my party of heroes out— we were dashing to escape with our lives hanging on by one or two “Body Points” (the game’s term for hit points or wounds, which depending on hero range from 4 to 8). Suddenly I found myself respecting this old, “simple” game.


Later, when I took over as Zargon for my friends, I was surprised to discover that first quest, which I had thought too easy, was almost a death sentence for my buddies— indeed, they did lose one hero (the Wizard) to a combination of hazards and a well-rolled monster attack. When it all ended and the Big Bad Monster bit the dust, the remainder of the team were out of spells and almost out of lives— and glad to abandon the dungeon, despite knowing they were leaving potential treasure behind.


Now, part of the reason for that is as Zargon, I play with a little better tactical and strategic sense than the app does— going for high value hero targets (like the Wizard), retreating for better tactical conditions, etc.. But my players also ran into some horrendous luck— monsters improbably blocking multiple hits, treasure searches producing more hazards and monsters than treasure, and so on. Still, even with that accounted for, the game wound up being more exciting (and tense) than I had thought— proof that once again, the old school can be a very good school!


...and the trouble begins!
Defend yourselves, brave heroes-- if you can. MUA-HA-HA-HA-HA!

What’s to Like

HeroQuest is fun— there’s no question. If you want that old school fantasy game experience and you’re not wanting a heavy evening of roleplay, negotiations, and rules minutiae, HeroQuest will certainly satisfy that itch. And unlike many dungeon crawl games— TSR/WotC’s Dungeon!, Ganesha Games’ Four Against Darkness, SJG’s Munchkin, and the various dice or card-based dungeon games, HeroQuest allows for and requires tactical thinking in combat— it matters where and how your hero moves and stands, and the equipment can allow for good tactical advantages beyond just increasing the die roll. Also, the game is simpler and purer in its approach than current popular takes like GW’s new Warhammer Quest, Flying Frog's Shadows of Brimstone, FFG’s Descent, Cephalofair Games' Gloomhaven, and the like (some of which I have played, some not). It’s dead easy to pick up, and doesn’t require reading lengthy rules or attention to heavy details. (Plus, the ability to move either before or after an action is not a trivial difference to most of these games— hit and run away is a viable tactic in HeroQuest, if not essential!)

The app (again, in an upcoming blog post) allows for the potential Zargon player to experience the quest for himself, playing as the heroes before he reads the entry in the Quest Book.


There’s a lot of tactile appeal to the game— the miniatures and the three-dimensional dungeon furnishings are terrific to look at, have a nice heft, and can be painted (though this isn’t necessary to play). The dice are unique and fun to roll— who doesn’t like seeing results consisting of skulls, shields, and scary monster faces? The card artwork is solid as well— there’s nothing to take you out of the experience of the game. There’s a special screen for Zargon to hide the details of the Quest from the players, though to be honest, it’s not all that necessary. I think it was included in the original 1989 game as a way to “look” like 1980s D&D with its famous “Dungeon Master’s Screen” element. But it’s fun, and the artwork is nicely evocative, with its depiction of a brooding wizard “controlling” his dark minions.


Playing time is quick— about an hour and a half or even less to complete most “quests,” making this a great game for quenching that fantasy thirst in a single evening. This also helps keep the player elimination aspect from being a drag on the evening— usually a hero death won’t happen until the final boss fight, so everyone stays engaged during play.


There are a total of 14 adventures in the included Quest Book, as well as instructions for creating original quests— but 14 gaming nights is a pretty good run for any adventure game. Also, Hasbro has already produced two expansion quests sets (“sold separately”), and has materials to do at least three more. (I purchased my game through Hasbro’s “HasbroPulse” crowd-funding sight— an in-house version of Kickstarter. I went whole hog, and wound up getting all the expansions then produced, with extra miniatures.)


The heroes are presented as three males (Barbarian, Dwarf and Wizard) and one female (the Elf), but the crowd-funding effort also produced counterparts to these, as well as four additional hero choices. I imagine these may wind up being sold in an expansion set, if your players want a personal connection to their heroes. It really doesn’t matter in play— nothing about the game expects male or female or distinguishes between the two, aside from some art. Otherwise, the female Barbarian has the exact same abilities and levels as the male Barbarian, and so on. And if you do collect or play other games with miniatures, you can easily substitute these for the figures included in the boxed set. (For those interested, just eyeballing ‘em, the scale appears to be “heroic” 28mm— certainly no more than 32mm.)


The rulebook is clear and easy to read. Some elements might be slightly out of place (the rules for purchasing equipment are presented in the section about Searching for Treasure, though the purchases can only happen after a quest has ended, which is discussed at the end of the rule book). But for the most part, everything is easy to follow and find. There are a few discrepancies between the text on some of the cards and the rules. For example, some spells are line of sight, and the cards so state, but others aren’t clear on that point (as the various healing spells). Also, the various “dangerous” Treasure cards say to return the card to the bottom of the deck, while the rules say to reshuffle the Treasure deck every time a hazard or wandering monster card is drawn. Which applies? My group decided the rulebook superseded the card. (I would propose putting the card on the bottom of the deck and reshuffling only after an actual treasure is drawn as an interesting house rule, but I haven’t yet tried that.) And the Dagger equipment card says it can be thrown as a missile weapon (at which point it is lost), but the Wizard has a Dagger as standard equipment, with no indication this can either be thrown or lost. We decided that dagger wasn’t balanced for throwing (or he was very sentimental about it).


The Quest Book is also well done and clear. The few “read aloud” passages are evocative, but I also recommend that the Zargon player add some flavor of his own from time to time when placing the items and monsters in a room. But that’s just my approach, and certainly isn’t required.


For Parents: Nothing to Fear

The box says the game is for ages 14+. I’m not certain why this age is set so high. The game should be easily grasped by ages 10 and up, or even with adult guidance, kids 8 and up. There’s some reading to be done, but it’s quite clear, and there isn’t any objectionable material in the game that I can see. The art and figures are tasteful, there’s no presentation of gore, and what violence there is is abstracted into dice rolls. I suppose a few of the monsters are “scary,” but on a level about as frightening as creatures in a Power Rangers episode. I suppose parents stuck in 1980s Moral Panic mode might see the Gargoyle as demonic looking, but he’s presented as a magical creature of living stone (and was back then, too), to the extent that he’s presented as anything other than a Big Boss Monster. The other foes are classic Games Workshop style goblins (little, mean and green), orcs (big mean and green), “abominations” (who look like giant fish-headed trolls), “Dread Warriors” (big men in heavy armor), and mummies, zombies and skeletons straight out of stop-motion movies like Jason and the Argonauts. There’s also “Dread Sorcerer” who is a skeletal wizard, but no where near as alarming as something in Harry Potter. So if you’ve got a kid who likes books like The Hobbit, Harry Potter, or just Saturday-morning adventure cartoons, he (or she) will eagerly embrace HeroQuest. Younger kids might struggle with what to do without adult guidance, and yes, a hero can die, eliminating a player from the game— but the eliminated player could easily become Zargon’s “assistant,” controlling one or more monsters in combat and helping to place out the various dungeon furnishings.

Lit'l Zar-zilla is ready to play!

What’s Not to Like

Very little. The one thing potentially lacking is some strategic decision-making for the Zargon player. The quests are largely static (with a few exceptions)— the monsters wait in place until the heroes discover them, and the only “wandering monster” aspect is triggered by hero treasure searches— if the heroes don’t search, no new monsters can appear. So once the monsters in an area have been defeated, there’s nothing for Zargon to do on his turn until the heroes enter a new area. Fortunately the dungeons are relatively compact, so the downtime for Zargon is minimal.


The game also requires the surviving heroes to return to the stairway where they entered the dungeon to complete the quest— but by the time the heroes have pulled off the main goal, there’s rarely any opposition to stop this movement, and the dice rolling for it becomes a bit pointless. As Zargon, I simply waved away this rolling and movement when the players indicated they weren’t going to explore further, but just wanted to escape. Since they therefore wouldn’t trigger any encounters, the game was effectively over. It seems to me an element of “monster spawning” might be good to allow for the retreat to be more than just retracing one’s steps unopposed. But that’s a quibble, and it may be that further quests in the Quest Book address this (I’m only about halfway through).


Another (minor) quibble is with the Equipment. Between quests, the heroes can purchase weapons, armor and other items to improve their abilities, all presented on cards. (There’s no supply limit on these, but one could house rule limitations based on the number of cards, if one likes). There are some nice elements here, but they feel a bit limited in scope and influence on the game. And, aside from magical items in the quests (most of which so far have been one-time use potions), there’s no other way to improve a hero— there are no experience points or “leveling up” in the core game. On the other hand, simplicity has its virtue, so this objection is, as I said, very minor and probably personal to my own tastes.


And a Good Time Was Had By All…


That’s really the standard of a great game, isn’t it? That it’s fun to play, and everyone enjoys the experience— win or lose. Under that standard, HeroQuest isn’t just great, it’s terrific. It captures the theme perfectly, both in components and game play. It’s fast, easy to grasp, yet also nicely tactical— it challenges you to think a little before and during your turn. The randomness is present, but it’s not overwhelming— the player does have a sense of control over his actions, but not over the results, and to me that combination makes for an ideal and enjoyable game.

Despite being nominally oppositional between the hero players and the Zargon player, in many ways the game is cooperative not only among the hero players but also with Zargon. Even as the Zargon player acts to fight and defeat the heroes, he’s really engaging in a collaborative effort to produce a fun fantasy experience. There’s no sense of true opposition, or any impulse for cutthroat competition among the players (not that there’s anything wrong with that ;-) ). It’s just a grand time at the table, imagining being heroes facing fearsome foes— even if one of the players controls those foes. For that dungeon crawl itch, HeroQuest is a very satisfying backscratcher.


Sew five stars on the wizard’s hat for this one.


-- Howard Shirley, aka Parzival


Oh no! A wandering goblin leapt out from behind the comfy chair! My Wizard is in peril!
Lit'l Zar-zilla: "ROAR-HA-HA-HA-HA!


Monday, April 13, 2020

Saxon Violence! And Viking Violence, Too! (878 • Vikings: Invasion of England-- a review)

In the height of the Dark Ages, the bulk of the island of Britain had pretty much become the domain of the Anglo-Saxons, and was divided into multiple smaller kingdoms with names like Wessex, Mercia, Cumbria, and more. And while the region itself was known as “England,” there was no one English nation, and no one English king. Despite this political disunity, the Saxons were enjoying a time of relative prosperity and peace— and then the Vikings came. Racing across the North Sea in their dragon-headed longships, Scandinavian raiders launched a series of bloody invasions, bent largely on plunder. For over two hundred years, they preyed upon the coast (at first) and then surged into the mainland (not unlike the Saxons themselves had done to the hapless Britons some three centuries before). Eventually these Scandinavian intruders set up their own kingdoms, or forced nominal Saxon kings to be puppet rulers for their new Danish masters. Despite being essentially out-numbered by the locals, the Vikings were able to run wild because the Saxon kingdoms largely fought them piece-meal, and frequently failed to team-up to stand against the hordes. Finally, a lone Saxon king, Alfred of Wessex, rose up against the “Danes” (as the Saxons called them), and defeated their greatest army in a grand battle. Using this victory, Alfred was able to force the Treaty of Wedmore upon the interlopers— and thereby created the Kingdom of England.

878•Vikings: Invasion of England from Academy Games seeks to recreate the strategic situation of the times, when sizable Viking armies landed on the coast of England and raided, plundered, and eventually settled the countryside, while being resisted by the scattered Saxon leaders. “878” is not a reference to the number of Vikings invading England, but the year in which the Anglo Saxon Chronicles record the raids beginning— 878 A.D.. Personally, I think the title may be the most uninspiring case of board game naming I’ve encountered. But despite this, the game itself is quite the opposite— challenging, engaging, and most of all a lot of fun.

Don't mind Sven. He's just a friendly sailor looking for loot.


IT’S TRUE- ENGLAND IS A LAND OF TREASURE— OR AT LEAST NIFTY STUFF

Speaking of loot! This hoard includes a horde!
There’s a lot in the box:
A nicely sized (but not too large) game board featuring a map of 9th Century England.
Six full color card decks
21 Blue plastic miniatures of armored Saxon warriors (representing the “Huscarl” or “Housecarl” faction)
41 Green plastic miniatures miniatures of armored Saxon warriors with spears (representing “Thegn” faction)
10 Yellow plastic miniatures of Saxon peasants with spears (representing the “Fyrd,” or local levies, which are not a faction)
43 Black plastic miniatures of armored Viking warriors (representing the “Norsemen” faction)
21 Red plastic miniatures of unarmored Viking warriors with axes (representing the “Berserker” faction)
A single wood pawn as a “round” marker (basically the game clock).
15 thick cardboard “Viking Victory” tokens
6 thick cardboard Leader markers (mostly Vikings, but there is one of King Alfred the Great as well)
6 clear plastic stands to hold the Leader markers as standup pieces.
5 sets of different colored dice: Black (3), Red (2), Blue (2), Green (3), and Yellow (2)
4 colored cubes (basically dice without any markings): Black, Red, Blue and Green
A black cloth drawstring bag

As my set was from a Kickstarter set (purchased second-hand, yet still unplayed and unpunched), I also had four thick cardboard card holders, six “Saxon Navy” tokens, and several “Leader Movement” tokens (which we didn’t figure out what to do with), not to mention an expansion set with more rules and cards, Leader miniatures, and miniature Saxon churches, Viking forts and Viking settlements. Since these are not elements of the standard board game, I will hold off on reviewing these until we’ve had a chance to try them out.

VIKINGS, SIRE! THOUSANDS OF ‘EM!

Put on the Led Zeppelin track... "A-A-A-AAAA!"
The game can be played by either two players, or by four players divided into opposing alliances. My gaming buddy Will and I gathered for an initial run through with the two-player version, but we agreed at the end that the game felt more like a four-player game, even with the fact that there are only two “sides” in the game.

The two sides to the game are the Saxons, who inhabit England, and the Vikings, who want to raid, plunder, and maybe inhabit England too. These sides are further divided into two “factions”each — for the Saxons, the Huscarls (the elite forces of the various kings, also called “Housecarls” in the game) and the Thegns (the forces of more localized rulers). For the Vikings, the factions are the Norsemen (“ordinary” viking warriors) and Berserkers (blood-thirsty fanatics with a death wish).
All factions essentially play the same and can even temporarily control forces of the other allied faction, but each have their own deck of command cards, and each have different combat probabilities based on their unique dice.

The object of the game is fairly straightforward: The Vikings seek to capture as many Saxon city territories as possible, tracking these conquests using the Viking Victory Track at the bottom of the map. The Saxons seek to stop the Vikings, at the very least by limiting the number of cities the Vikings capture, or if possible, eliminating all the Vikings from England. The game also includes four special “Treaty of Wedmore” cards, one for each faction; if at least two of these cards have been played, the treaty takes effect, the game ends and the victory conditions are checked.

The game starts with the two Saxon factions’ forces spread about the board in groups of 1, 2, 3, 4 or 5 figures of mixed color (Green and/or Blue). The Viking player will move first (though the movement order will change), and begins with a large force of Norsemen and Berserkers on a Leader card, which immediately “lands” on a coastal territory of his choice (early in the game, this can only be on the North Sea— later it can be any sea). Looking at this force, it will seem enormous— well over two dozen or more figures landing and moving from a single territory. (Recall those Saxon groupings of at most five figures? They’re doomed.) Viking invasion, indeed! Yikes!

ROUND AND ROUND WE GO

Round marker, King Alfred waiting to arrive, turn order cubes, and "fled" units waiting as reserves. Plus a Beserker faction movement card over to the side.
The game is played in 7 “rounds” (though it can end sooner) consisting of 4 “turns” each. All factions have one turn per round, but the order of these turns is random, determined by a blind draw from the velvet bag containing the four colored cubes. Whichever color is drawn indicates the faction who has the current turn. That faction completes its actions, and a new cube is drawn. Once all four cubes have been drawn and the factions have acted, the game advances to the next round and the cubes are returned to the bag.
The rounds are tracked, because on the 5th round, Alfred the Great enters the fight as a Saxon leader, and the possibility of an end to the game goes up. (It’s also possible for the game to end earlier, but not likely.)

When the first Viking faction is drawn in a round, that faction draws a Viking Leader card, which triggers an invasion. (This is in addition to any invasion already going on from the previous round.) On that card are placed an entirely new army of Vikings of mixed factions. For the Saxon player, this is a case of “They. Just. Keep. Coming!”

MOVE ‘EM OUT! OR WHATEVER THEY YELLED IN OLD ENGLISH!

The thrust of a turn is simple: The faction player choose one Movement command card from a hand of three potential commands and plays it. (If he doesn’t have a Movement card in his hand, he must discard the hand and draw three new cards, continuing to discard and draw in this manner until he has at least one Movement card in his hand— which might also be a Treaty card). When the card has been played, the player then carries out the movement the card allows. For example, a Movement card may state that the faction my move 2 armies 4 spaces each. An “army” is any collection of any number of allied pieces which are all in the same territory, or on a Leader’s card— but the army must include at least one figure of the active faction’s color in order to be moved. For example, if it is the Thegn (Green) player’s turn, this card would allow him to move any two armies containing at least one green piece, each army moving up to four adjacent territories. If an army enters a territory occupied by an enemy, the moving army must stop, and combat will occur. 

Leaders with armies have the ability to continue moving their specific army if they eliminate the enemy forces in one roll of the dice.

Other cards may be played as well that offer other effects to either aid the card’s faction or hamper the enemy. These cards can sometimes be played out of turn. It should also be noted that the Treaty cards are also Movement cards, which means that if a faction’s only Movement card on a turn is a Treaty card, it must be played, even if the player would rather not do so.

KILL, RETREAT, OR FLEE

Once a player has moved all his forces, if any share a territory with an enemy, these must engage in battle. Each force has dice that match the force’s color, and only the dice which match a force’s color will be rolled. The number of dice also may not exceed the number of matching figures in the battle. The dice are rolled simultaneously for all forces in the battle. Results are straightforward: Each roll result of swords (or axes for Viking dice) is a hit against the enemy, removing a figure for each hit. Results of a running man means that a matching colored figure is forced to flee (being placed in a “Fled” space on the map). Each horn rolled indicates that a matching colored figure may instead withdraw to an adjacent territory containing only friendly forces. A blank result means no effect occurs. All dice results of a roll are applied immediately for both sides. If neither side is eliminated (whether due to hits, withdrawals or flight), the dice are rolled again, repeating until only one side has forces remaining in the territory. Player should pay attention to the number of symbols on each die, as different factions and forces are better at combat than others (for example, Berserkers never flee!).

Once all movement and any combat is completed, the active faction draws cards to restore its hand to three, and that faction’s turn ends.

WE NEED A FEW GOOD PLASTIC MEN

Reinforcements are indeed a part of the game. The Saxon factions can potentially gain new forces on their respective turns, provided forces are available in their reserves. These are placed according to symbols on the map, and are restricted to one or two figures being added to any given city. However, the Saxon player may also regain any Fled figures, placing these in other available locations as chosen by the player. The Viking factions only gain forces through the function of drawing a Leader card, or restoring Fled units to coastal regions controlled by other Viking figures.

EVEN THE YELLOW-BELLIED ONES

The Saxon player also has the (dubious) advantage of raising the Fyrd, which represent the peasant farmers of the day taking up arms when their lands are threatened. If a Viking force attacks a Saxon army on a city territory, the Saxon player draws a card from a special Fyrd deck, and places the indicated number of yellow Fyrd figures in the territory. The Fyrd cannot be ordered to move, and exist only to aid in battle, for which they are ill equipped (they are more likely to flee than fight, or even do nothing at all). They’re not great troops, but they can take hits— preserving the better Huscarls and Thegns— and occasionally even manage to strike an enemy.

Thegn faction cards, attack dice and men. If you're the Saxon player, you'll want more of these. But there aren't any...

SIMPLE PLAY, COMPLEX STRATEGY

And that’s about it for the rules. There are a few special conditions here and there, and the unique faction cards can throw in twists, but there’s little more to it. Though the game at first glance looks complex, it’s actually quite easy to grasp— if you can play Risk, you can definitely play this. However, the strategy is far richer and deeper than one might expect. The alternating flow of faction turns, with uncertainty as to who moves when, calls for careful planning. It may seem to be better to be first in a round, but if you’re not careful, all your gains can be wiped out by the last faction to take its turn!

YOU LOOK GOOD IN HORNS, WILL

The Great Heathen Host (says so, right on the card). The Viking side starts with this... and keeps adding more.
It didn’t take too long for Will and I to leap into the game. He opted for the Viking invaders, and on his first turn I was wondering about the viability of my Saxon forces— there were a boatload of Vikings on his Leader card, and I couldn’t see how my puny, scattered troops could stand up to the onslaught of The Great Heathen Host (as the Saxon chroniclers dubbed the Viking invaders).
But that’s where the movement restrictions come in; the Viking faction has a lot of men, but they’re not going far at first. As he divides them up to attack the city territories which he must have to win, the Host begins to dwindle— and if he’s gone inland, he’s not getting reinforcements quickly. Meanwhile, the Saxons are often in a good distance to converge on the Vikings, while gaining inland reinforcements on each faction’s turn.

Pretty soon we were knocking each other back and forth across the map, and I was feeling good about my position. Will was gaining cities, but I kept hitting him back below his necessary victory number (9), while I managed to get out an early Treaty card.

Alas, my second needed Treaty card just refused to turn up. And Will started claiming my important reinforcement locations, reducing the forces I could bring to bear. But even up to the 7th round, I thought I had him beat. I had lost Alfred the Great, but I had pummeled Will down to 6 Victory cities claimed, out of a necessary 9. And that’s when I discovered I had failed to consider the chance that one of Will’s Viking factions would move last. Yet another horde descended upon my hapless defenders, and whack, whack, whack, he reconquered the cities he needed and claimed the crown. Alas, despite all advantages and positive omens (I mean, “Howard” is a good Anglo-Saxon name— “Heoward,” for “Royal Guardian”— I should win this fight, right?), my defense proved less than great.

HOY, SVEN— WANNA INVADE ENGLAND AGAIN?

The answer to that question is a hearty “Yes!” 878•Vikings: Invasions of England proved to be one of the best light wargames I have added to my collection. The look is gorgeous and thematically perfect (I especially love the Old English names on the map), and the components are of solid quality, and spot on in appearance. But even better, the rules are simple without being simplistic— players aren’t bogged down in complexity, though the game still feels like the historical situation it intends to represent, and the strategic challenges are rich and varied. “Elegant” truly is the operative word here. Plus, the game is just plain fun. Our conflict was a thing of constant triumphs and reversals, with just enough luck introduced by the dice and cards, yet never the feeling that we were at the whims of fortune. And the faction structure is well done— though we only tried the two-player approach, it was clear that an allied game would have enough independent action and decision making that no one would wind up feeling like a second fiddle. I expect that we will be returning to this game again and again— rather like the Vikings eyeing England across the North Sea.

— Parzival, the Wargamesmonger.