Sails Ho! Playing Armada for the First Time
With my fleets out of dry dock, it was time to see how well the rules work. Although Mantic does offer some solo play scenarios on their website, I decided to play both sides straight myself, doing the best I could for each. I chose the introductory scenario from the rule book, “Maritime Patrol.” Although intended for the standard starter set of four ships each, I put all twelve of my ships on the board because what admiral wouldn’t? This scenario runs for 8 turns, after which damages, sunken vessels, and surrendered vessels are totaled to determine the victor.
 |
| All the tools… (Well, the tokens are just one example of each.) |
Precision Instrumentation for the Successful Navigator
Obviously, there’s more to Armada than just ships (and bases). The starter set includes:
• 3ft x 4ft printed paper play “mat.” At the side midpoints and corners are elements of a compass rose. The edge is printed with alternating 6-inch bands, which helps set up.
• Several full-color, die cut cardboard tokens and game implements:
— 8-inch range and movement ruler
— “Ship Turning Template” guide for 30° or 45° ship turns, depending on a vessel’s capability
— “Firing Arc Template” guide for bow and stern guns (if any)
— “Wind Rose” wind direction marker (resembles a compass rose)
— Several tokens and markers: Activation, Speed, Identity, Blaze, Fired (cannon), Damage, Loot, Ship Upgrades. You’re gonna want a lot of baggies or storage elements for these.
— Islands, rocks and shoals and fog/storm pieces (one divided for some reason into quarters, perhaps to use on play area corners?). Printed double-sided for different elements.
— And a fancy Armada logo that I haven’t yet read a purpose for.
• Ten-sided dice: 3 red, 3 blue, 3 black, 1 green
• 2 six-sided dice with the Mantic Kings of War helmet logo instead of the six side (no in-game purpose that I can find— it’s just a fancy bit that counts as a 6.)
• Ship Cards corresponding to each model, showing its abilities and other stats, and used to track damage and other game events. Although one Ship Card is needed for each ship, my set was short one card (for a “Basilean Gur Panther”). Fortunately, this was one of the damaged models Mantic replaced, so with that I received a card with the ship’s information. I noted the stats and played down one card. I’ll probably just scan this in and print a replacement.
• A full cover, very thick Armada rule book.
The cardboard tokens are thick and sturdy, and the art on all of these is excellent.
My set came with additional laser-cut MDF upgrade tokens unique to the Basilean and Orc fleets. I would have liked for these to be printed cardboard, but that’s a minor quibble, as there’s really no need for these to be painted; they sit on the ship card, not the playing space.
The play mat is a little disappointing— the color is muted and blurry, and it’s just thick poster paper, which won’t last long with repeated folding. Alas, it comes heavily creased, so smoothing these out isn’t possible. A neoprene mat is available from Mantic, and several third party game accessory companies sell “sea” print tablecloths. You could also hunt in a fabric shop/craft store for a blue mottle cloth. Or you can play on a bare tabletop; the play mat is just for looks.
 |
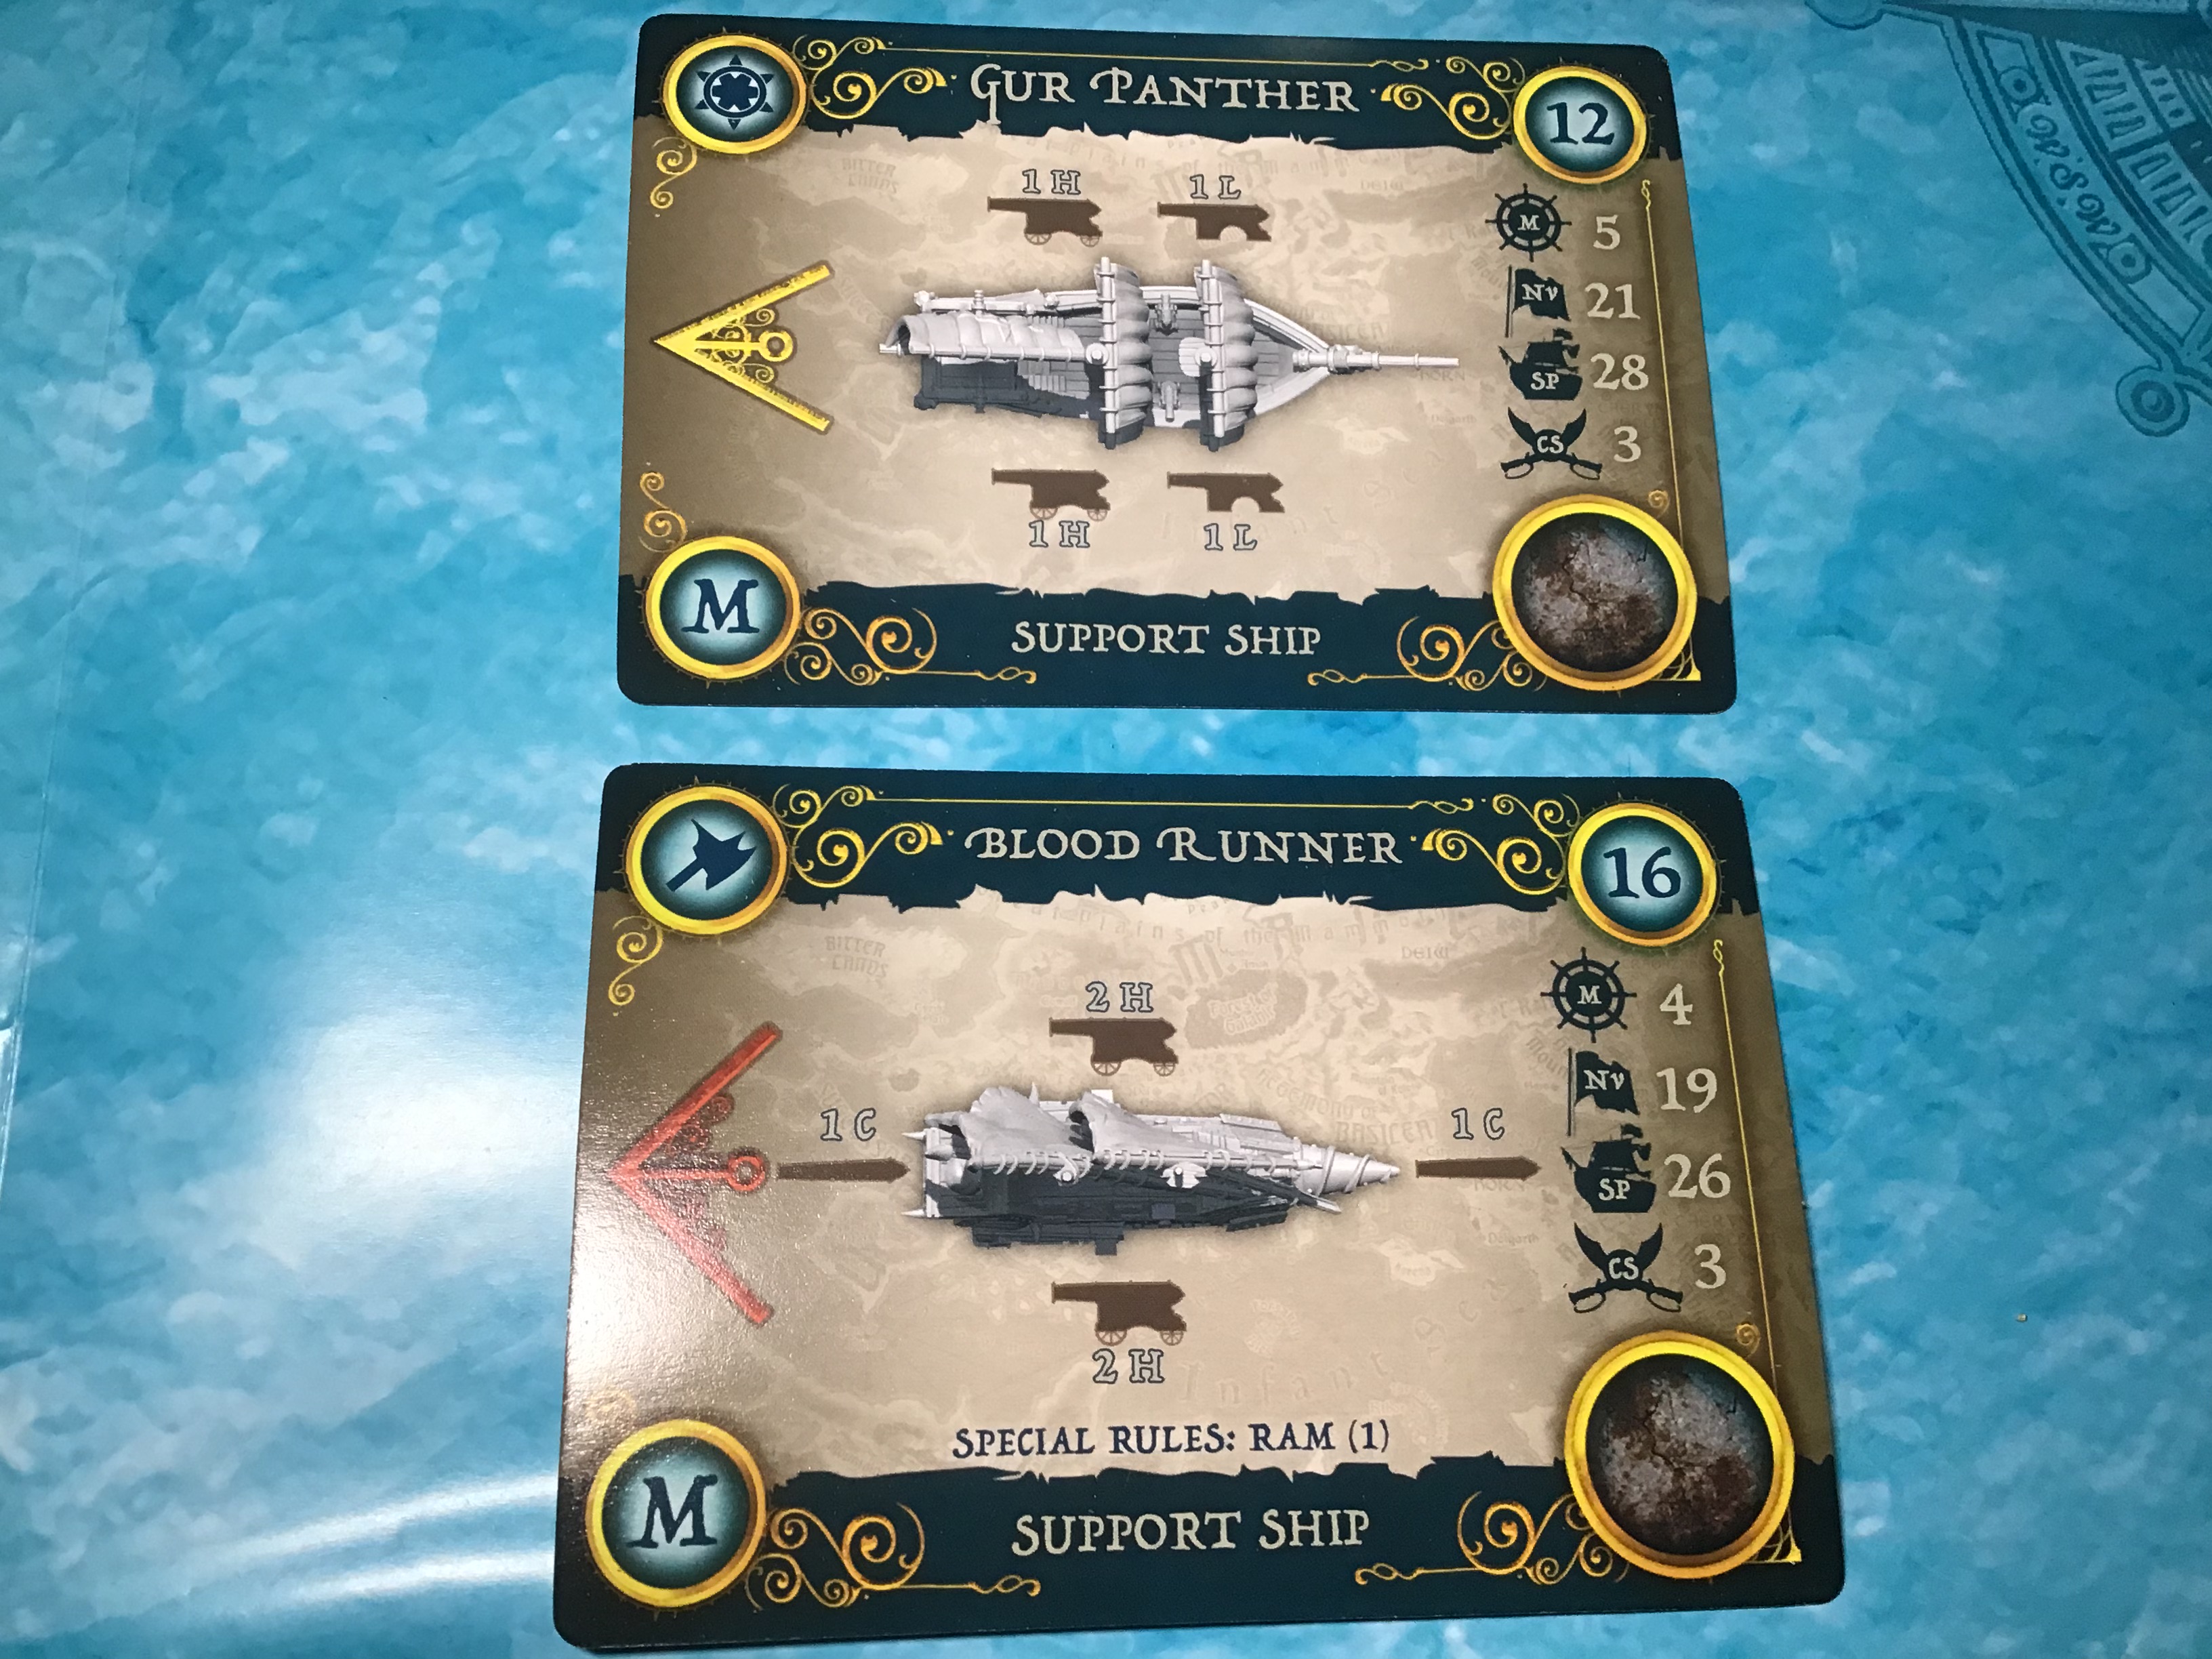
Ship Cards: Basilean Gur Panther, Orc Blood Runner.
Notice the “Turn Angle” symbol on the left. How is that bulky Blood Runner scow more maneuverable than the sleek Basilean vessel? Uh… magic? |
The card art depicts an overhead view of a ship, showing its faction, name, weapons and their orientation, and lists the relevant stats:
Point Cost,
Speed (in inches),
Nerve (the amount of damage the ship can take before its crew loses effectiveness)
Structure Points (the amount of damage the ship can take before sinking)
Crew Strength (for boarding actions).
There’s also a “Turn Angle” symbol that indicates whether the ship uses the yellow 30° maneuver or the (much better) red 45° turn. You will have to find a spot on your table for each of these cards, as you will be placing damage markers and other tokens on them over the course of play. In my case, I simply had to leave them on top of the play mat, and moved them aside whenever the action came too close.
Wow, the Captain’s Log Could Be Ballast
The rule book is, honestly, overproduced. But that’s typical for UK-based gaming companies who want to create a full-blown “world history” for whatever over-the-top generic fantasy factions they sell to eager gamers. Over half the book (49 pages out of 97) is therefore nothing but fluff, backstory and non-essential art. I’m not reviewing any of that. Read it if you like that sort of thing. The actual rules could probably be distilled even further; the remaining 48 pages contain numerous examples and illustrations, with lots of empty page space. So don’t let the book size daunt you; you can pick up the gist of the rules quickly, and look up special details as they arise.
 |
| Bit of a scrum today, Leftenant, eh what? |
Just a Taste of Sea and Blood
Obviously, I couldn’t test all of the rules in a single setting. For one thing, the rules include both a basic movement method which ignores any wind effects, and a wind-based movement section with rules for tacking and speeds dependent on wind location. For simplicity’s sake I opted to ignore these for my first run through, though they aren’t particularly complicated (tacking is simply turning a ship to catch the wind).
Also, different factions have different capabilities for their vessels, most of which are listed as “upgrades” with a point-based cost. You add upgrades (or not), increasing the point cost of the ship, and then you plan battles based on roughly equal point costs for all players. Again, for simplicity’s sake, I set these aside to try out later. Instead, I went with the barebones elements of the ships as listed on their ship cards— which, for the orcs at least, did indeed add some special rules, which will come up below.
Anyway the Wind Blows…
Initiative and activation in this game is based on two factors: The direction of the wind and crew experience. The scenario sets the direction of the wind, and after the first turn dice are rolled to see if the wind changes direction by one compass point (and only ever one each time). The compass rose wind marker is placed on the midpoint or corner from which the wind is blowing; in my case this was from the East, so the wind marker went on the midpoint of the Eastern side of the play mat. (The center compass rose on the map determines this orientation; for the photos, I was standing on the North edge of the map, so the wind is coming from the viewer’s left.)
Ships then move and take actions based on their closeness to the side or corner from which the wind is blowing. For those of you who do know something about age of sail battles, this nicely simulates the tactical advantage of “having the weather gauge,” meaning being between the enemy and the source of the wind. In real life battles, this gave a sailing vessel an advantage in speed and maneuvering, and captains always sought to gain the weather gauge whenever they could. For Armada, this is simply to imagine a straight line parallel to the edge of the map from which the wind is blowing, or perpendicular to a corner if the wind is there. Move the line in your mind from the windward side to its opposite; whichever ship the line crosses first is the first ship to take action, and so on. If two ships are at equal locations with regard to the wind, then the ship with the more experienced crew activates first, or if both location and experience are the same, a six-sided dice is rolled for each vessel to resolve any ties.
As a result of this system, any ship could wind up moving first (or last) on any given turn, and ships can be maneuvered to take advantage of the wind position— to have that important “weather gauge” on the enemy in a subsequent turn. (Note that “weather gauge” is not a term in the rules; but it is this concept which the rule clearly represents.)
 |
The “Gur Panther”, Speed 5, has moved one Movement Step of 5 inches.
Depending on its current speed level, it could move up to two more times (“Full Speed”). |
Steady at the Helm
When a ship activates, it must move (unless it is anchored or grounded) shoot, and possibly take other actions. A ship completes all possible actions it can take, after which the activation passes to the next ship in the wind’s line.
Movement, except for anchored ships, is mandatory. There are four speeds in the game: Full Speed, Battle Speed, Steady Speed, and Anchored. A ship at Full Speed must move at its Speed rating (on its card) three times. At Battle Speed this is reduced to two times, at Steady only one time, and when Anchored not at all. The player may declare that a ship will either increase or decrease its movement by one level when the ship activates and before it moves. If a ship wants to drop from Steady Speed to Anchored, it must still move once before doing so. Otherwise the ship’s movement drops or increases immediately as declared.
 |
The Gur Panther has turned 30° to port, guided by the handy “Turn Angle Template.”
It could have turned less than 30°, but not more. The red side of the template, however, offers a 45° turn angle for more nimble vessels. |
A single move of a ship’s speed is called a Movement Step. So, for example, my Basilean Gun Brig has a speed of 4. This means that at Battle Speed it will take two Movement Steps of 4 inches each. At Full Speed this would be three Movement Steps, and at Steady Speed only one.
After each Movement Step, a ship may change its heading. The Maneuvering Tool is placed behind the ship’s base, and the ship pivots at the rear corners up to the angle allowed for that vessel. Afterwards the ship may continue to move (and maneuver) in the same manner until all Movement Steps are completed. Anchored ships can Maneuver immediately without moving, or before moving if the ship changes to Steady Speed.
(Note that the above are for the basic rules, and ignore the effects of wind.)
It’s a simple movement system that’s easy to use, but can catch the unwary commander off guard, especially in a crowded sea— always know where your ship is headed, and consider where the enemy is headed, too. Otherwise— CRUNCH— you may find yourself colliding, a bad thing for nearly all involved.
Collisions are generally discouraged, with colliding ships required to make an “Evade Test” (roll a d6) to avoid such things. If either side succeeds in this test, no crunching occurs. However, certain factions (notably, the Orcs are one) can opt to deliberately ram opposing vessels. In this case, they don’t roll; only the target can Evade. In this case, the Orcs have specially designed vessels which increase ramming damage against a target.
 |
| Everybody shoot everybody. The Orc Bombboat in the left center uses the Firing Arc Template to see if the distant Basilean ship can be targeted by the Bombboat “Indirect Weapon” (yes, it can). |
Run Out Your Guns
The ships in Armada are universally armed with cannons, classified into four types: Light guns (doing 1 point of damage), Heavy guns (doing 2 damage), Close guns (doing 3) and Indirect Weapons (doing 1d6). They each have ranges, generally less range by damage type, though Indirect Weapons have the longest possible range (22 inches). Shooting is by rolling 1d10 for each weapon listed; results of 6 or better are a hit, natural rolls of 10 (or “0” on the die) are a Critical Hit which triggers a roll on a Critical Hit table for more damage and possibly extra effects (like being set on fire). Range and other tactical elements may modify the die rolls up or down, or sometimes both.
Shooting is restricted by firing “arcs” to the fore, the aft, and the sides, and can only be made at vessels within such an arc. If only a portion of a vessel is within the firing arc, the chance to hit it may be reduced. If all of a target vessel is within an arc, and the target’s bow or stern is facing the shooter, the target may take extra damage from “raking fire.”
Fire As She Bears
Typically, a ship shoots only after moving. However, the “Fire As She Bears” rule allows a vessel to attempt to shoot while moving or when a moving vessel crosses her firing arc, provide the latter vessel has not yet activated for the turn. In this case the shot is reduced in accuracy, and the vessel must note which guns have fired, as each cannon can only fire once per turn. (This is the closest thing the game comes to acknowledging the limited fire rate of muzzle loading cannons, a major consideration in the real world Age of Sail.) I didn’t use the Fire As She Bears rule in my test, though I should have; it’s a neat concept and my fleets would have benefited.
Generally there’s a lot of chance to “exercise your guns” in the game. The ranges are sufficiently long that there’s always someone you can reach out and touch, though one has to be careful with one’s firing position… many times I thought I had a shot lined up, only to discover my movement had caused me to not have any targets within my intended firing arc— which I should have covered by declaring an FASB beforehand, but did not. Live and learn.
The Orcs Expect Every Orc to Smash Everybody Else. Duh.
 |
| First Blood goes to the Basilean Gunbrig, with a Critical Hit on the Orc Hammerfist. |
So how did it play out?
I began by maneuvering both fleets to try to seize the weather gauge and out flank the other. Very quickly I had a veritable scrum tracing along the Eastern edge of the mat. First blood went to a Basilean Gunbrig, with a well placed shot into an Orc Hammerfist. However, the shot (a lucky Crit) didn’t otherwise affect the target enough to cause any concern.
Most of the battle went this way, with ships pouring fire into each other with little significance aside from attrition of hit points. The Basileans did sink the sole Orc Bombboat— an indirect fire ship— for the first kill. I also declared two vessels “lost” when they sailed over the edge of the world— that is, the play mat— though the actual rules provide a method for return which I opted not to implement.
 |
| “Stand by to repel boarders!” An Orc Hammerfist rams a Gunbrig, grapples, and starts a slugfest on deck. |
(Upper left)
Getting In Close and Personal…
When an orc vessel found itself moving into the same Gunbrig, I decided to use the Ramming rules (the orc vessel being so equipped), and branched into the Grapple and Boarding Action rules as well. This resulted in the Hammerfist and the Gunbrig becoming immediately “Anchored” by the orc’s successful grapple attempt, and the crews fighting out. The Gunbrig had a Crew Strength of 2, while the orc had a Crew Strength of 4. Each side got 1d10 per CS value, with hits being the same as with cannon fire. (Honestly, I found this a little uninspiring. I was hoping for something more crew-oriented in terms of damage for a boarding action.)
This went on for two more turns until the Gunbrig escaped (Huzzah!)… only to be sunk one turn later by an orc broadside (not-so huzzah).
Oddly, there doesn’t seem to be a function in the game for actually capturing an enemy ship. A ship is either “surrendered” or “sunk”— and the surrendered status only means it’s out of the fight— it still apparently “belongs” to its original side; or at least, the rules don’t say differently. Apparently, you can still fight boarding actions on a surrendered ship, but there doesn’t seem to be much point in doing so, especially for the boarder. (The one exception is a single scenario where loot— “victory points”— can be claimed from a boarded ship.) Maybe this is supposed to reflect an attempt to recover the surrendered vessel for its original force, but if so, the rules don’t provide for this, or say what would happen if you do so (Can it fight? Sail off? Scuttle itself? The rules don’t say).
 |
| A battered Hammerfist lowers the colors, and managed to find an unsoiled hanky somewhere to wave instead. (Certainly counts as a miracle in itself.) |
White Flags in the Sunset
Getting back to the fight, the Basileans were able to catch another Hammerfist away from its fleet, and multiple ships pounded it with their cannons, breaking its crew’s Nerve Rating (about ten hit points shy of its sinking), causing it to be “Crippled”— that is, less effective in its various efforts— and within another turn it surrendered on a failed Skill Test from this status, leaving it afloat but out of the fight.
A few turns later it was all over. Final score was a whopping victory for the Basilean fleet, especially thanks to the surrendered vessel. I hadn’t bothered to count up the point cost before starting, but I discovered that technically the Orc fleet far outclassed the Basilean fleet in strength, yet I never noticed this in play. Perhaps if I had attempted more rams or boarding actions, it might have made a difference. But the cannon fire seemed about equal throughout, and the Basileans were taking lumps too… just not as many as the Orcs suffered.
 |
| “Time!” The battle ends. Now to review the tab. |
Aside From the Eye, How was the Battle, Horatio?
Armada plays quickly, and even using the basic movement rules there’s a definite “sailing” feel to it all, thanks to the ingenious Wind rule. The rules were generally easy to understand and I was up and playing quickly with only a cursory read. I was a bit disappointed in the rules compared to the ships. The orcs had two ships with some funky ramming weaponry— the Blood Runner, with a prow like a giant wood screw, and the Hammerfist with what looks to be a ridiculous spinning pair of huge metal fists. But in play these amounted only to a +1 and +2 ramming damage advantage, respectively, without any other consideration of what the rams resembled. I call that somewhat unimaginative. However, I acknowledge that additional “specialty” rules for these implements might have been kludgy and slowed things up. In some ways, though, I’d rather they’d have toned down the silly on the ship models than leave me with a milquetoast +2 damage as the design effect. If you’re gonna go for silly fantasy, own it! Make the enemy fear the fists and be wary of the screw. The ramming rules really didn’t set that up.
Similarly, the prow of the top Basilean “Elohi” ship features a massive figurehead bearing a fiery torch— painted with magical blue flames in the Mantic rulebook art, and mentioned in the ship fluff as being divine in origin. What do these mystical flames do in the game? Absolutely nothing.
Boring.
At least give us something like the fabled Byzantine “Greek Fire” flamethrowers (seriously— their early medieval ships carried frickin’ flamethrowers!!!), or some sort of magical affect.
Yes, the ship card mentions a “Halo of Light” ability, tied to some Basilean upgrades, but even so there’s little tie in. As is, the design is disappointing (not to mention fragile for the model— that ‘spear of fire’ will snap in two if you sneeze on it).
Shall We Set Sail Again, Captain?
Despite my criticisms above, I like this game. I’m pleased with the look of the ships, and the game play was engaging and entertaining. The rulebook offers some scenarios which introduce sea monsters and other aspects, so hopefully that will dial up the fantasy levels. I’m looking forward to introducing Armada to friends. There are some other factions I’m eyeing (the Dwarf fleet has armored, steam-powered vessels reminiscent of American Civil War ironclads— hard to pass up on that!) So it’s been a winning purchase for me, and I expect to play it repeatedly. What more can you really ask than that?
Game Rules & Play
Rulebook: Clear and easy to follow. Way too much fluff, but the fluff doesn’t overly intrude into the rules themselves.
Accessories: Top notch, although the paper play mat is lackluster.
Game play: Good sailing feel. Plays quickly, easy to jump right in and know what you’re doing. Needs a little more variety and imagination among the starter forces’ ships’ abilities. The “fantasy” is a little low. 4 pennants out of 5.
Over all product rating: 3 1/2 pennants.


+T4W.JPG)


